Adobe Photoshop has been and continues to be the best software for designers to use to date. While there are many Photoshop alternatives available in the market for free or lower cost, they are usually targeted to beginners and limited by their functionality. The success of Photoshop as a designing tool makes news around it very important. Adobe also recognizes the need for continually pushing new features for its users to enhance their designing capabilities even further. Keeping this in mind, we must talk about the new update that Adobe is rolling out for Photoshop named Photoshop CC 2020.
Below is a list of confirmed changes in this updated Photoshop CC 2020 version to give you a clear idea about what you can expect:
1. Improved accuracy for Auto Selection:
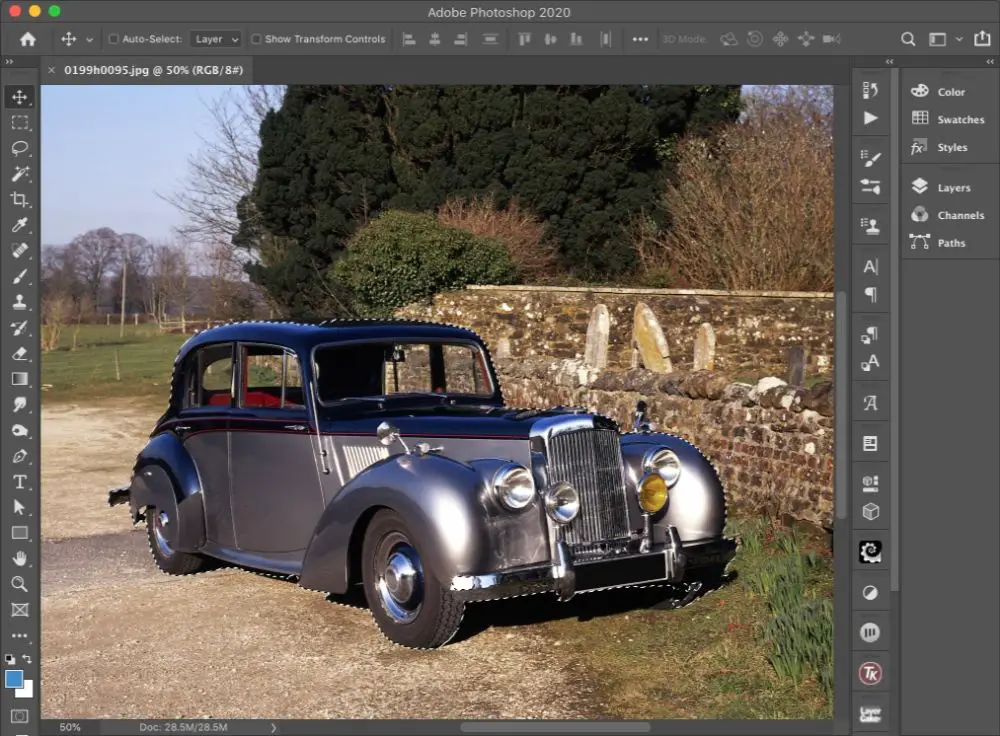
Adobe Photoshop has a select subject command that has been improved significantly. It is due to Adobe Sensei – the name they’ve given to their artificial intelligence system which should allow Adobe Photoshop to analyze an image. This would allow the software to guess what the user wants to select. When put to the test, this feature works decently even with a car that has a complex background. It isn’t entirely perfect, but it’s way closer than it ever has been. This is undoubtedly the right first step towards this approach.
2. Selective Selection changes and improvements:
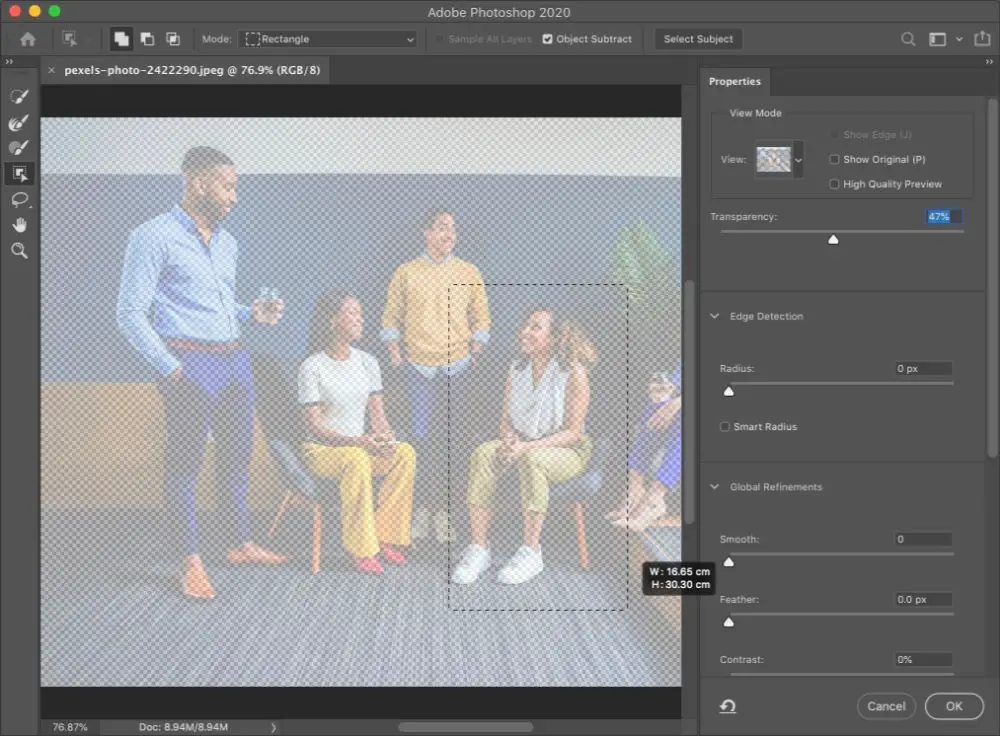
It was earlier known as Refine Edge and is now called Select and Mask dialogue. This feature always has had a quick selection brush. In addition to this, there is a new tool which enables the user to select the object they want to isolate. Once you make a rectangular selection on the object you want to isolate, Photoshop would itself find the subject in that confined area. This would ease the process of separating one person from a group in a group or crowded picture.
This feature would particular be helpful in situations of having multiple backgrounds, unintentional characters or noise.
3. Improvements in Properties Panel:
Properties panel has been the go-to panel for checking the location of the current layer for many version updates. This year with Photoshop CC 2020, they have enhanced this feature by many folds. They have added context-based additions that depend on the current tool type and the selected layer. Properties Panel now also accommodates Quick Actions for useful features like removing a background. It uses the same concept of Adobe Sensei to do so. This feature, however, doesn’t delete the layer; it just hides the background in another layer. This is useful as it allows the user to make any mistakes or errors. This is super helpful as it allows room for unlimited edits till you get it right, as opposed to deleting the background, which would leave no way to retrieve any lost data or pixels if needed.
Properties Panel is way more optimized for Type now. It holds all standard typography tools on character and paragraph level. The bottom part of the properties panel also has buttons for converting type into shape or a frame.
Since Properties Panel has many improvements, and it has been the go-to tool for designers for a long time, it makes perfect sense to optimize it so efficiently. It would help creators to save time and improve efficiency majorly.
4. Wrap Customization improvements:
Image Wrap function has been famous for Free Transform feature over the years. It allows the user to envelop distortions for changing the shape of an object. However, it was limited to using a 3 by 3 grid. Now, in Photoshop CC2020, the feature Image Wrap is just known as Wrap. It comes with four control handles, one at each corner. This allows you to adjust wrap direction and amount from all directions. There is no limitation to how many wrap points you can add to an image anymore. To do so, you can use the Options Bar at the top. Another way is to press the option or alt key and then to click the image. This gives room for greater customization and increases flexibility for composing complex warp effects.
5. Revamped Preset Panels:
The Preset Panels has additional panels that are useful and effective. The new panels for Gradients, Shapes and Patterns make it easier to revive them and to store them. There is also a graphical preview that helps recognize the object much easier. This improves efficiency and saves time. The new shapes panel especially improves the method of choosing a shape by a considerable amount. You can drag it from the panel into the artwork for creating a new vector layer that has that shape. This makes the user experience much easier and allows the user to save time with small adjustments that save the overall time a designer needs to spend on a project. Hence this improves efficiency.
6. Smart Objects with Layer Comps:
Layer Comps panel is a way of providing a method of creating various versions of one artwork. This allows you to move and turn off elements between various compositions. There has always been supporting for Layer Comps within Smart Objects, however previously you had to manually switch to smart object in a new window to make the change. With Photoshop CC 2020 they have now embedded Layer Comps in the Properties Panel on the selection of a Smart Object.
This would help ease the process and make it seamless, which would eventually save time and thereby increase efficiency.
7. Improved Presets:
Photoshop has improved Presets after considerable years with Photoshop CC 2020. Each element like gradient, layers, swatches and layer styles has new library content. However, you need not worry if you prefer the previous presets Photoshop had. They are still available under the category Legacy. They have just shifted from preset manager to Photoshop Panels.
This ensures you get the best of both versions, which enhances and expands the available options for designers.
8. New Custom Content-Aware Fill:
Prior to Photoshop CC 2020, the last update tremendously improved the Content-Aware Fill feature. It is a feature that automatically fills an area that the user selects with pixel information similar to its surrounding area. However, it was still not very optimized as it was missing an invert button. Invert button would have helped as it would have allowed the user to start with nothing and paint the areas that were to be used. Adobe realized this, but and did more than that. They added three different modes. The rectangle was the old default mode retained, other than that there is Auto which generally does a better job than a rectangle, and the third one is Custom. Custom allows the user to paint on the image. Only the areas that would be painted would be used on the sample.
The addition of the two new methods would drastically help the users speed up their designing process and also improve efficiency.
9. Choose constraint or not with ease:
With earlier versions of Photoshop, one problem with transforming was that you had to hold down the shift key to maintain constraints while dragging an object. If you wanted free transform, you could simply drag without holding the shift key. In the more recent versions, they reversed the process. So if you wanted to free transform, you’d have to hold down the shift key, or else it would take constraints as the default setting. Since all of this was getting too confusing and irregular, Photoshop went ahead with providing a link button that is available on-screen scaling.
Pressing the link button would toggle between constraints and no constraints. It is a simple yet effective change worth nothing.
10. Cloud Docs:
Whenever you save a project on Photoshop now, you would have to save it on your local drive like always. However, now there is an additional Cloud Photo option. By saving on cloud photo, the user would be able to save their projects on Creative Cloud for accessing its cross devices and platforms anywhere. This is an added choice given to the user to choose where to save their work. There is also the flexibility of changing these settings anytime the users like. Hence, Photoshop isn’t imposing cloud storage on its user, but providing a valuable option. A significant reason to do this is for optimizing the experience of recently launched Photoshop for iPad.
Photoshop released an iPad version of its commendable software for allowing designers to make use of the software with more convenience anywhere anytime. You could craft compositions with touch and also retouch images with the Apple Pencil. It would also allow you to work with multiple layers at a single time.
The PSDs don’t change whether you’re operating on them from your desktop or iPad. The iPad version of Photoshop hosts a familiar workspace aesthetic as the traditional desktop version that makes accommodating to the new platform much easier.
The files are easily saved on Adobe Cloud to access it on multiple platforms anytime anywhere. It also allows the user to combine digital elements for creating something new on multiple layers. There is no limitation or difference in the number of layers you can add on desktop and iPad version both. The software also works great for easy retouching and making selections.
11. Improved Typography:
When we talk about design, Adobe has not missed a single element with this new update. Adobe Photoshop CC 2020 comes with all 17,000 Adobe Fonts that were previously called Typekit. These fonts are now included in the Creative Cloud plan with the Creative Cloud Photography plan. They are easy to identify with the new Creative Cloud icon on the right to the font’s name. These fonts can be used for any projects as they have a license for both personal and commercial use. Moreover, there is no constraint to the number of fonts a user can activate at one time anymore.
OpenType fonts now allow the user to apply Stylistic Sets. This makes applying a font’s alternative character much easier.
12. Panorama Merge with Fill Edges:
The Content-Aware Fill allows the user to automatically fill any uneven edges of a panorama when you merge panoramas in Adobe Camera Raw or Lightroom. The fill would be applied to a raw image so you would be able to make non-destructive edits once you merge the image.
13. Brush Tool Improvisations:
Brush Tool has a slight update from the previous version in Photoshop CC 2020. Now the users can rotate the brushes and toggle to eraser with easy keyboard shortcuts. It is as simple as pressing arrow buttons on the keyboard to rotate the selected brush. It is a drastic improvement from previous methods.
14. Newly introduced Adobe Sensei:
Adobe Sensei is at the core of many improvements and updates regarding Adobe software, including Adobe Photoshop CC 2020. It is a leading way of reshaping how digital marketing, workflows, and powering creativity works. There are various benefits of Adobe Sensei. You can search for your documents quicker. It also saves time for various software applications like selecting subjects in Photoshop, understanding audio types in Premiere Rush, and making edits in Lightroom as well. Many fantastic effects are empowered by Adobe Sensei such as 3D Scene that matches the background image in terms of dimension. Moreover, it allows users to modify and stylize objects and puppets organically.
These were the 14 different features and uses of Adobe Photoshop CC 2020 that will improve the user experience and efficiency of the software by many folds. Make sure you utilize all of these nifty features as soon as you get your hands on the new version and try it out for yourself.
The post Adobe Photoshop CC 2020: Features and Uses appeared first on Web Design Blog | Magazine for Designers.
via https://ift.tt/2t6W20B


No comments:
Post a Comment