There are various color modes in Adobe Photoshop and Adobe Illustrator. The different color modes that Adobe Photoshop offers are RGB mode, CMYK mode, Index mode, Grayscale mode, and Bitmap Mode.
RGB mode consists of millions of colors that we see regularly. CMYK offers four-printed color forms. The Index mode gives out 256 colors. Grayscale mode offers 256 grays, and Bitmap mode has 2 colors. The color mode or image mode defines the combination of the colors, which bases on the number of color channels in a color model.
While working with Adobe Illustrator, you require a sound knowledge of color models and color modes because applying colors to an artwork is a common Illustrator task. You should always keep in mind as to which medium your artwork is going to be published. Once you decide your medium, you can decide which color model and color definition are best to use.
Here in this blog, we are going to look at how we can convert an image that has different color modes to a Grayscale mode in both Adobe Photoshop and Adobe Illustrator. We are going to look at each method step by step.
1. Converting an image to a grayscale mode in Photoshop:
An image in grayscale mode uses varying shades of gray. There are up to 256 shades of gray in 8-bit images. The brightness value of a grayscale image ranges from 0 which indicates black, to 255 which indicates white. The percentages of black ink coverage also define the Grayscale values; 0% equals white, and 100% equals black.
When you convert an image from one mode to another, it implies that the color values permanently change after the conversion. It may even lose some of its color information. And this may not allow you to get your original color mode back if you undo the changes. So there are some things that you should make sure of before converting an image from one color model to another.
- You should do all the possible editing in the original image before converting it to another color mode.
- You should have a backup copy saved somewhere before you convert the color mode from one mode to another.
- You should flatten the image before conversion because when the color mode changes, the interaction of colors between layer blending mode also changes.
Let us see how we can convert a color image to Grayscale in Photoshop step by step. We are going to look at three methods, that Adobe Photoshop offers where we can convert color images to grayscale images. But each method comes with its list of advantages and disadvantages. Read on to explore.
1. Quick and Dirty Method:

First things will come first. You have to open the picture that you want to convert from color to black and white mode.
a. Choose Image
b. Select the “Mode”
c. Select “Grayscale”
When you follow the above steps, Photoshop prompts you whether you want to “Discard” the color information. You have to say yes to discard by clicking Discard. If you have multiple layers in your image, it asks you whether you want to merge the layers. If you want to retain the layers, you have to click “Don’t Merge”.
The image that emerges out after you convert it to Grayscale may look colorless because it rips out colors from the original color image. Hence, you can adjust the contrast levels by Levels Adjustment.
a. Choose Image
b. Select “Adjustments”
c. Select “Levels”
It will up the amount of contrast in your recently converted image. If the results are not up to the mark, you can take up other conversion methods. Once you have already converted the image to Grayscale, there is no going back. You cannot reapply the colors to a converted image.
Color Panel defines the color values of foreground colors and background colors. You can modify the foreground and background colors with different color models, using the slider bars in the Color Panel. Hence, the colors in the foreground and background color icons appear gray when you choose the color in Color Panel. However, if you want to apply color to a grayscale image, you should choose RGB to CYMK color conversion method type.
2. Lab Color Mode Method:
Cameras and computer screens often use the RGB color model. But Lab Color is a highly defined color space. It uses three values to define how the colors appear in the specified image. Lab Color mode has a function similar to a human eye. It specifies the colors using green to red axis, blue to the yellow axis and lightness axis.
The most beautiful thing about the Lab Color space is that it is device independent. That means whatever color it brings out, it is going to look the same color across all the other devices, even if the media is different. Lab Color offers a wide range of color selection you can make the colors of the image look more vivid and vibrant without using the saturation sliders.
Hence, for instance, if your company wants to print your company’s logo on a T-Shirt, or a mug cup, you can use Lab Color mode to print the same color of the logo across all the merchandise.
This method gives out a better quality grayscale conversion image than the previous one. But you should complete all the editing before you start converting your color image to grayscale color mode.
1. Choose Image, Select the “Mode” and then Select “Lab Color”
The conversion gives a lightness channel that forms two channels, channel-a and channel-b that contains the range of the color. Here again, you are going to be prompted to merge the layers before committing the grayscale conversion. You are free to choose whatever option fits your requirements.
2. Choose Window, Select “Channels” :
Now, you have to remove the Channel-a by dragging it to the bin icon at the bottom of the panel.
Here you are required to flatten the layers by clicking OK to flatten them. If you click Cancel, it is going to abort the operation. If you delete the Channel-a, the Photoshop renames the Channel-b to Alpha 2.
3. Delete the Alpha 2 channel:
When you delete the Alpha 2 channel, you have only lightness channel which has the name, Alpha 1.
4. Choose Image, select “Mode” and select “Grayscale”:
Once you follow all the steps as mentioned above correctly, you are going to have a color image entirely converted to grayscale mode.
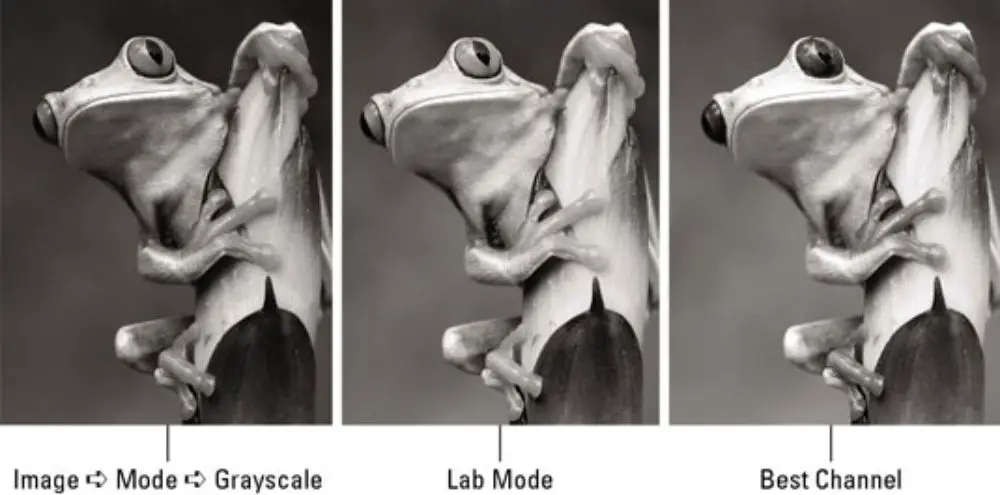
3. Best Channel Method:

Channels in Photoshop are the grayscale images that define different types of color information. When you open an image, Photoshop creates the color channels automatically, and the color mode defines the number of channels created. So if an image is of RGB color model, Photoshop shows you Red color channel, Green color channel, Blue color channel and a composite channel that you can use to edit and modify the image. Alpha channel store the selections as grayscale images.
You can add alpha channels for the creation and storage of masks. These alpha channels allow you to manipulate the image or protect certain parts of it during editing. Photoshop can create as many as 56 color channels for a single image. But, all the channels maintain identical dimensions and number of pixels as it is in the original image. The pixel information can define the file size for a channel. Best Channel Method: Channels in Photoshop are the grayscale images that define different types of color information. When you open an image, Photoshop creates the color channels automatically, and the color mode defines the number of channels created. So if an image is of RGB color model, Photoshop shows you Red color channel, Green color channel, Blue color channel and a composite channel that you can use to edit and modify the image. Alpha channel store the selections as grayscale images.
You can add alpha channels for the creation and storage of masks. These alpha channels allow you to manipulate the image or protect certain parts of it during editing. Photoshop can create as many as 56 color channels for a single image. But, all the channels maintain identical dimensions and number of pixels as it is in the original image. The pixel information can define the file size for a channel. When you look at the different channels in the image, one of the channels always looks like the best version of the grayscale image. You would notice that the Red channel gives out an excellent grayscale image result when the subject is humans because humans have much red color in their skin. If you are looking at a scenic shot, Green channel has a first grayscale version. The Blue channel often ends up with a wrong version of a grayscale image because all the waste material of a digital image is generally there in this channel.
Hence, you should select each channel and view its contents to select the best content, and then Choose Image, select “Mode” and then select “Grayscale”. It is going to prompt you to merge the layers if you have not merged them before going about the conversion. You should select OK to merge the layers to flatten the image before the conversion. As you select OK, Photoshop merges the layers and converts the image to the selected channel into the grayscale mode. You should press OK when Photoshop asks you whether you want to discard all the other channels.
2. Converting an image to the grayscale mode in Illustrator:
In digital graphics, color models control how we see and work with colors. Each color model has a different method that describes and classifies the colors. Numeric values define the visible spectrum of color in each color model. A variant of the color model called color space defines a specific range of colors.
1. Grayscale:
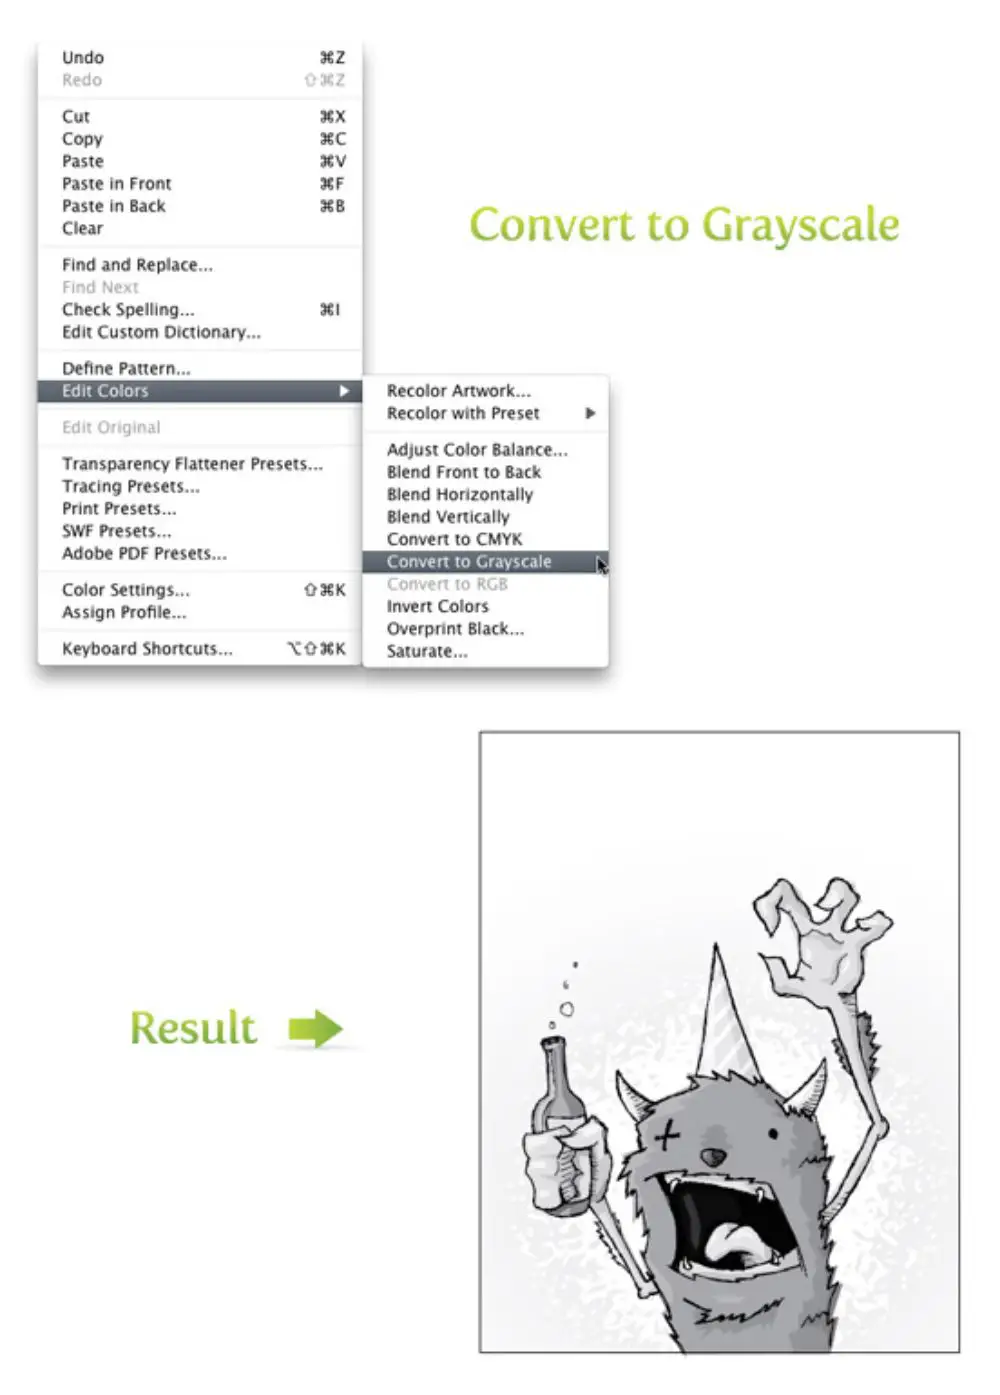
Grayscale images are images with only two colors: black and white. An example of a grayscale image is an image which has black, white and varying shades of gray. Hence, the image has black as the darkest possible shade and white as lightest possible shade. Other shades signify the varying intensity of grays in the image.
Sometimes you need to convert a color image to a grayscale image using Illustrator for a variety of reasons. There are ways to go about the process which gives you more control as to how the image appears in the end. This method is probably the fastest but least versatile methodology. Select your artwork, Go to “Edit”, choose “Edit Colors” and select “Convert to Grayscale”.
2. Color Balance Adjustment:
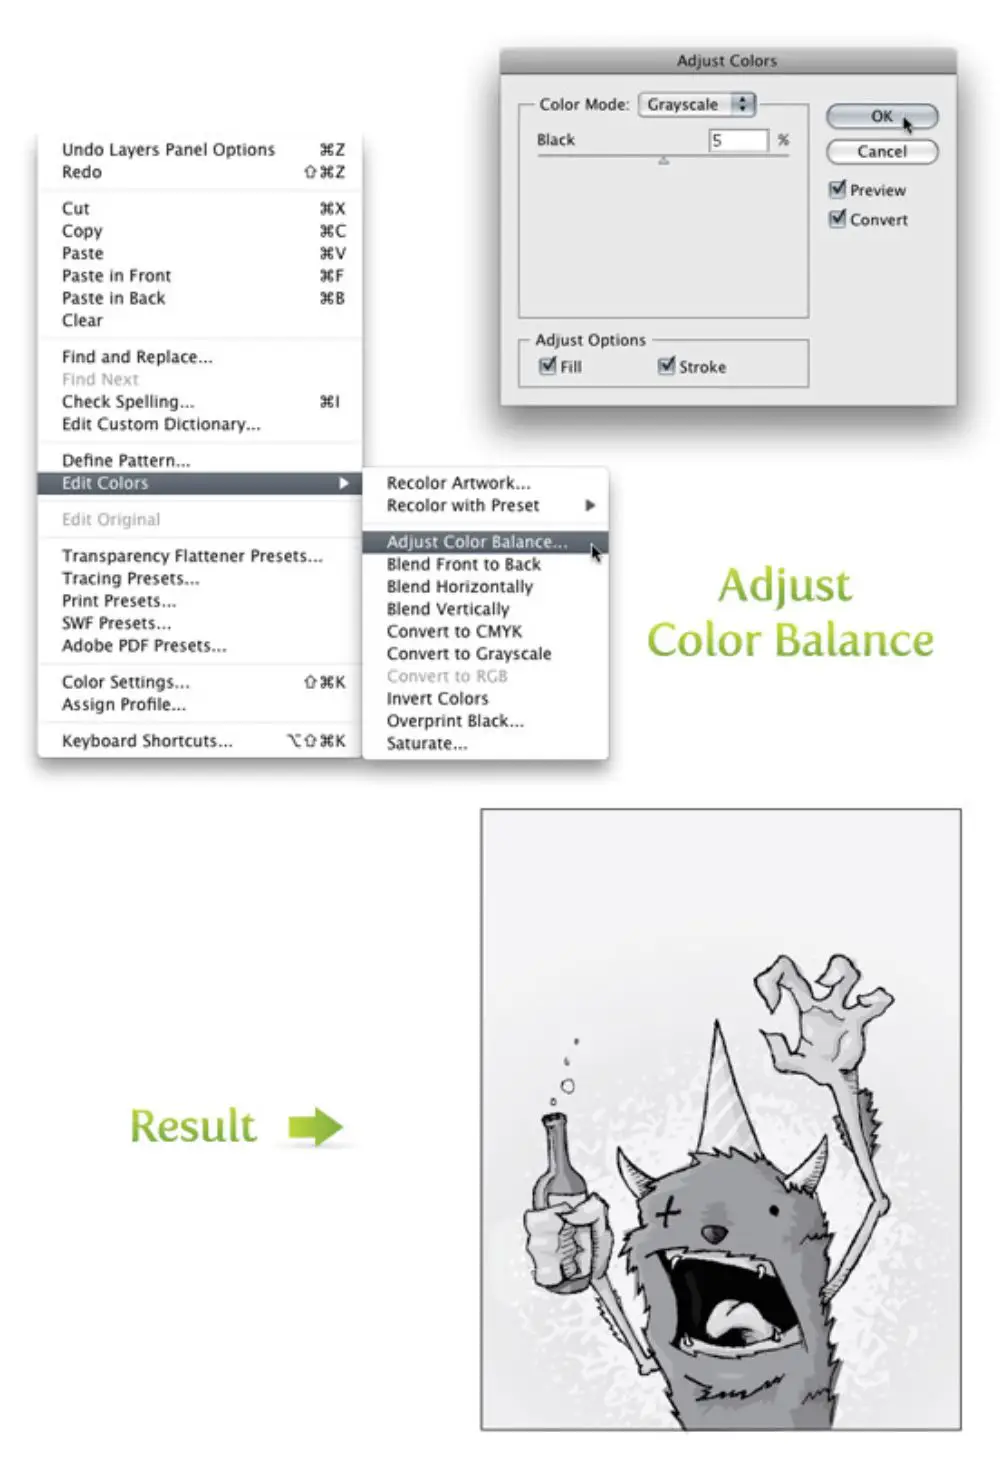
In this method, you can have more control over black and how it behaves when you opt for conversion. Select your artwork, go to “Edit”, select “Edit Colors” and then choose “Adjust Color Balance”.
In the Adjust Color Balance, you have to select Grayscale from the Color Mode drop-down menu and check the Preview and Convert boxes. Here, you can control the percentage of black in the image by sliding the slider from left to right.
3. Desaturation:

This method gives you even more control over the grayscale conversion than the previous method by using Adjust Color Balance. Saturation and Desaturation change the color definition of an image to which it is applied. Saturation makes the colors of the image look vibrant. While Desaturation mutes or tones down the colors of the image to which it applies.
Select your artwork, go to “Edit”, select “Edit Colors” and click “Recolor Artwork” or click the color wheel icon in the Control Panel of Adobe Illustrator. By following one of the steps as mentioned earlier, you can open the Live Color dialog box. There are sliders at the bottom of the dialog box. To the right-hand side of the sliders, you have two buttons. Press the button that appears like a play button. Select Global Adjust from the drop-down menu and move the Saturation slider to the extreme left. You can tweak Brightness, Temperature and Luminosity to achieve different results.
4. Artwork Recoloration:
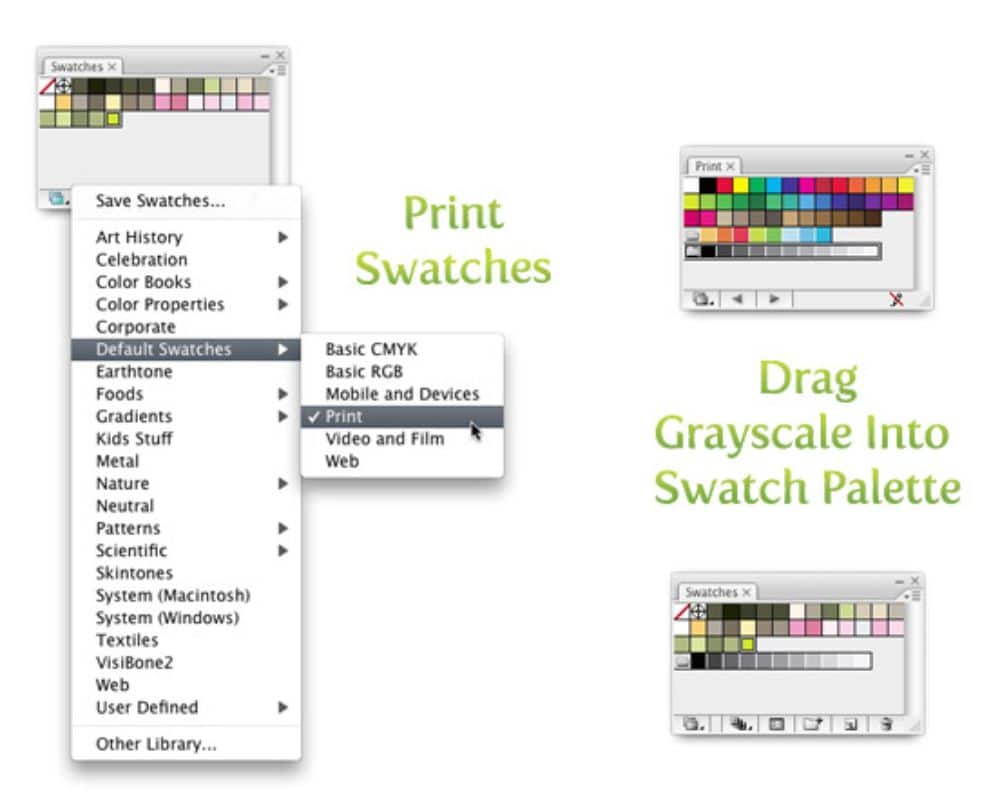
To achieve the maximum amount of control over the conversion, you can opt for a Recolor Artwork option. Begin by opening the default Print swatches if they aren’t open yet. On the bottom left corner of the Swatch panel, click the Swatch Libraries Menu and select Default Swatches>Print. Once the required swatches have appeared, you have to drag the grayscale swatches folder to Swatch panel. Select your artwork, go to “Edit”, select “Edit Colors” and choose “Recolor Artwork” Or you can click the color wheel icon in the control panel. Once you have entered the Live Color dialog box, click the Grayscale swatch set on the right-hand side of Color Group column. It converts your image to Grayscale but allows you to change the black swatches according to original colors.
You have to click the play button beside the sliders that sit at the bottom of the Live Color dialog box and select CYMK. To modify the original color from the Current Colors column, use the slider at the bottom of the box to change the percentage of the black. If you move the mouse cursor over grayscale swatches, in the New Column, besides Current Colors, you notice an arrow that signifies a drop-down menu.
Above mentioned methods are useful to convert an image from color image to Grayscale. You can use Adobe Photoshop, Adobe Illustrator, or both to accomplish the task. Each method comes with its own set of pros and cons. Hence, you should weigh the advantages and disadvantages of the methods and the applications before selecting the mode of conversion. Both the applications have their color models and the ways to understand and control the color information of the given image. Always, you should have an original copy of the image saved somewhere before you convert the image. Just in case, the conversion did not go well, and you can take up the original image and start to work again with it.
via https://ift.tt/2XlfhQR


No comments:
Post a Comment