10 Tutorials to Create Your Own Photoshop Actions

Tuesday, March 31, 2020

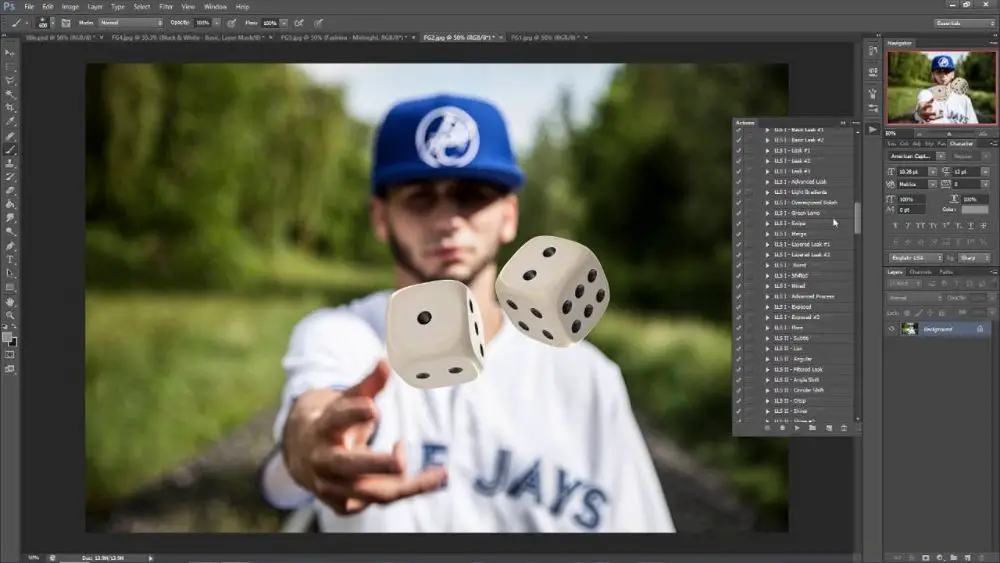
Photoshop is a software that is the most used by web designers and photographers for editing photographs. There is a particular set of tools you use as a designer which are pre-decided. Every time you undertake the task of designing, applying a specific step is where Photoshop action comes to use. There are numerous Photoshop Actions, and the more you use Photoshop, the more you will want to save time when doing tasks that you have to repeat every time you work.

There are free and premium versions of Photoshop actions. You can also create your own Photoshop actions. There are lists of video as well as editorial tutorials that would guide you on how to create your own Photoshop Actions. Photoshop Actions are a real-time saver and make the workflow speedy. Moreover, easy work happens with Photoshop actions as they are fun to use and require fewer effort. Let’s check out some best tutorials to guide you on how to create your own Photoshop actions.

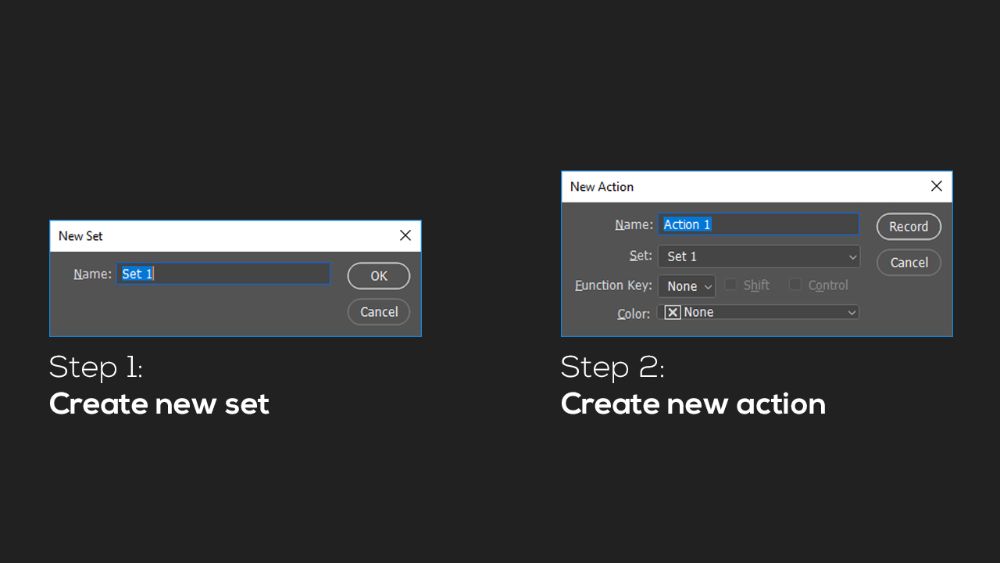
1. How to create Actions in Photoshop: 

Photoshop Actions- How to create actions in Photoshop

This editorial tutorial is by Filtergrade and written by Mike Moloney. Mike Moloney has created many This editorial tutorial gives an introduction about Photoshop action and would be helpful to those who are beginners in creating them. This tutorial would help designers to create Photoshop actions as it gives step by step details. It is easier to follow when each tool and process begins with not just text but also with infographics.

It starts with selecting an image in Photoshop and proceeding to the next step. Each step is explained through limited text and infographic, showing the action to be followed, which makes the designer easier to follow. The editorial tutorial is usually not preferred as reading is necessary. But this tutorial is recommended for the quality it presents the task to you. Someone even new to Photoshop can also follow the steps and create Photoshop action, as it is clear, and the language used is simple that anyone can understand.

2. How to create actions in Photoshop-Ben Willmore:


This video tutorial is by Ben Willmore. There may be certain techniques to achieve a specific edit effect, and it not necessary every time you remember it. Photoshop Actions allows you to store your steps and then let you use it whenever necessary. This video tutorial has a voice-over which guides you in the process to create an action.

This tutorial specifically teaches you how to create a Photoshop action to have a vintage look to your image. The voice-over in the tutorial is crisp and clear and has subtitles in English to make it easier to follow the instructions on how to create a Photoshop action. The voice-over and the steps in the video are parallel, so it makes it easier to follow. Within nine minutes, you would learn how to create Photoshop action even if you are new to it.

3. How to create professional Photoshop action:

This video tutorial is from Phlearn, and it guarantees you to create Photoshop action just by watching this. It focuses on creating Photoshop action, which would help you to create error-free actions which would increase your productivity. Photoshop action saves much time and helps you lessen the redundancy.

Creating Photoshop actions would be tricky as you don’t want to get errors later. This tutorial let you know why Photoshop actions are essential. It guides you precisely through the process of creating Photoshop action. There are many default layers which may not exist, and because of it, an error may occur. This tutorial also makes you aware of the common mistakes you commit while creating Photoshop action. Whenever you create a Photoshop action for a document, it is possible when you use the same action for another document, it shows an error, as particular layer or tool may not available for that specific document. This video tutorial is a bit lengthy, but it assures the best result.

4. How to create Photoshop actions to create star trails:

The tutorial enables you to create a specific Photoshop action on star trails. Usually, star trails are captured by clicking multiple photos over a period and then merge it. Here this tutorial teaches you how to create star trails with just one photo using Photoshop action. Nemanja Sekulic presents this video. With this Photoshop action, you would be able to create a star trail effect to your image.

Your guidance on creating action is just eleven minutes, on how to create a Photoshop action to create star trails. The voice-over is clear, and the pitch is perfect, which makes you interested in the video. While creating a Photoshop action for a specific effect like star trail, may not be up to the mark. In this tutorial, Nemanja explains how to perfect it and guides you until you get the expected and perfect result. This tutorial is not just like your usual tutorial but a fun and enlightening one. There goes one more thing you learn in creating Photoshop action.

5. How to create perfect actions in Photoshop:

One of the significant tasks of the designer is to save time and increase productivity. Creating a perfect Photoshop action sometimes become a risky business for the designer. In case you want a good grip over the Photoshop actions, or you are new to the Photoshop action, check out this tutorial.

This tutorial not only helps you learn to create Photoshop actions but also on perfecting them. So that every time you use those action, they are bound to work. Max Bridge presents this video tutorial of about twelve minutes. The tutorials explain the process along with the video showing the Photoshop.

To not create mistakes while creating a Photoshop action in future, general mistakes are mentioning in the article. It easy to show the mistakes made while creating a Photoshop action, but the tutorial also guides you on how to correct it and proceed. The audio of the tutorial is audible enough, unlike others, which helps you go through the whole tutorial.

6. Using Actions to automate tasks in Photoshop:

Using actions to automate tasks

This editorial tutorial is by Trevor Morris Photographic, and it shows how to create a Photoshop action without much hassle. This tutorial widely explains why actions are a must and how to create one. It starts by giving an introduction, and then by the initial steps on how to create Photoshop action. The tutorials include infographic so that the steps are precise. It has also mentioned short cut keys, to give an edge of faster learning for the designers.

Knowing how to create a Photoshop action is not just enough but also knowing the short cut keys enable your performance to get improved. The tutorials have proper headings explanations, infographics and tips. This tutorial helps you to know each thing to be known while creating a Photoshop action. Going towards the end of the tutorial, it has also shown how to create complex actions. The tutorials are not just for beginners but also for professional as it mentions, tips for editing action, tips and guidelines for creating actions and much more.

7. How to create and save actions in Adobe Photoshop CC:

The best part of these fantastic tutorials is that it is just three minutes. Though the tutorial is short, it makes you learn the basics of creating Photoshop action.

Designers new to Photoshop actions can quickly learn the basics of creating Photoshop actions. Within a few minutes, you would know how to create Photoshop action sets. Additionally you would know how to record new actions and save them, and there you are done with the basic of creating a Photoshop action.

This tutorial is not for beginners, but for designers who are aware of Photoshop and its tool beforehand. This tutorial is most preferred as it is a quick video about learning Photoshop actions and doesn’t consume your time.

8. Quickly and easily create your own Photoshop Actions: 

Quickly and easily create your own photoshop actions

When it comes to Photoshop actions, there are numerously available for free and premium. To create Photoshop action seems much better as it helps an individual designer to defer to their needs. Every designer has their own need of actions to conduct on their designs, and only self-created Photoshop actions would fulfil that need.

This tutorial would teach you wonderfully the basics of how to create a Photoshop action. This tutorial would benefit designers who are new to Photoshop and can create Photoshop actions. With proper headings and Photoshop screen, they have guided finely with an arrow with what keys or tools to follow. The language used in this tutorial is crisp and straightforward that anyone would understand it. Get your basics of creating Photoshop action to begin from here.

9. How to create Photoshop Actions the right way, so they work every time:

How to create actions the right way so they work every time

Actions are an essential part of designing. Photoshop actions are part of the work of designers and help them regulate their workflow and save enough time. You can record specific steps that you regularly follow to create the same kind of effect and apply it till you get the desired result. This tutorial shows you the right way to create Photoshop actions.

Many times, there are chances that when you create a Photoshop action, you get an error. If you want to create an error-free Photoshop action, this tutorial is worth recommending. With proper steps mentioned and explanation given under it with Photoshop screens showing the tools and keys, this tutorial has gained as the best tutorials. The tutorial has also stated tips which would set the designer to create an error-free Photoshop action. One of the tips they have put gravity on is about using shortcut keys while creating Photoshop action. Finish your basics of creating Photoshop action with this tutorial and get the best out of it.

10. How to create and use Photoshop Actions:

This video tutorial would show you how by following certain step you could create Photoshop actions. The tutorial helps you with the basics of creating action and saving them. All tools and functions are shown simultaneously with the voice-over. Hence, it makes the designers follow the instructions easily. It has subtitles and clear voice-over, which makes it easy to go through the tutorial.

Whenever any tool or filter is used, the video zooms into that specific tool to make sure the viewer finds it easy to find the tool. You just have to spare approximately nine minutes to learn how to create Photoshop actions and use them. This is an introductory tutorial that helps the designer who is new to Photoshop or Photoshop actions too.

Photoshop actions and applying it on your designs are made easy with tutorials mentioned above. Photoshop actions are a real time-saver that a designer can have to regulate their workflow. Managing time by Photoshop actions is the best way to get the best result and save time. You can create actions as per your need and customise it as per your design to achieve different results.

It is possible, and there may be simple or complex Photoshop actions you may want to deal with, which may not be available in the premium or free versions. By referring to the above video as well as editorial tutorials, you can come across various ways to learn the basics of creating Photoshop action and not just creating Photoshop actions but an error-free one. With the additional tips suggested, you can create Photoshop action as a beginner too.

Using the tips and more straightforward ways to create Photoshop actions by the experts help you to come through the phase of a beginner and get the grip of expertise in your work. Not only you can multitask, but soon you could create a tutorial on how to create Photoshop actions by becoming an expert in it.

The post 10 Tutorials to Create Your Own Photoshop Actions appeared first on Web Design Blog | Magazine for Designers.


via https://ift.tt/34ae2WJ

10 Benefits of Using WordPress for your eCommerce Website

Monday, March 30, 2020

Speaking from personal experience, having just finished building my sixty-page WordPress e-commerce website and the ongoing global feedback from web designers and first-time users, the WordPress content management system is out on its own when it comes to user-friendliness.

It enables you to build SEO optimized, adaptable and professional-looking websites with very little prior knowledge of design. Its multiple functionalities and modification capabilities allow you to try and test different design layouts so you can customize your website to suit your business needs. If you are new to web design like I was, it can, as with anything new, take a little bit of getting used to, but once you’ve familiarized yourself with the WordPress dashboard, you can become a self-taught designer in no time.

The following list highlights some of the beneficial features that you will find when using a WordPress e-commerce website.

1. COST-EFFECTIVE

The cost of creating a website has reduced significantly over the years, and few content management systems are more cost-effective than a WordPress e-commerce website. The numerous WordPress themes available are very affordable for new businesses and ongoing maintenance won’t be a drain on finances due to the simplicity of the dashboard and the ability for the users to install plugins, which enable the expansion of the website.

2. QUICK AND EASY TO USE

WordPress is easier to use than any of its competitors and whether you’re an experienced designer or fresh at the platform, you will find the WordPress dashboard intuitive an easy to use. You can immediately start creating posts and new pages, content, images, and customize your layout.  When you need to update the capability of your site, this is easily achieved by installing your required plugins.

Although you certainly don’t have to have prior design experience, if you do need assistance, there is an easily accessible support system in place to help you.

3. EASILY UPGRADED

The WordPress theme you choose for your eCommerce website will define how the front end of your website looks. Designing your website so it accurately represents your business is easily achieved due to the platform’s flexibility, and you can customize your theme at any stage of the design process. You can also upgrade and extend the functionality of your eCommerce website by using plugins so your site adapts to suit the growth of your business.

The theme you choose at the beginning is often based on your current needs, but it’s important when choosing to consider what changes might be required in the future, so check that your theme is adaptable.

4. SEO FRIENDLY AND LOVED BY SEARCH ENGINES

It’s quite likely that most of your initial traffic, and going forward, will be channelled from organic SEO. This is why it’s important that the underlying framework of the platform you choose is SEO friendly.

WordPress ranks highly with search engines due to its clean and constant code, which makes it easy for search engines to read and index eCommerce websites built with it. Other reasons why WordPress themes fit so well with search engines is due to being able to add meta tags to posts, pages, images and titles, and you can fine-tune your SEO campaigns on high converting pages. There are also extensions and plugins designed specifically for when you need to increase your SEO capabilities.

5. WEBSITE RESPONSIVE CAPABILITIES

Choosing an eCommerce WordPress theme that has responsive capabilities is essential considering that your website will have to perform on multiple devices. If you choose a theme that isn’t responsive, plugins can be added to enhance its responsive capabilities. However, if you have to change your theme in the future, it will affect how your content is displayed on mobile devices, so it’s wise to choose one that already has this in place. It is also something that Google takes into account when it comes to rankings.

6. GREAT COMMUNITY SUPPORT

The WordPress Community gets good press, and it is well deserved as help is available 24/7. If you need assistance with your site, there are plenty of options, such as the official WordPress database, direct assistance, online tutorials, guides and blogs.

So, if you have a question, you only need to reach out to the community and there will be somebody that can help you.

7. MULTIPLE USERS

As the system operates on an open-source platform, it enables different designers to work on your site. I found this to be particularly useful as it meant I could contact designers with my technical questions and they could immediately assist with accessing the platform and fixing the problem in real-time. This not only saves time, but it also provides a handy way of seeing what the designers are doing and how they are doing it.

8. ACCESSIBLE ON MULTIPLE DEVICES

Another benefit of the WordPress management system is that it’s browser-based. This enables you to log in from any device that has an internet connection and make use of the dashboard to add design changes to your website.

9. BLOG READY

As WordPress was created as a blogging platform, it has built-in blog capabilities. This means you can seamlessly integrate with all the social networks without having to log in to each one individually and instantly connect with your community to promote your latest offers and promotions.

10. SECURITY

Compared to other website management systems, WordPress has a well-proven and secure system. However, to ensure your website is impenetrable, use WordPress security plugins that can further bolster your website’s security.

Conclusion:

If you are considering building your first website or your business needs to upgrade its e-commerce capabilities, then you should be considering a WordPress website.

All too often, businesses, especially start-ups, are held back due to limiting budgets and the high costs of website design. However, by their very nature, WordPress themes are a way for you to take control of the entire design process at a fraction of the cost.

The post 10 Benefits of Using WordPress for your eCommerce Website appeared first on Line25.


Source: https://ift.tt/3bC9kmQ

What You Need to Do to Create Award-Winning Websites

Friday, March 27, 2020

Any business probably wants to see award-winning websites that feature their services or products. Creating a website is not that difficult anymore today; it’s a skill that can be learned.

A stunning website that has a nice design together with good pieces of content can make your company shine. It helps in sharing the story of the companies mission and also brings new visitors that can check what you do. A website is going to capture the attention of users that can be used for different purposes.

Compared to other domains, websites get awards, not just for their design part. Other milestones, reaching certain goals or delivering exceptional user experience, are equally important. Usability is indeed an important element in running a successful website. This is why site owners need to adapt often to new trends and more effective design principles.

Award-winning websites usually are visually-stunning, easy to navigate, and there are no bugs. The information that you see on them brings a lot of value and interest. In this article, you are going to find out some tips on how you could get your website to that level.

Looks are not all for award-winning websites

For sure, any of us wants their website to be a beautiful one. However, in order to be successful, the site needs a lot more help. Until design even starts, we need to understand how the site works and how users are navigating through it.

The features of it also need to be in line with the mission of the company. By checking all of these things, you will get a solid base to start with.

Look at these German websites, for example. Being, well… German, they’re more efficient than filled with fizzy graphics. And their experience is awesome.

Responsive Design

Award-winning websites need to have a responsive design. More and more people are checking websites not only from their computers. As the market is full of smartphones, tablets, and other devices, you need your website to work on any of them.

Creating a website that can work on multiple devices can be a big investment from the start. Still, in the long term, it is going to pay off for sure. First, it is going to optimize the way your visitors are interacting, and it is going to improve your search engine ranking.

The best advantage of it comes down to the numbers. It’s quite simple; your website is going to be available on more devices, so this means a bigger potential number of visitors.

Having a responsive design also helps with the users’ interactions with your website. Filling a responsive form? Amazing compared to a non-responsive one seen on a mobile device.

Looking at a map to see where a restaurant or company is located? Easy now. Websites now have responsive Google Maps embeds that make it easier for you to check out the map directly in the website.

Structure

A solid structure is going to help you bring a consistent, user-friendly experience from your website.

So the navigation needs to be smart and easy to use. From a user perspective, all you want to do on a website is to go quickly without any kind of problems to what you are looking for. Use this principle; award-winning websites do that.

Use white space

Your audience wants to see a user-friendly website, so be careful about how you use white space. You can start with a minimalist approach and showcase great graphics that people are going to enjoy. Having a busy and messy homepage can cause users to feel overwhelmed and confused.

So creating a website that has a lot of white space is going to encourage the audience to stay and explore it.

Speed is important

When the design part is done together with the functionality, you need to think of speed. Award-winning websites are very fast.

The best way to improve the speed of your website is by getting an expert on this task. What you can do by yourself is to reduce the redirects that are active, to simplify the codes and avoid any kind of bad requests.

If you’re using WordPress, things are easy. You can use several plugins like W3 Total Cache or something similar. An alternative to using plugins is by doing improvements yourself: use browser cache, Gzip, download some fonts and use them locally instead of embedding them, disable anything that WordPress offers and you are not using.

You’ll see the difference.

Think about your audience

A good experience for your audience is done when you consider them in the design process. Ask yourself who is going to check your website and why. This is going to help you better understand the design elements, colors, and visuals.

Content

In order for a website to be engaging, the content that it contains needs to be relevant for your audience. It has to be clear, and it can be of great help in building trust. There are a few categories of content that you can create, and that is useful, informative, and funny.

Make it interactive

People like to interact with websites. That can mean a simple chat with other members that are using it or just with its functions. Put this social aspect into your plan. It can help you create a community around your brand.

Avoid elaborate transitions

Transitions are very important as they can be exciting and bring a lot of energy. Still, you have to keep them short and relevant for the mission of your website. If you exaggerate, you might start seeing people live your website.

Engage

Your website even if you don’t know it is already competing with the whole internet. You need to keep your users engaged, starting the moment they come to your site. The rule of 3 seconds is important here. You need to make sure the first piece of content they see is clear, organized, and can start conversion.

If you have an online shop, you can use certain positive customer reviews that you had in the past. Another strategy could be to showcase certain deals or coupon codes for a particular promotion that you are running. By doing so, readers are going to be more open to purchasing your services or products.

Experience

Think about the experience that your site is offering. Award-winning websites always have a clear experience that makes their users be amazed. This means that all elements starting from the design part to functionality need to work together.

Here’s a quick example that you might have seen on boutique consulting firms’ websites or on any type of consultant’s website. They don’t use contact forms anymore. And don’t think that they just throw their email address in there.

They take it to the next level and implement a booking system so that you can book a certain time frame from their schedule.

Ideas

Play around with ideas, and don’t be afraid to do something new. For sure, you don’t know how it is going to be received, but taking chances can pay off.

Conclusion

In conclusion, award-winning websites are not that easy to create. It requires a lot of work and effort. Still, it’s not an impossible mission, and anybody that follows the tips we just mention and goes even beyond has a big chance of making their website visible. It’s just a matter of how important is this to obtain.

The post What You Need to Do to Create Award-Winning Websites appeared first on Web Design Blog | Magazine for Designers.


via https://ift.tt/39l6QYI

Design your way

The well-known Suzuki brand is a Japanese multinational corporation that has its headquarters in Hamamatsu, Japan. It specializes in creating compact vehicles and 4×4 automobiles offering a full range of motorcycles as well.

Suzuki is the 4th greatest automobile manufacturer after Toyota, Nissan and Honda and the 9th largest one in the world when we look at its production volume.

The Suzuki logo is something that we all recognize and people know it even if they are in India, America or other zones around the globe. Suzuki is also producing many motor parts for other brands like Nissan, Fiat, General Motors, Mazda and Volkswagen and Mitsubishi.

Suzuki logo is also quite an old one because it was introduced in 1958 four years later after the first car was built. The emblem has a stylized “S” letter and it has become an icon.

The Suzuki logo

s1-84 The Suzuki logo (symbol) and why the emblem is successful


The Suzuki logo combines a bright red emblem with a blue wordmark. At the base of the logo, you can spot the word “Suzuki” that shows up in capital letter. The letter is of the exact same size and the font used is a Helvetica one.

This logo has stood the test of time for many decades now and you can consider the logo an ideal example of a simple, clean and consistent yet visually appealing symbol. A lot of times it is considered one of the most known and easily recognizable logos in the car world.

Logo Description

The shape of the Suzuki Symbol

s1-1-4 The Suzuki logo (symbol) and why the emblem is successful

At the start, the Suzuki company had a simple logo that showed the founder’s name in the traditional Japanese text. Actually the S-shaped Suzuki symbol was first used in 1958 when the automobile product took off in the well-known post-world war II automobile boom.

They did keep the company name under the S using some small letter. After that, it was moved to the right side to look like a horizontal line. The last change to the shape of the Suzuki logo was moving the wordmark under the emblem and making it bigger compared to the S.

Suzuki logo is simple and complex at the same time. It is quite hard not to recognize where the S letter is coming from. The sharp edges that you see and chopped forms are for sure associated with the Japanese culture and remind us of the samurai heritage and heiroglyphs that Japan is very well known for.

The Color of the Suzuki logo

s1-85 The Suzuki logo (symbol) and why the emblem is successful

The first color that was used in the Suzuki logo was bold black. Afterward, the company decided to change it to the red and blue color scheme. The older version has a more indigo blue and the new ones have a navy blue shade instead.

The current Suzuki logo that we can see on their models is made using red and blue colors. The red stands for passion and tradition and the blue stands for excellence. The emblem you will see it has a silver color on it.

The Font

s1-87 The Suzuki logo (symbol) and why the emblem is successful

Suzuki has used the same font since they moved to the new English version of the logo and that is the classic Helvetica font.

Influences/Inspiration

The Suzuki logo is inspired by the need for reaching the Japanese and English audiences together. Because the brand name sounds good in English, they also wanted an emblem that would be easy to recognize in Japan as well. So, they went for curves and lines that are very similar to the Japanese kanji characters while also keeping the English S alive.

The Suzuki logo Meaning

The shape of the S is also connected to the innovations that they brought in the automotive industry. They decided to give the logo four different corners to represent the four-stroke, engines and four-wheel drive that is used in their vehicles. The colors do a great job and make it stand out so we can say that the Suzuki logo is a really cool one.

The Suzuki logo History

s1-3-2 The Suzuki logo (symbol) and why the emblem is successful

Suzuki was first established in 1909 and it did not have a logo until the year 1958. In its first 50 years of activity, it focused on producing looms for weaving silk and cotton. The need for a logo appeared after the company started to make four-stroke engines and when they presented the first car in 1955.

In 1955 the Colleda COX 125cc was launched and the name of the company was changed to Suzuki Motor Co., Ltd. A few years later we can see the logo being introduced and the design was completed with four strokes that represented wheels and showed the company started in the auto industry.

Later the logo was replaced with the “S” that we know today and it was a bigger success towards customers.

What types of vehicles bear the symbol?

s1-89 The Suzuki logo (symbol) and why the emblem is successful

The Suzuki symbol can be found for sure on all the vehicles that they produce. Besides that, the company also makes motorcycles and outboard marine motors. So, we really have to appreciate this company because it expanded not only to vehicles but also other machines that are useful for humanity.

5 Reasons the Suzuki Emblem Is Successful

s1-90 The Suzuki logo (symbol) and why the emblem is successful

The Suzuki logo is not a complex one and you can’t say it brought something revolutionary in terms of design but there are still a lot of reasons why it is successful:

  • It comes from the company’s name and when you see the big “S” you know for sure the brand that we are talking about. The company identity is strong and people relate to it.
  • It’s been the same in the last 60 years, and the corporate “S” emblem was probably the best choice they made back in 1958.
  • It connects you with a company that has an old history, the original business was founded in 1909 by Michio Suzuki and they produced looms. If we look at it today for sure you wouldn’t have expected such a turnover.
  • The edges reflect Japan and the influence that has been brought from the culture into the logo.
  • The colors are powerful each one representing a set of values that connects with the brand.

In conclusion, the Suzuki logo is an interesting and minimalist one that has stood the test of time. It is recognizable to both Japanese and English speakers so we considered it a real success.

If you enjoyed reading this article on the Suzuki logo, you should read these as well:

The post The Suzuki logo (symbol) and why the emblem is successful appeared first on Design your way.


Source: https://ift.tt/2UqsXZD

Things NOT to Do While Choosing a WordPress Theme

Thursday, March 26, 2020

Using WordPress to build your website for starting your blog or any digital presence for your online business is often the best choice you can make. WordPress is most used by people who want to start their work with fewer hassles, and who want to do it in the shortest period of time possible. You can have full control over your website with WordPress, and that makes it easier to work with. When you start with WordPress, one of the essential things to start with is selecting an appropriate theme.

There are many options for a WordPress theme that you can choose from. It might seem easy to choose any theme from the options available, but often, users tend to spend a tremendous amount of time trying to pick the one theme that is a perfect fit. When you select a theme, maintaining caution is a must. Before you finalize your WordPress theme choice, consider specific steps that will help to choose a theme that makes sense for you.

In this article, we list some of the things NOT to do while choosing a WordPress Theme.

1. Themes that limit your use of WordPress:

Themes that limit your usage of WordPress

Specific themes that only support pages, in such case, whenever the theme is changed, the content may need to be changed. It is a time-consuming job to keep changing content when the theme is changed. Persistent monitoring is needed when you have to undertake the task of changing content with every change of theme. It is just that the theme should work with the page and post. So you must select a theme which needs to support the content it has.

While working on WordPress, you would have to continually keep updating with the contents, theme and the upcoming work. The one thing you need to take care while selecting the theme is always checked whether it has a custom admin panel or dashboard on the page which ensure changes made when required. It ensures that you don’t go deep into the coding but also have a theme which is compatible with the page, post and also changes made as and when needed.

2. Multiple Plugins:

Avoid using Multiple Plugins

There are a lot of WordPress Plugins that are very helpful and make the work easy. Plugins come with various features and functionality which helps in improving user experience and getting the page loaded quickly. But there are specific uses of the Plugins that are available. You have to make sure that according to your need, you install a plugin. Choose a plugin that gives you overall performance. Installing multiple plugins can create conflict between them. Once you have installed multiple plugins and later uninstalling them can leave specific bugs in your system.

At times uninstalling specific Plugins can cause your system to act crazy. So it is advised to avoid having multiple plugins to avoid bugs in your website and also to improve the user experience. There are specific themes which upfront lets you know which Plugin is needed. At such time, install the Plugin. Whenever there is a need, install the apt Plugin and then uninstall it whenever the need has passed. There is no point in having multiple Plugins.

3. Heavy use of Shortcodes:

Heavy use of shortcodes

We know Shortcodes in WordPress are a boon. Shortcodes add compelling contents in WordPress widgets, pages and post. It helps the user to use certain functions without coding knowledge. Shortcodes are a great tool to use until used for every other thing in WordPress. The thing about shortcodes is that it needs to be processed.

When every other function created through Shortcodes, it makes the page site performance low. So when you choose a theme with inbuilt Shortcodes, it turns out to be messy. And it is messier when you change the theme. So whenever you have to switch the theme, you would have to remove all the shortcodes. Possibly avoid the process of removing shortcodes from multiple pages and then switching to a different theme as it consumes much time. The shortcode has a place in Plugin, and that is where it should stay. Avoid heavy use of shortcodes for better user experience.

4. Not considering fast loading times:

Not considering fast loading times

The important thing about any website be it WordPress, it should have a better user experience, and the page must be loaded quickly. So while considering any theme for WordPress, you have to examine whether it doesn’t take much time to load. Some Plugins slow down the page. Shortcodes also have to be processed, which give the page load and make it slower.

Specific visual effects also bring everything to a halt. Before you go through different WordPress theme, all you should do is go through the reviews and comment. Learn how fast the theme would take to load when operated. Select your theme, taking into consideration the above points. If the page doesn’t load within a few seconds, the user tends to prefer other pages. It might seem easier to select the theme, based on how better they look, but how it affects your page must also be known.

5. Lack of Support:

Lack of support

The first rule to follow when you select a WordPress theme is to check whether the theme has its community support. If you select any such theme which lacks community support, you are bound to have problems which would be hard to solve. Always make sure, the theme you select has active and significant community support which can avail solutions at any point you encounter with a bug or some issue. You would need help with relation to the theme you use, and you have to go for the community support. If at all any theme doesn’t have such support check whether it has active users.

The more the users, you can look forward to asking the troubles to them, there are chances they might have encountered with the same issue. But having excellent community support is recommended while opting for a theme. Many time there are problems like website stops loading or the site becomes inaccessible to your customer, and if there is no support time or enough FAQs that can solve it, you’ll be in problem. Recommending that whenever you get any theme, make sure it has community support online or adequate FAQs which can solve your issues. Every time an issue arises doesn’t mean you switch to another theme.

6. Not considering branding:

Not consider branding

Every brand has its preference and colour palette they use in their brand. Whenever a website is in the making, it is a must that you should keep into consideration the brand you are designing. Always before choosing a theme, keep in mind the theme should go with the design of your brand. The colour palette, colour scheme, features and functionality of the theme and whether there is space for the logo all must suit with the brand you are working. Considering all these points helps the users by immediately letting them know about the website.

Keeping branding in mind is because, when a user visits the website, he would come to know about the brand instantly, and it would remember the same for an extended period. If the product or brand differ from the website, it would be difficult on the part of users to recognize the brand. The whole point of the website is of no use if the website is unable to convey it to the audience the brand language. While opting for a theme, one must keep the brand in mind.

7. Poor Font:

Poor Fonts

The font has been given importance, just like the other essential tools and function when it comes to designing websites. Conveying the right message and idea can be through contents and fonts. The right type of font with the theme helps the brand to reach a much larger audience. There are many themes which come with fix fonts. These are the necessary kind of themes. Now, it is available that you can choose the theme, and there is an option to select font styles to create the best.

The primary thing to take care while choosing a theme is to select a font style that is readable enough. There are handwritten fonts which are preferred for particular branding as it speaks the brand language. Whereas most people prefer simple and plain font to make sure the readability is good. It doesn’t matter the theme is good and then you choose an altogether different font which doesn’t match the theme and makes the mix worse.

8. Theme not compatible with other devices:

Themes that are not compatible

Multiple choices of theme leave you in confusion which to choose. There are elements to be considered when getting the theme for your website. One of which is to check whether the theme is compatible with other devices. Some users are working on their systems which would get the website as it is.

It possible that there would be users who access this website through mobile. The situation above makes very necessary that theme must be selected, which can be compatible in all devices such as mobiles or tablets. We can’t restrict the users based on device-based. If in case, any user finds the website not compatible with the mobile, he may switch to other websites. The moment your website gives the users a bad experience, they are bound to choose your competitor. Choose the theme compatible with other devices as well.

9. Low Budget:

Low Budget

When you have decided to get the website done, make sure you spend your money wisely on tools that render you the best. There is plenty of free WordPress theme available, but it comes with certain limitations like fixed fonts, limited customization, not compatible with other devices and much more. When you cross the budget, and there are limitations to the theme you select, then there would be chances that the website may not be as per the mark.

The theme of the website decides the market for you are your satisfied users. The moment the theme is compromised based on the budget, the whole sense of creating a website becomes futile. So it is recommended, you choose a theme which defines and reflects your brand language no matter if there is expense included. As while selecting for the theme for your website, a little extra cost is worth it, as it would be your investment.

10. Wasting time to perfect it:

wasting time to perfect it

As you might have seen there are multiple options of the theme to select. Selection of the theme itself takes much of the time. Once you have finalized the WordPress theme, there comes customization, editing tweaking and much more. When it comes to making the theme perfect the time taken is forever.

While spending time for making the theme look better other important work may be left undone. When we decide to make something perfect, we tend to keep on doing it and finding some of the other faults. Nevertheless, the important thing is to keep the website updated and postings regularly. Making the theme perfect can be done once you have launched the page and make sure it is running well. Never forget basic optimization is a must but not on the cost of the other important work.

You know what things you should let go while opting for a WordPress theme. Selecting a theme may take time, but giving appropriate priority to the essential things that matter it would yield better results. Always consider the time and money spent while considering the theme for your website. The above points mentioned are the common mistake people tend to commit while choosing the WordPress theme, all you have to do right now is, learn and recognize the time spent and utilize the best from the given resources. Save your time by making sure not choosing to spend time on the points mentioned above.

The post Things NOT to Do While Choosing a WordPress Theme appeared first on Line25.


Source: https://ift.tt/33UImV6

Design your way

Fonts are absolutely essential when it comes to UI design and digital communication. It can either make or break a design, no matter if other aspects are on points, such as a good user interface or logo design.

Text is considered as one of, if not the most important thing when it comes to design. It makes it easier for users to read the interface and also makes things like menus and user interface much more user-friendly and easier to read. Choosing the right fonts can be very important, and you also have to keep in mind that the font is appropriate for the small screen.

Generally, it is believed that serifs are better and easier to read than sans serifs for smaller sizes especially. While this is often the case, it is not a rule for every design. There are many considerations you have to make when you are choosing the right font – the readability of the font, design characteristics, the nature of the website and more.

What is Discord?

discord-logo The Discord Font or What Font Does Discord Use (Answered)

Have you ever wonder what fonts Discord uses and which Discord font is the best for you? Then you should read on, as we will cover what fonts can be found in Discord and we will also talk more about Discord.

Discord is one of the most popular applications for the video gaming community out there. It is known as one of the best text, audio, and video communication tools for video gamers. The application uses chat channels to connect gamers together and enable them to communicate effectively.

A good thing about this VoIP app is that it is free and it offers a lot of good features. It also offers great support for a variety of different platforms – Windows, macOS, Android, ios, Linux and most web browsers. This along with its quality and also accessibility and the fact that it is free of charge makes it one of the most popular apps in the world. There are more than 250 million users on the platform.

While it is primarily made for video gamers, it can also be used by a number of different users who are looking to connect with other people and discuss various topics. But we here will discuss what a Discord font is and which ones are used.

Appearance

You should take note that the app itself has many different features and types of communication that it is rather difficult to treat it as a whole unit with the same design. It has many subparts that there is not only one Discord font on the platform itself but rather a mixture of more designs and fonts.

The Discord Font

When we are looking at the font that is used for the Discord logo, the font is called the Uni Sans Heavy. This Discord font first appeared in 2009. Let’s take a look at some other fonts that Discord uses.

Uni Sans Font

unisans The Discord Font or What Font Does Discord Use (Answered)

The Uni sans font is the basic Discord font that is used all over the platform. It can be used in various different ways, and the weights range from thin to heavy.

It is highly customizable; it has 14 different weights, which allows you to customize it as you want. It has seven uprights with seven italics, and combine that with weights and you have a nice font to play with. The great thing about this Discord font is that it offers great legibility and great performance on all levels.

The Uni sans font has its own unique style, but it also possesses some qualities of other fonts, such as DIN and Dax-Uni sans font, which are also quite strong fonts. This font family has a number of good uses, such as logos, headlines and text blocks that need a strong font. It can be applied for a number of different uses – web design, motion graphics, as well as for branding purposes, such as t-shirt design and similar uses.

Discord font alternatives

Filetto ExtraLight Font

Filetto-ExtraLight-Font The Discord Font or What Font Does Discord Use (Answered)

Tepeno Sans Light Regular Font

Tepeno-Sans-Light-Regular-font The Discord Font or What Font Does Discord Use (Answered)

Hattori Hanzo Light Font

hattori The Discord Font or What Font Does Discord Use (Answered)

SF Arborcrest Light Font

SF-Arborcrest-Light-font The Discord Font or What Font Does Discord Use (Answered)

Pontano Sans Font

Pontano-Sans-font1 The Discord Font or What Font Does Discord Use (Answered)

Sarabun Font

Sarabun-font The Discord Font or What Font Does Discord Use (Answered)

Kuro-Regular Font

Kuro-Regular-font The Discord Font or What Font Does Discord Use (Answered)

Premium Alternatives

Uni Neue

Uni-Neue The Discord Font or What Font Does Discord Use (Answered)

If you are looking for a great Discord font alternative, then look no further than the Uni Neue font. It is known as the redesigned version of the Uni sans font, which makes it a great alternative for the Discord font. This remake has seen some major changes to its proportions, thickness, and widths, but it has also maintained the soul and the spirit of the original.

Uni Neue has rounded corners, which makes it appear very soft and friendly, but that does not mean that it is not professional; quite the contrary, this remake of the Discord font is actually very suitable for proper professional use such as for branding and even corporate identities.

It has some eye-catching features and it is a great font for a variety of different uses. It can be used for TV, branding, publishing, logos, advertising, screen use, and packaging. In short, this is probably the best premium alternative for the Discord font.

Pero

peo The Discord Font or What Font Does Discord Use (Answered)

Pero is another good alternative for a Discord font. It features 7 different weights, ranging from extra light to extra bold. This makes it a very versatile option as a font. It can be used for titles, headlines and also as text. The great thing about this font is that it is very readable, and it gets rid of unnecessary elements of font and is quite minimalistic in that sense. It is a perfect alternative if you are looking for a more versatile font.

It also has rounded corners, making it a friendly font with softer edges. It is best used in a variety of different settings, and it appears professional at the same time.

Accord Alternate

Accord-Alternate The Discord Font or What Font Does Discord Use (Answered)

The Accord alternate is a direct companion to the Accord font, and it has some great features that make it a great alternative as a Discord font. It is suitable for lowercase projects, and it has great details that are not otherwise visible with some other fonts. It gives the project a very modern look.

Solomon

Solomon The Discord Font or What Font Does Discord Use (Answered)

Solomon is a retro-style font that is a sans serif font. It has some great features that make it a great alternative.

Flexo

Flexo The Discord Font or What Font Does Discord Use (Answered)

Flexo features quite a square design that makes it appear quite warm. It has sixteen different styles, language support for a lot of languages and some very good features. It is appropriate even for more advanced projects that you might have.

Tips for choosing the right font

Choosing the right font for you might be a very important question, and it is one of the most important issues that a designer can face. Here, we will provide you with some useful tips for choosing the right font for your project.

  • The font should suit your content

This one might be straightforward, but the importance to choose the font to suit your content is massive.

  • Create a hierarchy using sizes and weights

Creating a hierarchy in your projects is quite important; fortunately, you can use sizes and weights to do this.

  • Add some personality

This is the last step, and sometimes this is where projects are distinguished from being good to being superb. Add a more personal touch to your projects to make it more “human”.

If you enjoyed reading this article about the Discord font, you should read these as well:

The post The Discord Font or What Font Does Discord Use (Answered) appeared first on Design your way.


Source: https://ift.tt/2Jfc1P0
 

The Cash Box Blueprint

Most Reading