Design your way

Thursday, October 31, 2019

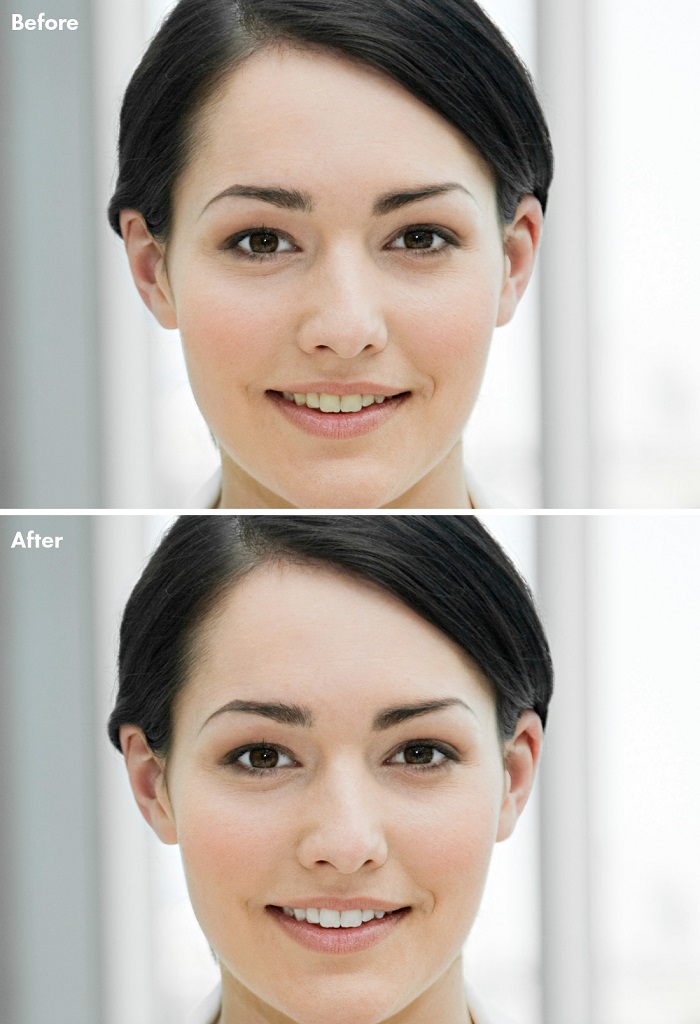
Having white teeth in a photo is important, especially if we are talking about a professional one that has been done. What is cool about programs like Photoshop is that even if you had a “bad teeth day” for taking photos you can still turn the smile to a good looking one by learning how to whiten teeth in photoshop.

Finding out how to do this is not that complicated and it is just going to require some time from you to understand the things you need to do. If you are photographer whitening teeth is going to be for sure one of the most common tasks that you can do.

You will always get this demand when you are taking pictures no matter if it is a special event or one of your friends asked for some photos. You can make the necessary changes quite easily so here are some suggestions on how to whiten teeth in photoshop.

How to whiten teeth in Photoshop: Cool tutorials

Natural Teeth Whitening – Retouching Tutorial

s1-1 How to whiten teeth in Photoshop and make a picture look better

Bear in mind that when you are editing portraits you need to balance all of their features and make them look as natural as possible. In this tutorial, you will discover a quick way to it.

How To Whiten Teeth In Photoshop

s1-2 How to whiten teeth in Photoshop and make a picture look better

If you are quite confused about how to get it done then you should really try out this nice simple tutorial.

How To Whiten Teeth In Photoshop

s1-3 How to whiten teeth in Photoshop and make a picture look better

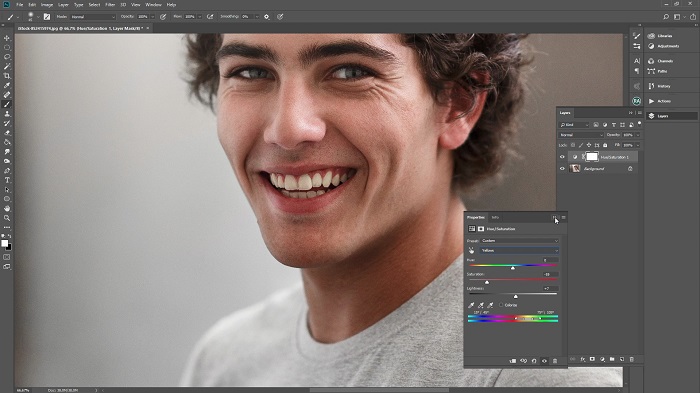
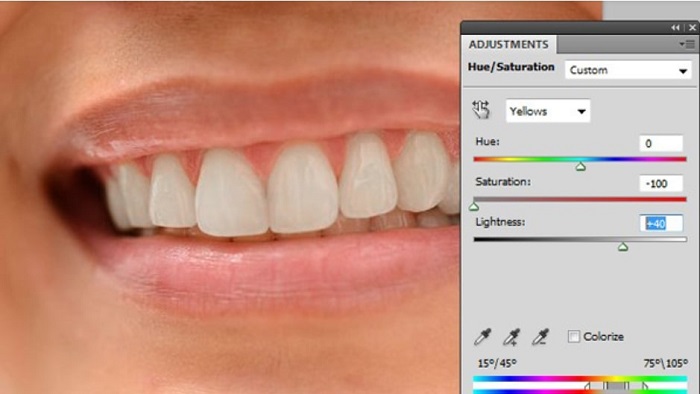
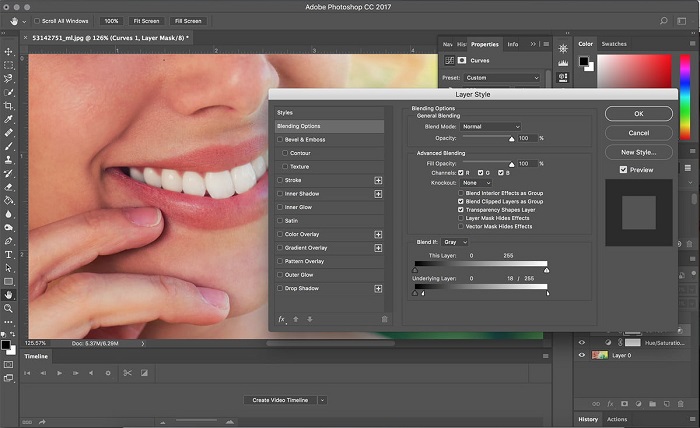
Check this tutorial out if you want to whiten teeth using photoshop. It explains all the steps from the Hue/Saturation layer until the mask that you might be needed to use. Start now and soon enough you will be able to understand how to get the best result.

How to whiten teeth in Adobe Photoshop in 3 easy steps

s1-4 How to whiten teeth in Photoshop and make a picture look better

Find out what you need to do when you need to get this task done. This tutorial has 3 steps and this means you will be able to finish it quite fast. It starts with a single person image and then it moves on to multiple person images that might sometimes be a bit more challenging.

How to whiten teeth in Photoshop

s1-5 How to whiten teeth in Photoshop and make a picture look better

Make yellow teeth look white using this tutorial. It is explained in detail and you shouldn’t have any big problems with it.

How to Whiten Teeth in Photoshop

s1-6 How to whiten teeth in Photoshop and make a picture look better

Go with this guide if you want to learn the techniques that need to be done in order to whiten teeth in photoshop.

How to Whiten Teeth and Eyes

s1-7 How to whiten teeth in Photoshop and make a picture look better

Explore this simple tutorial that shows in a step-by-step way what you need to do in order to get white teeth for your pictures.

Whiten Teeth in Photoshop

s1-8 How to whiten teeth in Photoshop and make a picture look better

Using this tutorial will help us understand how important it is to use Photoshop to achieve this goal and make your photos look better especially for the persons we took them. Give it a try and see what you will learn.

2 Easy Ways to Whiten Teeth in Photoshop CS6

s2-1 How to whiten teeth in Photoshop and make a picture look better

These two methods that are shown in the tutorial show how to perform this task and you can do them even if you are a complete beginner in this software. Just make sure you follow all of the instructions and you will be just fine.

Photoshop CC Tutorial – (Quick tip for beginners)

If you want to learn more about whitening teeth in Photoshop then this tutorial might be the best one to go for especially if you are a beginner.

How to whiten teeth in Photoshop

s3-1 How to whiten teeth in Photoshop and make a picture look better

Images that look great but don’t have a white smile can be a frustration for many photographers. Take advantage of this tutorial and learn how to Photoshop in a simple and fun way.

How to Whiten Teeth Using Photoshop Tutorial

s2-2 How to whiten teeth in Photoshop and make a picture look better

If you are going to explore this tutorial you will be happy to know that at the end of it you will be able to use these technique to achieve your aim.

The BEST Way to Whiten Teeth in Photoshop

One of the best ways to perform this task in photos that look good is by using photoshop. It shows how you can do it from zero and you don’t really have to invest a lot of time into it.

The best way to whiten teeth in Photoshop

Learn how to perform this task by going for this guide. You need to make sure that the look you get feels natural. The guide is done by a cool artist that shows all the info you will need in order to get this natural-looking result.

How to fix and whiten Teeth

s1-9 How to whiten teeth in Photoshop and make a picture look better

To achieve the white teeth effect in Photoshop you will need to give a try to this simple tutorial. It has all the techniques well explained and it is a matter of time till you will do it on your own.

How to Whiten Teeth in Photoshop

s1-10 How to whiten teeth in Photoshop and make a picture look better

If you want to start removing the yellow color from teeth in photos you can surely try this tutorial. It shows all the steps that you need to do in Photoshop so you can start doing a better job with your photography.

Here’s how to whiten teeth in Photoshop for a natural result

s1-11 How to whiten teeth in Photoshop and make a picture look better

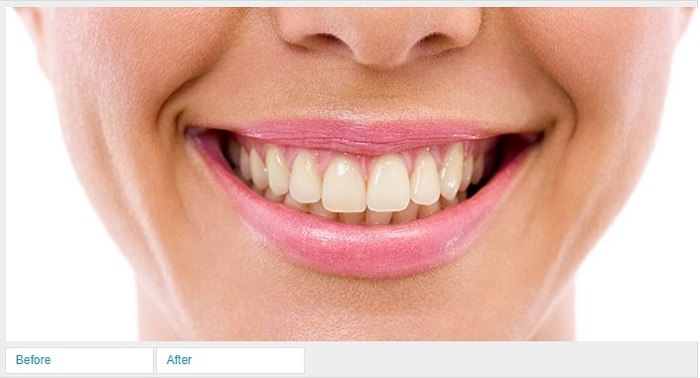
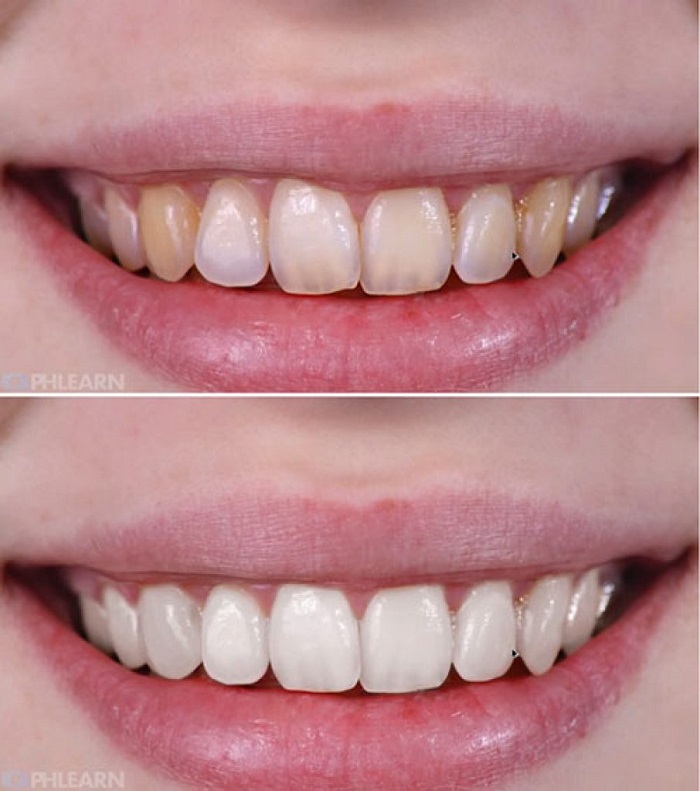
Nothing is going to impact more a photo than the smile of the persons in it. This is why having a white smile is an important aspect and if you want to get this effect sometimes you will have to edit it using photoshop.

How to Whiten Teeth in Photoshop (A Helpful Guide)

s1-12 How to whiten teeth in Photoshop and make a picture look better

This is a simple guide that teaches you how to do it. You will discover all the steps needed to be done in order to get that effect.

Whiten Teeth! TWO STEPS!!

Start whitening teeth easily with this Photoshop tutorial that has all the information you might need to be included.

How to Whiten Teeth in Photoshop– Video Tutorial

s1-1-1 How to whiten teeth in Photoshop and make a picture look better

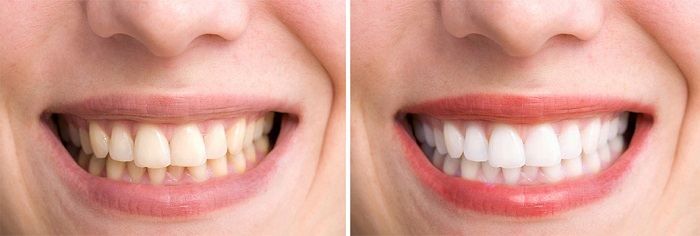
Yellow teeth are a common problem that happens in photos. Most of the times you will need to clean that up by using these techniques. This tutorial is in video format and it shows all the steps that you need to do in order to get the job done.

Whiten Teeth In A Few Easy Steps

s1-13 How to whiten teeth in Photoshop and make a picture look better

You can whiten teeth on any person that you have in your photos and you might want to start doing this now. The main idea is to balance the effect and not overuse it.

Photoshop is the best program to perform this in so have a look at this guide because it includes all the specs needed and it perfect for any beginner photographer that wants to get this kind of job done.

How to Whiten Teeth in Photoshop

s1-14 How to whiten teeth in Photoshop and make a picture look better

Why wouldn’t you like to have a beautiful white smile in all of your photos! Sometimes we do see a picture that doesn’t have a great smile but we can fix all of that using this simple guide.

If you enjoyed reading this article on how to whiten teeth in Photoshop, you should read these as well:

The post How to whiten teeth in Photoshop and make a picture look better appeared first on Design your way.


Source: https://ift.tt/34cbp5g

Studying Graphic Design: Top 5 U.S. Universities

Wednesday, October 30, 2019

Graphic designers are among the most important knowledge workers in the economy. Their greatest aim is to attract consumers and to help to promote ideas through the use of creative art and visual concepts, though I have got a graphic designer to write my research paper once and he did an excellent job.. The industry is among the oldest, with art as a means of expression and advertising going back hundreds, if not thousands, of years.

The good news is that you can get a bachelor’s degree in graphic design. You can use these programs to start building up your portfolio for the future, where you will showcase it to potential employers. We went through the trouble of going through the many universities in the U.S. where you can learn graphic design. We came up with a list of the top such schools for you to choose from.

  1. Carnegie Mellon University

Carnegie Mellon University is found in Pittsburgh, Pennsylvania and is over a century old, having been founded in 1900. The university currently has over 6,000 students enrolled. The average class has fewer than 20 students and each teacher is matched to 13 students at most.

The Program

Carnegie Mellon University likes to treat graphic design and design principles as separate subjects from the fine arts. They have three main areas of focus for their design students: Communication Design, which is graphic design, Product Design, which is industrial design, and The Design of Physical and Digital Environments.

  1. Maryland Institute College of Art

The Maryland Institute College of Arts is located in Baltimore, Maryland, and was founded in the year 1886. The college has 725 students enrolled. Each class has less than 20 students and every teacher is matched with 13 students.

The Program

The name of the program is Bachelor of Fine Arts in Graphic Design. Students who succeed in completing the program will have mastered the art of visual composition that is crucial to print and digital design and will work with real clients as part of their education, taking projects and carrying through the entire process from conception to service delivery.

  1. Virginia Commonwealth University

The Virginia Commonwealth University is located in Richmond, Virginia and was founded in 1838. It is a fairly large school with over 31,000 students enrolled. Understandably, each class has somewhere between 20 and 49 students and each teacher is matched to 17 students.

The Program

The universities aim with its graphic design program is to ensure that students are fully capable of communication and form in the visual medium. The program is dedicated to exploring many different methods of problem solving in order to cultivate professionalism in its students.

  1. Otis College of Art and Design

The Otis College of Art and Design is located in Los Angeles, California, and was founded in 1918. It currently enrolls about 1100 students. Each class has fewer than 20 students and every teacher is matched to 8 students.

The Program

This college is heavily focused on research and encourages students to continually refine their projects in order to make them more meaningful. The research paper is a common feature. A significant part of the program is dedicated to fostering presentation skills and refining the graphic design skills of the students to the point where they have an unmatched level of excellence.

If the idea of writing research papers at Otis College scares you, especially if English is not your native language, don’t worry about it. I managed to get through my own education easily by finding someone to write research paper for me. There are many such professional services online that will help you keep up with the high research standards at Otis College.

  1. Boston University

The Boston University is located in Boston, Massachusetts. It has been around for nearly 2 centuries now, having been founded in 1839. It is also a fairly large organization, currently enrolling over 18,000 students. Remarkably, however, even with the large size, each class still has fewer than 20 students and every teacher is matched to 13 students.

The Program

The Boston University offers the Bachelor of Fine Arts in Graphic Design degree. The program is designed to cultivate and strengthen the technical abilities of students through open-ended projects. These projects also serve to give the students extensive experience in doing professional work in preparation for their careers. Students are also encouraged to join various professional organizations in order to engage themselves in design communities.

If you’re not a native speaker of English who is planning to join any of these universities, you might feel daunted at first. How will you write your research paper topics and communicate effectively in English? You might also want to take your time to appreciate everything that the US has to offer.

Conclusion

These are the 5 top American universities that offer excellent graphic design programs. You can hardly go wrong with any one of them. Going through any of these programs should turn you into a consummate graphic designer by the time you graduate.

The post Studying Graphic Design: Top 5 U.S. Universities appeared first on Web Design Blog | Magazine for Designers.


via https://ift.tt/2BScXW9

Design your way

The world is faster and faster and we see this because of the fast improvement in technology. In order to keep up with the changing needs and trends that our world has brands have to reinvent themselves in order to survive.

Samsung is one of the biggest electronic producers in the world.  The Samsung Logo appears on millions of devices and is recognized in the entire world. Even though it was launched a century ago it is quite obvious that probably they didn’t think so big when they first started so let’s discover more about them.

Samsung

s1-5-1 The Samsung logo: How the brand evolved over the years

In Korean, the word Samsung translates as “three stars” and the name was picked by its founder Lee Byung-Chul. At the beginning of the company, the idea was that one day it is going to become so powerful, that is going to be strong and everlasting like all the stars that we can see in the night on the skies.

But why is three the lucky number, what does it have to do with its success? The Samsung Logo has its secret in the Korean language because the number three is used as a symbol that shows something big and powerful.

Samsung is a big South Korean multinational corporation that has its headquarters in Seoul, also known as the Samsung Town. It was created in 1938 by Lee Byung-Chul as a trading company. In present days Samsung is one of the largest electronic device manufacturers.

The Samsung logo

s1-55 The Samsung logo: How the brand evolved over the years

The Samsung Logo is a basic logotype together with the shape and both offer a simple and recognizable logo. The base is an elliptical blue oval that is a bit slanted in order to make the oval’s right side higher compared with the left. Within the oval, we can find a wordmark that says “Samsung”.

The lettering is positioned in the top of the first S and the bottom of the G intersect together with the edge of its oval.

Colors of the Samsung Logo

s1-6-1 The Samsung logo: How the brand evolved over the years

The use of blue color in the Samsung logo represents reliability and commitment and the white color stands for purity and elegance. So, we can say that they did some great choices for their Samsung Logo.

Font

s1-61 The Samsung logo: How the brand evolved over the years

The font is a basic Helvetica Black that can be seen on the basis of the logo and is written in white. Still, the crossbar of the A has been removed because it adds some visual focal point on the otherwise simple logo.

Inspiration

s1-62 The Samsung logo: How the brand evolved over the years

The Samsung logo might look simple but each design element has been carefully planned. The ellipse was actually added in order to give the logo a more international air. Also, the removing of the crossbar in the A is a move that was intended to look more dynamic and to show the innovation of the company and what they are striving for in the future.

They also decided to keep in the Samsung name the small part of the S and G open in order to show open-mindedness.

The Samsung logo Meaning

s1-7-1 The Samsung logo: How the brand evolved over the years

If you are wondering what Samsung means well first of all you need to know that it got its name from the Korean language that means three stars. The word three stands for something big and powerful so the first version of the Samsung Logo had three stars in it.

The elliptical shape of the Samsung Logo also shows the world that is moving in space showing the fact that we are changing and bringing innovations. This is how Samsung reflects its core values.

Also, if you check closer the logo you will see that the S and G letter go out of the oval in order to connect the interior with the exterior. The idea behind this Samsung meaning is that they are trying to find a balance between the world and be of service to society.

If we check, even more, the blue color used shows trust and reliability that Samsung was to fulfil always in their service and products.

Samsung logo history and evolution

s1-56 The Samsung logo: How the brand evolved over the years

If we check the Samsung Logo history, we will find that the brand was created in 1938 and the logo actually appeared in 1958. The first logo had 3 stars, 3 stripes and some plants that went all together in a circle shape. The stars were connected with the Samsung name and the plants focused on their agricultural origins.

1969

s1-58 The Samsung logo: How the brand evolved over the years

In 1969 the founder created Samsung-Sanyo Electronics. The first product that they did was a black and white television and the company went for a rebrand so they show the new direction they are heading to.

They went for a rectangular box in order to show that they wanted to dominate the television market which now can be seen in the corporate identity as well.

1985

s1-59 The Samsung logo: How the brand evolved over the years

By 1985 Samsung managed to launch that year the SC-1000 a mobile unit that could be used in-car. This moment marked a new chapter for the company and also the Samsung Logo.

Their designers searched for a simpler idea removing the outside circle and chancing it for the three stars there were made of a diamond shape. So, what they did was basically to go to a more technical-oriented identity.

1993

s1-57 The Samsung logo: How the brand evolved over the years

Samsung decided to bring a new corporate identity because they were celebrating 55 years of activity. The new blue Samsung logo has become one of the most popular logos in the electronics market. It features the company’s name is a basic oval shape.

2005

s1-60 The Samsung logo: How the brand evolved over the years

After more than two decades the logo is changed again and they eliminate the blue ellipse and focus just on the wordmark. The Samsung Logo really went for a more simple and modern approach and it looks like they did a great job with their choice.

In conclusion, the Samsung Logo has had a great history and it is really interesting to see how it evolved in time. We can be just curious about what the future will bring from them in terms of technology and also their brand identity.

If you enjoyed reading this article on the Samsung logo, you should read these as well:

The post The Samsung logo: How the brand evolved over the years appeared first on Design your way.


Source: https://ift.tt/2NpLdNN

Create Scary Halloween Looks Using These 5 Steps in Photoshop

Tuesday, October 29, 2019

It is Halloween time! And having a scary makeover is a must. However, in reality, this can be very expensive and also complicated. Even for experienced makeup artists, achieving a scary makeup that passes the test of time and partying can be difficult. Thereby, we have come up with a perfect tutorial for you, which lets you create Scary Halloween Looks using these five tricks in Photoshop.

Generally, people used to dress up in only scary costumes during Halloween, but these days people experiment with different genres.

There are many ways in which you can create your scary look using Photoshop. Photoshop works best for enhancing the makeup you have done or created a new look from scratch on a typical picture. Photoshop allows for creativity beyond the reach of physical makeup. You can create some captivating images and looks using the right Photoshop tools effectively.

Here we are some tips and tricks from some prominent YouTubers who specialize in Photoshop that can help you create very scary yet creative Halloween designs.

1. Using a variety of Layers:

One of the essential features of Photoshop is layering. It allows designers to create layers of images over the other or many images over each other for creating interesting effects. By making using of layering, you can superimpose a subject’s face on a picture that has a scary element in it, for instance, we have taken an example of a hooded skull. After you superimpose the image, you need to make use of the Pen Tool and create a precise outline of the subject’s face. You can then cut this marked area in such a way that it looks as if the subject is wearing a hood.

After the underlying layer has been created, you can lock that layer, and work on a new layer. Now use standard paintbrush tool and paint the eyeballs red. Go just a little out of the eyeball’s area to give an illusion that the eyes are bleeding. You can also hint blood at the bottom rim of the eyelid. Now you need to work on the lower layer. Pull it out of some regions of the face, for creating an impression that there is a skull make up. Now search for a cracked surface image, and create another layer of it. And finally, blend the cracked surface in proportion to the subjects face by fading it to match the skin texture.

2. Use Grungy Textures:


Another way of creating such creepy effects is by using textures, which opens up a world of possibilities in Photoshop. It lets you add a new perspective to your image, by adding shapes, patterns and many other pattern designs out there. This technique comes handy when you are trying to make your subject look like a zombie. This is even easier if you have a  base Halloween make up, as it can enhance the look by many folds. Many times the effects to be used vary according to the makeup of the subject. Some use latex in liquid form or create blood like textures using different components. These makeups can be very helpful in augmenting the designs.

Once you have a picture of your subject with blood, makeup on their face, enhance it using the Hard Brush. By using hard brush blend pieces and chunks of skin with the background to make it look like the subject is missing out on chunks of skins. Create another layer and call it blood for easy reference, and now start painting skin covered in blood in all the areas that were blended with the hard brush earlier. It would look imposed if it’s a full-body portrait image of the subject and only their face is covered in blood and deformed. This is why you should use the same steps on the subject’s exposed areas, such as creating a chest wound by using stock images of meat. By using the colour palette, you can experiment with the tint you want to be added to the subject’s skin.  By adding shadows near the eye area of the subject and pulling the lips behind the teeth and using the same meat stock image to blend the lips would give it a very crude look.

3. Try the Scary Joker Look:

Take an image of yourself as close to the reference image you want the image to turn out to be like. We are using the reference image of the new Joker character from the Joker movie. He generally wears formals, so try getting yourself clicked in similar attire, with a jacket and a shirt on the inside. It need not be the same costume. That is the beauty of Photoshop. Change the colour of the jacket to Red, by creating a new Hue/Saturation adjustment layer and clip to the base layer. Using the Selection tool, select the jacket and click the mask button. Now tweak the hue/saturation slider till the jacket turns to your desired colour, in our case Red. Copy the mask of your previous layer on a new selection of the inner shirt. Set the blend mode to Luminosity, which ensures it only affects the lighting and not the colours. Experiment with the hue and saturation slider till you get the right colour, in our case Yellow. Fix the edges with brushes if they seem rough. Using an exposure adjustment layer, you can add the top green part of the shirt in our reference image.

Now moving on to the face, add a vibrancy layer and remove all the colour. Create a mask for this to affect specific areas of choice. Don’t try to be too in the lines, as a messy look would look more realistic. Also, ensure you don’t cover the eyes as well. Now using the mask of the previous layer, make the grey looking face, white. Add a new Hue/Saturation layer, and make it all red and create a mask for this as well to target selected areas, i.e. eyebrows, face and nose for this look. Finally, group all the layers and covert it to a Smart Object.

4. Get the Vampire Look:

To practice, you can use a free stock image from the net. Now make a folder and name it adjustment layers.  Add four layers in this folder, with the first being black and white adjustment layer. Go to the preset panel and select maximum black option, and change the opacity to 50 per cent and blend it with overlay option. Add the hue and saturation layer next, and change it accordingly to create a pale look, for which you’d generally want to increase the Hue value to a positive number and reduce saturation. Now move to the levels of adjustments layers and change the middle value to 0.80. Now the last layer will be the gradient map adjustment layer. Experiment with the different gradient options and select the one that works best for you. Now tweak the opacity of the layer to  50 per cent and use a hard light blend layer. Now, let’s focus on the eyes.

Take another free stock photo of a scary or spooky eye, using a cat’s eye, for instance. By using the, create a cutout of the eyes and add it to a new layer. Do the same for the other eye. Duplicate both the layers and add it to the original document where you were working. Adjust and resize the cat eyes on the subject’s eye and reduce the opacity of the cat eyes to see what’s behind the image. Now reduce the size of the eyeballs to fit the eyeball of the model better. Now use the brush tool for the foreground and apply it to the side of the eye to erase it. It is ideal to use brush tool for this rather than eraser tool as there’s no going back from eraser’s tool. Repeat the same method on the other eye and increase the opacity to 100 per cent. Use similar blend modes from different images to add texture on the face of the subject.

Now take the polygonal lasso tool and zoom in on the teeth, and make a selection on the tooth you want to convert into the fang. Copy and paste it on a new layer and increase the length of this tooth horizontally, and add a layer mask to the new layer and apply black colour using brush tool for shaping it in a vampire’s tooth. Set the hardness to 100 per cent and apply it carefully around the tooth. Press control +T to activate transform tool and rotate and position the tooth to put it the right orientation. Repeat the same steps for the other tooth.

5. Unzipping the Fright:

Photoshop has a zipper feature that is widely used for creating horror images for a long time. It works best for Halloween. You can use this effect along or combine with other effects. After you’re done with the basic framework of adding blood-related effects and also creating black layer near the eyes, add a very creepy zipper to your image for more effects. For achieving this look, you need to source an image of a leaf which is dark red in colour and another image of a zipper. Layer in the leaf first and then create another layer consisting of the zipper image, and position it to the centre of the subject’s face. Now use contouring to blend it around the leaf image starting from the chin and moving towards the cheeks.

Halloween is thereby the best time to use your creativity and at the same seriously improve your photoshop skills with some promising practices that refine your skills and also gives you a great look for the festival. With each look, you practice you’ll be able to blend in all the elements more smoothly and create more interesting looks. Keep practising.

The post Create Scary Halloween Looks Using These 5 Steps in Photoshop appeared first on Line25.


Source: https://ift.tt/2BU7a26

Design your way

The online is full of fonts and choosing the best font for print might be quite a challenge. The best way to go towards this by knowing what you want and keeping your approach simple.

When we start speaking about media materials, the fonts that we use in them sometimes might be quite ignored by us.

However, the design used should always be one of the first things that we consider when building such printed marketing materials. After you get all of this you might start focusing on the type of print font you are going to go for.

If you don’t have an illegible writing nobody is going to understand what you are trying to say. This principle is also true for handwritten letters or any other kind of documents even if they get printed online.

This is why you really need to find the best fonts for print when you are making a choice and if you have some basic principles that you follow for sure the reader is going to understand exactly the message.

Why is font type so important?

The answer is quite simple, if the viewer can’t understand what is written then they are going to ignore any brochure, flyer or poster that they see. Your text needs to be clear and very easy to read and fit your brand elements.

Choose the best fonts for print from the list below

Baskerville

baskerville The best fonts for print: Pick a few from this collection

Baskerville is a classic serif font that is still popular even to this day. It was designed in a transitional period between the 19th and 20th century.

Having high-contrast letterforms Baskerville succeeded in doing so.

Helvetica

Helvetica The best fonts for print: Pick a few from this collection

This is a graphic designer favorite and a classic for print advertising. It was created in 1957 and this sans serif font boasts a simple, clean feel making it easy to read in any situation.

It’s a really cool print font and maybe one of the most common one that is being used. It has a simple feel and can be used for sure in your brochure or flyer.

You might recognize Helvetica more easily because it has been used by a number of top brands including Microsoft, Panasonic, Staples and Evian.

Apercu

Apercu The best fonts for print: Pick a few from this collection

This is a grotesque sans-serif typeface that got released in 2010 by Colophon an independent type foundry that was set up by UK-based studio The Entente.

The design that you see in it is full of character and can be spotted easily. It is also available in light, regular, medium and bold so take advantage of it right away.

Frutiger

Frutiger The best fonts for print: Pick a few from this collection

Frutiger is one of the best fonts for print families that include serif, sans serif as well as ornamental typefaces.

Because it has different options to choose from this means you can really take advantage of it and use it for anything that needs a modern look.

Verdana

Verdana The best fonts for print: Pick a few from this collection

This font was designed back in 1996 by Matthew Carter for Microsoft. It is part of the san serif family and it was made to be read on a computer screen but it also works great for printing.

It goes well in both large and small sixes and can be a great choice if you want a consistent look in your writing.

Bodoni

Bodoni The best fonts for print: Pick a few from this collection

This is one of the best fonts for small print because it is part of a series of typefaces that can be used on posters.

It has a unique style and it brings a pronounced contrast between thin and thick strokes.

Century Gothic

Century-gothic The best fonts for print: Pick a few from this collection

This sans serif font was designed in 1991 for monotype imaging. Century gothic is simple and easy to read making it one of the best fonts for print.

It is always a great choice for headlines and can be spotted fast from the distance.

Leitura News

Leitura-News The best fonts for print: Pick a few from this collection

If you didn’t know this serif typeface was created in 2007 with editorial use in mind, making it easy to read no matter the type of body text.

Akzidenz Grotesk

Akzidens-Grotesk The best fonts for print: Pick a few from this collection

Check out this sans serif typeface because it was one of the most popular ones. It inspired a lot of typographers and can be considered the precursor of the well-known Helvetica.

Although it is an old font it still has a clean look and is very relevant even today. Many typefaces are available to choose from like light, extra bold and even condensed versions. This adds more versatility to your font.

Franklin Gothic

Franklin-Gothic-URw The best fonts for print: Pick a few from this collection

Franklin Gothic is a realistic font that was made in 1902 by Morris Fuller Benton and in 1970 it got some great updates. Because it has a great quality it makes it a popular choice for a lot of media outlets.

However, more than a century after its original release even well-known media companies like The New York Times use it for different projects and the condensed version is known for the opening part in the Star Wars films.

Open Sans

Open-Sans The best fonts for print: Pick a few from this collection

Open Sans is one of the best fonts for print because it brings open rooms that have a neutral vibe and still offer a friendly appearance.

It was made for print and web and it can work great for the work that you need to do.

Lovelo

Lovelo The best fonts for print: Pick a few from this collection

Lovelo is a unique pick that you can take advantage of and it is inspired by geometric shapes. The lined version used is a lighter pick compared with a more classic one.

Electra

Electra The best fonts for print: Pick a few from this collection

A typeface that has some Art Deco flair was designed in 1935 and is a great pick for a company that is looking to add a twist to the body text while it is keeping the message legible.

Mission Script

Mission-Script The best fonts for print: Pick a few from this collection

Script fonts are really good in headlines if they remain thick enough. This is also one of the best fonts for print if used correctly.

Macro Print Font

Macro-Print The best fonts for print: Pick a few from this collection

The macro print is a display font that is available in a regular and bold version and it can create a great vibe to your writing material.

Give it a try and see if it is going to be one of the print fonts that you are going to use.

Once you find a print font that works for your genre, ask yourself…

1. Is it the right one?

Go with one font family, there are too many typefaces that make your work chaotic and sometimes that are confusing. One or two different fonts are more than enough for a project.

2. Is it the right size?

Printing uses 10-12pt font for large text blocks but the font size can be adjusted depending on what your material is about and what you are trying to accomplish.

3. Is there space?

Margin is everything. The more text you will have, the more margin will be required so take this into consideration especially when all you need is just some white space.

Ending thoughts on using the best fonts for print

In conclusion, finding the best fonts for print can surely be done and all you need is to invest some time in your research. We already offered you some tips to take advantage of them.

If you enjoyed reading this article about the best fonts for print, you should read these as well:

The post The best fonts for print: Pick a few from this collection appeared first on Design your way.


Source: https://ift.tt/34flqPl

6 Things Every Designer Should Know About Copyrights

Monday, October 28, 2019

As a designer, you can find inspiration in anything. You might visit a new place and find inspiration in its architecture or sculpture, in a painting or another artwork. After this, you may find yourself following the artist behind those works in your projects. Everything that is created has some form of inspiration.

However, there is a line between following and copying someone else’s work. That line is known are copyright infringement. As a graphic designer, you should know where to draw the line between copying someone else’s work and getting inspired by their work. Another case where the line gets blurry is when you are working on parodies. Parodies are funny, and most often, designers make parodies with respect to the work they like. However, even well-intentioned parodies may violate the original creators’ copyrights, and it could land you in a bit of legal trouble. Before you see how and when to take inspiration from design work for your project, every graphic designer should understand a few essential terms about copyrights.

1. What is Intellectual Property?

Anything original that anyone designs are their intellectual property only if the law protects it. That means if you invent a better the wheel, build a WordPress, draw a picture, name a product, design a character or write a song, your design is your intellectual property until you sell your ownership rights to someone. Intellectual property can even include expressions and innovations of discoveries. The only exception to Intellectual property is with a work-for-hire arrangement. If you have a full-time job, the designs you create are a part of your career and your employer’s intellectual property, not yours.

When a creation is your intellectual property, you have an exclusive right to profit, alter and use it. You even have the right to license your creation to others at your discretion. In simple words, if you write a novel with an imaginary character, another author cannot write a sequel to your book without you licensing the concept and character to them.

Intellectual property is protected legally in 4 ways:

  1. Copyright: This is usually used for literary and artistic works.
  2. Patent: Patents are used to protect inventions, technical solutions to existing difficulties and innovations.
  3. Trademark: Trademark is used to differentiate individual companies’ goods and services from products/ services provided by other companies. Mascots, company names, slogans and other things of branding that are protected with trademarks.
  4. Trade secrets: Business methods and specific strategies can be legally protected intellectual property under the UTS Act (Uniform Trade Secrets).

In the United States of America, each designer automatically owns the copyright of their work, except if they work-for-hire situations already mentioned. There is no requirement to register a copyright with the Trademark Office and US Patent to get protection using the patenting concept. However, if you want to copyright, you can register it with the US Copyright Office. Also, if you’re going to file a copyright infringement lawsuit, you should first register your copyright.

You also don’t need to register a trademark to use designs exclusively, but its recommended to do so. This way, your company’s name and other branding pieces are identified as yours as far as they are in the United States. To protect your designs and branding abroad, you will have to register your trademark in every country where you operate.

For our purpose, we will only talk about trademark and copyright work. Also, ensure that these rules apply to the United States, so if you are working somewhere outside the United States, the laws applying to your work and their scope would be different. For gaining proper legal advice, you should discuss your situation with your local intellectual property lawyer.

2. Where does Fair Use apply?

The Fair Use policy is an exception in the Copyright Act, which makes using copyright work without taking author’s permission in specific circumstances legal. Some of these circumstances are:

  1. Scholarly work: You can use copyright work in your college paper or any other published scholarly work only if you reference comment about the copyrighted work. However, you cannot claim copyright work as your own.
  2. News reporting: If you are reporting news about something and some copyright work is relevant to your news, you can simply mention it without thinking about copyright infringement. This also includes quotes from another news article to your story.
  3. Criticism: Similar to a piece of news or scholarly critique, you can use Copyright work in your published criticism work. For example, writing book critics is not illegal.
  4. Teaching: Sometimes teaching with existing pieces of work is the most effective way to deliver knowledge. You may use a poster for a movie or a phrase from a book to explain your lessons to your students. These are acceptable ways to use copyright work under the fair use policy.
  5. Parody: Using a copyright design for criticism through parody, an exaggerated impression of the design for critical or comedic purposes, is allowed under the fair use policy only if the parody is transformative in any way. Parody can be a funny worry, video or text.
  6. Transformative: There’s a critical difference between copyright infringement and fair use. An imitative work which simply uses copyrighted characters, ideas, names and concepts isn’t a parody. However, a work that takes copyrighted work and twists them in a way that is easy to understand the original work for consumers is indeed a parody. Sometimes the new way to understand the original work is being able to laugh at the fact how the parody mocks the original content. Parodying famous logos is an example of fair use of copyrighted work.

The transformative nature of designs is not the only factor to separate copyright infringement from fair use. Every case of alleged infringement is different, and when the court is given a specific instance, it considers everything given below to determine whether it is a case of copyright infringement:

  1. Nature of copyrighted work: Some types of work are benefited more from copyright protections more than others, and so these works receive more copyright protection. They include work like novels, movies and other content that need substantial creative work on the creator’s part. On the other hand, a news article or technical paper need less creative effort to produce, and so its use is more likely to be considered under fair use policy.
  2. Sustainability and amount of copyrighted work used in your work: Basically, you have to determine whether you have used a small piece of someone’s original work to support your point or whether you copied and positioned large portions around insignificant point. Quantity and quality both matter in such cases. In most cases, using a small amount of someone’s original work can be deemed to be fair use as small piece is just the crux of the original work.
  3. Derivative’s effect on the sales and marketing of the original work: Fair use of a copyrighted work should not hurt the profit of their work. If the court considers a derivative work to impact negatively on the original creator’s sales, it may be regarded as a case of copyright infringement. One such incident happened with Jeff Koons when he created a sculpture which was very similar to Roger’s photograph and so people would recognize it as a copy.

3. Can you use copyrighted work or intellectual property as an inspiration?

There may be an artist out there whose designs inspire you. If you use inspiration from someone else’s work in your own work, when does inspiration become plagiarism? Plagiarism means copying someone else’s work and acting like it is your own without giving credit to the original creator. Inspiration becomes plagiarism when the central idea or the crux of your work is copied.

For example, if an artist’s font pairing and colour scheme inspire you, using the same typography and colours will not come under imitation. Interpreting their ideas differently and using them to your own work in a unique way is considered as getting inspiration. The main concept is that the application of the concept has to be transformative, meaning your work has to be different from the main idea that creates the original artwork. So, it’s always better to play it safe when you are unsure. You should avoid imitation and focus on transforming and evolving the idea to a point where it is hard to find a connection between your work and original work that inspires you.

4. Who has to rights to an artwork?

Let’s consider you have designed something original for your client. Who has the rights in this case? Unless the client is your employer (in such case employer has the rights), it depends on which rights you have decided to sign over to them. If you work as a freelance graphic designer, you have the copyright of everything you design. You own the right to control how your is used commercially and reproduced. If you sell your work, it totally depends on which rights you have agreed to sign over to them. You need to see whether you assign your client the right to display, reproduce, use or make imitations of your work. Unless you give the copyright ownership to your client, the design is yours. This is a safety measure to protect your work from infringement and ensure that your work doesn’t infringe the copyright of someone else’s work.

So when a designer completes and sells the work to a client and signs the Design Transfer Agreement (DTA), the designers sell all the rights of the work to the client. The designer can no longer control how their work is used commercially. So if the client wants to modify the design after you’ve sold it, they are entitled to do it, and the original designer has no say in this matter. In case of copyright infringement, if someone sells a copyrighted image to a client, the original owner can take legal action against the client. The client can further take legal action towards the designer for giving copyrighted images in the first place.

5. So, how to play it safe?

Knowing who has the rights to the work and how to use it is essential. If you are unsure about whether a design idea could potentially be an infringement or good for fair use, you should avoid using that design. You can have a notebook or hard drive for roasting, criticizing or mocking famous figures and brands, but when you are selling and publishing designs, you have to know everything about laws that protect designs. If you have a business or you are a freelancer, it’s good to have a lawyer who can give you the best advice about such issues. This kind of expense is the most valuable investments for your business.

6. What to do if someone stole your designs?

The original content owner who has registered their designs for copyright has full control over their designs. However, before sending a letter to the people who used your designs in their or post a message on social media about your work being copied, do your homework correctly. You should first determine that the work they used your design for does not come under fair use policy. In such cases, it is always good to seek advice from a lawyer before taking any action. In case if the work does not come under fair use policy, you can fight for your designs.

As a designer, it is important to know how to claim your designs rightfully and what scenarios other people can use your designs. Also, you understand the meaning of copyright and intellectual property and in which cases you can use them. Otherwise, if you end up in copyright infringement, you may end up paying hefty fees. These things are important, especially if you are a designer and work as a freelancer or if you have a business.

The post 6 Things Every Designer Should Know About Copyrights appeared first on Web Design Blog | Magazine for Designers.


via https://ift.tt/34af7fL

Design your way

The online environment is full of information and you can find all kinds of professionals that have their own blogs. Depending on the topics that you are interested in for sure you are also going to find a lot of debates on the internet (maybe on the best forum software topic?). This is quite cool because you can get a better idea on a certain subject that you want to understand better.

Some of the best forum software that are online have been for quite some time active. Forums are even today very used and can be a great tool when you want to build your own audience.

There are also a lot of open-source forum software platforms available that you can check but things start to get stuck when you want to start your forum and when you get a little bit more confused about what platform is best to use.

The best forum software

PhpBB

phpBB The best forum software you can use right now

This is the most popular and free open source forum software that has all you need in order to start building. You can customize it easily depending on your user choice and there are also some themes available for free but the paid ones are a bit better.

phpBB is quite a cool forum software that lets you create boards where users can start interacting.

Once you finish the set up then you can create as many internal message boards as you would wish. This tool can handle thousands of users even more if you are using a great hosting provider.

VBulletin Community Forum Software

VBulletin The best forum software you can use right now

vBulletin is one of the best forum software that you can get because it was launched many years ago. It is considered to be the world-leading forum software. It has great security and powerful administration features that you can take advantage of.

On top of that, it’s premium features like mobile-ready design and SEO means that you have the chance of really doing a great job with it.

Discourse – Discussion Platform

Discourse The best forum software you can use right now

This forum software had its front-end made using JavaScript and it is powered by Ember.js framework so it means you get a responsive design that can work for any mobile layout.

It offers cool messaging chat with different emojis and a trust system that will really impress your users. In the end, this might be one of the best forum software because it is simple, modern and fun at the same time.

MyBB

myBB The best forum software you can use right now

You probably started to figure out that you are going to get some functionality that you need to expect from forum software that you are considering. The most common ones are the ability to create message boards, user registration, and activity moderation.

Instead of rehashing the same points then we are going to focus on each of the remaining platforms. MyBB, for example, has a lot of features that can be very useful in the long term for any member of the community.

WordPress

WordPress-1 The best forum software you can use right now

This is a platform that can use for many different purposes. But you can surely use it to create forums because this is the main topic that we are talking about.

Is it one of the best forum software choices that you can make? It is probably if you want to set up a normal website that also has a forum inside.

Vanilla – Modern Community Forum

Vanilla The best forum software you can use right now

This is open-source forum software that is robust, user-friendly and easy to use. It will offer a modern forum layout that allows users to post their questions.

It also has cool features like notifications, avatars, private messaging and a real-time preview that is built inside. Vanilla can be also integrated with social networks especially if people like to share stuff around.

There are also different plugins that can be used and all you have to do is check them out and decide.

XenForo

XenForo The best forum software you can use right now


This is a cool and simple forum solution that uses a more gamification layout. This helps because users will be more motivated to come back to the platform in order to reach certain goals.

So, for sure, you can consider it one of the best forum software that you can get your hands on.

Joomla!

Joomla The best forum software you can use right now

Joomla is very similar to WordPress because it is a CMS software. It can power your forum bringing cool plugins like Easy Discuss in the game.

If you want to build a powerful online application then you might consider it a real option.

Simple Machines Forum

Simple-Machine The best forum software you can use right now

Simple Machines Forum is a free and professional forum software platform that can be the right choice when you want to create your own online forum.

FluxBB – Forum Software

Flux-BB The best forum software you can use right now

Continuing our list of the best forum software choices we also encounter FluxBB. It is fast and easy to use and you shouldn’t have any problems with security while you have it.

It can support profiles, avatars, search option and much more.

Invision Power

Invision The best forum software you can use right now

This open-source forum building software allows you to create your own community depending on the needs that you have.

It is very flexible and you can add a lot of applications to it if you want to make it more custom.

Drupal

Drupal The best forum software you can use right now

If we talk about functionality, Drupal is one of the most powerful CMSs that you can find. No matter, these features also mean there is one steep learning curve.

If you don’t have any development experience it might be quite hard for you.

However, this is still one of the best forum software that you can get and it can help you achieve your goal.

PlushForums

Plush The best forum software you can use right now

PlushForums brings a blog and private messaging together with other features in the same spot. You don’t have to be a technical user in order to configure it so for sure you will be able to get what you want out of it.

How to pick the best forum software

If you want to get one of the best forum software in the online because you like this domain a lot here is what you should start doing, people really appreciate the best features and some of them are:

Efficient and Powerful Search

Users like to find fast what they are looking for in an online forum. Some even have their own autocomplete search feature that makes things go even faster than you would think.

PM (Private Messaging)

It is known that some users want to have a private one-on-one discussion and for sure this might be included easily.

Notifications Feature

Once subscribed sending notifications to the members of a forum can be a great way to show them what is happening in the community.

This will bring more traffic and make people check more often what is going on.

Signatures

All the best forum software focuses a lot on this aspect because it allows a member to bring a personal touch, his signature section. This is typically used for promoting things.

Roles and permissions

Roles might be assigned to members and this means they will be able to perform specific activities.

For example, a moderator permission can let a member edit content in order for them to moderate posts.  So, having moderators is important for any forum software that you might consider.

Advanced Editor

There is also the need for a powerful text editor that can read HTML fast together with other forms of content like image or video.

Powerful User profiles

The best forum software is for sore the one that also allows members to customize their own profile. They might add some personal information, a picture, different badges and so on.

No matter what software you will choose it doesn’t need to offer all of these features. What you need mostly depends on the kind of experience that you want to provide.

So, for example, if you want to set up an online forum you should expect some challenges. Here is a list that has some of the best forum software that you can get.

Ending thoughts on the best forum software

In conclusion, finding the best forum software is a matter of personal preferences and what do you want to build with it. Take advantage of the mentions that we had so far and make your choice.

If you enjoyed reading this article about the best forum software, you should read these as well:

The post The best forum software you can use right now appeared first on Design your way.


Source: https://ift.tt/2PpDH8h
 

The Cash Box Blueprint

Most Reading