5 Tips for Accepting Cryptocurrency Payments on Your Site in 2021

Thursday, December 31, 2020

It’s time for online merchants to face facts. We live in a digital world, and there should be little doubt that digital currencies are the wave of the future.

As an online merchant, your success depends on your ability to recognize trends and react to make sure you don’t miss the boat. Over the last five years, cryptocurrencies have slowly but surely been gaining popularity as a means of exchange between customers and online merchants. Are you taking steps to make sure customers can pay you with digital currencies?

As part of a drive to get merchants up to speed on the world of cryptocurrencies, we offer you these five tips on preparing to accept crypto payments in the future.

  1. Find the Right Payment Platform

If you want to integrate a crypto payment platform with your online store, you need to shop around for the right platform/exchange. While you have a lot of choices, you might want to focus on popular platforms Coingate, Spicepay, OKEX, and BitPay.

As you go through the selection process, you will discover there are several factors you need to consider. The things you should focus on are transaction fee charges, security, payout options, and whether or not the platform will allow you to conduct business through multiple cryptocurrencies.

While Bitcoin is the most widely used cryptocurrency, others such as Etherium are gaining popularity with consumers.

  1. Plan to Accept Multiple Cryptocurrencies

Today, Bitcoin stands as the most popular crypto payment option. However, there is no way of predicting which coins will be most relevant in the years to come. At a minimum, you should be looking for a payment platform that accepts common coins like Litecoin, Ripple, Bitcoin, and Ethereum.

You should also be looking for a platform that can easily integrate access to the coins of tomorrow. Keep your eye on the crypto market for new coins that are created. You never know which will become the next preferred coin in the marketplace.

  1. Focus on the Endgame

Cryptocurrency volatility can be a little intimidating. However, you can’t let that dictate how you do business. Your job is to focus on the endgame. What is the endgame? As a merchant, you are in the business of selling products to as many customers as possible. By accepting cryptocurrency payments, you will increase your potential customer base and open your door to new customers from all over the world.

  1. Don’t Hoard Coins in Your Wallet Account

When you start accepting digital payments, you will be responsible for managing your payment wallet. As crypto payments come in, you will need to immediately decide whether you want to trade coins like BTC to INR, EUR or USD (Fiat). Given the volatility of the crypto marketplace, hoarding would be a form of speculating.

For instance, let’s say you accepted Bitcoin as a payment form for a customer purchasing your product or service and kept the Bitcoin in your digital wallet. You would be speculating that the price of Bitcoin would continue to rise therefore making you a profit on that investment. The potential downside of doing this is if the price of Bitcoin went down before you cashed out which would result in you losing money on that investment.

If you are not looking to trade the market, you need to do payment conversions from cryptocurrency to fiat as frequently as possible.

  1. Understand the Risks Associated With Accepting Crypto Payments

Transacting business with cryptocurrencies is still a fairly new concept. It’s vastly different than dealing with fiat currencies because of additional risks. We have already discussed the risk associated with crypto market volatility. The other major risk is getting a visit from hackers. The best way to protect your money is to select a platform with multiple levels of security and convert your receipts as fast as possible.

Steps to Start Accepting Crypto Payments

Now that you understand some tips for managing cryptocurrency payments at your business, we will discuss what steps you need to take in order to make these forms of payment a reality.

  1. Register for a Bitcoin wallet: Before you can start accepting Bitcoin, or other cryptocurrencies, you need to register for a crypto wallet. This is a digital location where customers can send Bitcoin as payment. There are a number of wallet services like BTC.com or you can get a wallet address directly from a cryptocurrency exchange like OKEx. Your wallet is a unique string of letters and number that correspond to your account. You will also receive a private key which is used to sign for the Bitcoin transaction. These private keys need to be kept secret for security purposes. It’s a good idea to provide your wallet address in the form of a QR-code to make it easy for customers and help keep your wallet safe from hackers.
  2. Get a Bitcoin POS (for offline businesses): Just like a standard POS (point of sale system), companies like Bitpay and Coinkite have created Bitcoin specific POS devices for offline businesses to accept cryptocurrency transactions. Some customers may have Bitcoin based debit cards which makes having these devices easy for them to purchase.
  3. Online payment buttons: For digital businesses, like an eCommerce retailer, offering a Bitcoin payment button is critical for customers who pay using digital currencies. Services like BitcoinPay and even Stripe offer Bitcoin payment options via a digital button for websites. All you have to do is fill out a simple form on their website and get a few lines of HTML code to place on your payment form. Your account is then connected to your wallet for payments.

Wrap Up

As we enter 2021, more and more customers are adopting cryptocurrencies as a form of payment. This means businesses need to do the same in order to keep growing. Use these best practices to create a seamless customer experience no matter what type of business you are and keep your revenue safe from hackers.


via https://ift.tt/3nYVAJw
12 Tips to Help Designers with Overnight Projects

Wednesday, December 30, 2020

Working in the creative sector is exciting and fun, but sometimes it gets equally challenging and nerve wrecking. Every project comes with a specific deadline, and as a graphic designer, there is some pressure mixed with tons of excitement for all the projects. Sometimes, while you are handling multiple tasks at the same time, it is self-evident that you get to work with short deadlines or lack time management. But at times, you even have to deliver a project the next morning, and shortage of time can also not be a quality factor. Almost every designer experiences this kind of situation once in a while, it is a prevalent issue, but it is avoidable with the help of some management skills. Working in a limited period with the immense pressure of a deadline, quality management, and credibility can be difficult to maintain. It can be an unpleasant experience that every designer wants to avoid. And to help you with that, we’ve put together 12 most useful tips to help you with your overnight design projects.

1. Relax and analyze:

Relax and analyze

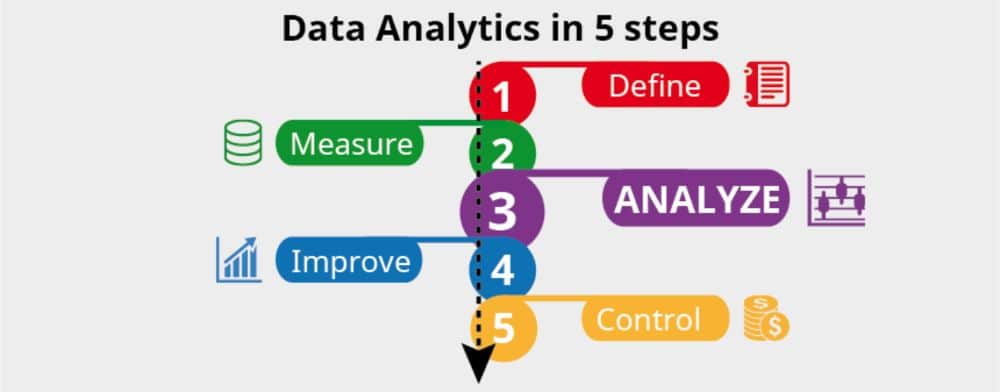
That initial point of nervousness due to the deadline and project length can make your work even more difficult and disturbing. It may seem impossible to achieve, but you still have to submit your project the next morning. So first, try to relax and take a brief look at the data that you have. Just analyze all the aspects you can, like what the project is, measure your ability, and how time-consuming it might be. Also, determine how many hours ideally you require to complete this, all the details of client requirements, and the efforts you need to put in to achieve this. This is a fundamental first step, especially when you are confused about where to start.

2. Take it as a challenge:

Take it as a challenge

Our second tip is that if you are considering a project as a task or as work that you are responsible for doing, you are very likely to miss the excitement and fun part of designing. On the other hand, you can see it as a challenge that can boost your confidence and make your working style a lot better and faster. You can also set a personal reward for yourself, be it a small pastry or a pair of shoes you were dreaming of buying. It can work as an excellent remuneration technique, and you can quickly help yourself get motivated to achieve this before the time is up. Studies have shown that the human brain is designed to work better under pressure. Pressure creates urgency and stress for us, and we always try to do our best in every situation. And hence, short deadlines can also work as a catalyst and help you understand the abilities that you are unaware of. You already know that you have limited time to focus on work and remove all the distractions that can block your way to complete this challenge.

3. Go through the client’s brief and overview:

Go through the client's brief and overview

Now it’s time to check what the whole project is in detail. This is the first stage of the task where you are reading and checking the client’s overview and brief related to the concept. Here you should understand all the necessary information that he wants to showcase. You are not supposed to miss any single detail mentioned because it is the whole outline of the project with the core information like how the client is thinking, what are his perspective and expectations and how you are supposed to deliver this to him. You can get your basic ideas from this. It can act as a necessary foundation in your project on which basis you can deliver satisfactory results with your creativity and ideology.

4. Do your research:

Do your research

After understanding the brief, you need to do your research to collect data for your project. Now what kind of research you should do and what data you require to complete the project entirely depends on the project itself, the company’s industry, and the respective client. But some basic research is the same in almost every case like the background and history of the company, latest industry trends and overall market trends, competitor’s approach and styles, your fellow graphic designer’s work, etc. you should do your research as per your thoughts and knowledge and combine them to fuel your brain in order to create the overall idea and concept for the project.

5. Management of time and task:

Management of time and task

When you have limited time to complete your project and don’t want to deliver any less quality to your client, it is highly recommended that you manage all the tasks and your time correctly. You have to count all the things you need to do, and all the time you have to do it. According to priorities and your skills, speed, and style, you should give different weights to all the hours left with you. You can divide the whole process into three major parts like research and concept finalization part, the actual work and implementation part, and the last review and retouching part. Going with a pattern like this, you can create a beneficial habit of working more professionally. Organizational skills do your work very well managed and neater, and eventually, all the results you deliver can become the reflection of it.

6. Sketch before you make:

Sketch before you make

This one is just a small and straightforward tip; in any graphic designing project, designers use multiple tools, techniques, and software. But making a rough sketch of a final output before you directly start working in your system is not very time-consuming. When you have tight deadlines, making a rough and small sketch first helps you take a look on paper at how your idea can look at the end. Sometimes what you imagine and what you create can go in different directions, but putting your imagination on paper first can help you to improve or revise your idea if needed. If there are any points that you are entirely missing, then they can quickly become visible on paper, and by this, you can save your time and energy from getting wasted in short deadlines.

7. Take a reference:

Take a reference

It is entirely okay to take a reference, and there is no rule that all projects must be based on your own ideas only. It does not mean that you are allowed to copy someone else’s work, but it merely means that you can take inspiration from your fellow graphic designers. Sometimes working on an overnight project, the stress and the urgency can block your mind from creating ideas, and at that time, it is highly possible that a fresh new idea can pop up in your head after looking over some great inspiration works. It is a simple and useful tip to get over your creative blockages, and it can help you deliver your project before morning and that too, with your unique creativity.

8. Have a look at your own work up till now:

Have a look at your own work uptil now

Keeping a mental record of your work is a secret tip to nurture your creativity. When you are working under pressure, sometimes your creativity can get shrunk, and you feel like your brain cannot churn out any new ideas. At that time, you can take a quick look over all your past works. They all are your creations, and they all have your ideas and vision, so when you are out of ideas, this can help you to open doors of your treasure of creativity, you can create something out of it, or you can take few ideas from multiple projects and create something different out of it.

9. Take a small coffee break:

Take a small coffee break

Yes, taking a break is the most important tip we can give out. Under the pressure of completing a project within a timeline, you might not even think about taking a break, but you should. Your few minutes away as a break can offer a lot of benefits to your project. Have some coffee or tea, listen to some music, and then come back again to your desk. After continually working on the same project, your brain and vision can get limited to that screen only. But after taking a break, you can notice small mistakes that were invisible to you before, and it can save your project from those errors in the end.

10. Review your work:

review your work

After finishing up with the project, you should not hurry to submit it just right after that. Relax and check your project with a sharp eye. It depends on the time you are left with but while deciding time management, make sure you keep some minutes for this part as well. Because reviewing your project before the client can help you make your creation even more perfect. Just remember all the aspects that you have considered in the first place and make some fair calculation of how much you have achieved at the end. Your concept, idea, and final look should match your expectations as well as the client’s expectations, so be your critic first and check all the details bluntly. This can eventually make you a perfection-oriented graphic designer.

11. Final touch:

Final Touch

A small tip can make your creation a little bit more beautiful. Before sending it to the client, give your own kind of a final touch, something that only you do in your projects, something that defines your style. It can be anything that can eventually become your identity as a designer. Many designers have their style, a small signature graphic or own kind of format, or pattern of displaying and presenting the project. It can be anything that you choose as your signature touch through which clients can easily remember you and your art.

12. Submit with a free mind:

Submit with a free mind

In the end, only one thing is left to do, and that is submitting your project. As per your opinion, you can decide whether you have completed this critical challenge or not, but now it is time to let the client decide. So, in the end, it’s only you and your creation, consisting of all your hard work, stress, brainstorming, restlessness, and time. Hence, do not overthink and try to ruin it. Submit the project and take some relaxing and fresh air. Once your project gets approval, you can enjoy that rewarded happy moment fully. But, if you get some rework, you can do it with all the new energy and creativity.

Conclusion

Creativity is an art of the brain; we create what we see, what we perceive, and how we feel in our unique way. Sometimes we can feel like going out of ideas, especially in the pressure of deadlines. It can be challenging and pressurizing for our brains, but nervousness and stress can make the process even slower. By following the tips mentioned above, you can make your work stress-free and time-saving. After practicing these suggestions for a more extended period, you can train your brain in a seamless pattern, which can change your whole process of working, and as a result, you can achieve your desired set of results and goals.


via https://ift.tt/3pDU93s

8 Quality Examples of Web Design Features That Increase Web Traffic

Monday, December 28, 2020

Technology has changed the way we live, communicate, and interact. It has become a major pillar underpinning the modern world. The internet has become the global market where anyone can shop anything at any time. With websites as the online stores where we buy products and services, companies are investing handsomely in web design to make sure their sites are appealing and easy to interact with for all visitors.

A website’s user experience determines whether the visitors will do business with the site or not. This is why websites are investing in web design features designed to improve user experience and increase traffic and the retention thereof.

1.     User Focused Designs

The most successful websites are designed with users in mind. In the eCommerce industry, designers center their sites on making shopping easy and hassle free. They label products clearly and place them where they are easy to find.

On review websites, designers focus on making the casino comparison process simple. Online-casinos.com for example, reviews the best online casinos in New Jersey through a neat, lean site that performs efficiently even on mobile devices.

That said, casino sites work a little bit differently.  They provide games from different software companies. They also have to work with varying banking companies. All the same, they must feature sites that make the entire gaming process delightful.

2.     Mobile-Friendly and Responsive Design

When having fun on an online casino or bookie, not everyone will prefer using a laptop or a computer. For most people, gambling is a fun way of passing time when they have some minutes to spare. Since people do not carry their computers and laptops around, mobile gambling has been on the rise.

However, most sites are not mobile friendly, and this can hurt the company’s performance significantly. It is, therefore, important to make sure that your online casino website is responsive and friendly to mobile devices such as tablets and smartphones.

Visitors browsing remotely with mobile devices make up the majority of internet users, and if your website is not friendly to these users, then you are losing great web traffic. Visitors will appreciate a mobile-friendly site by visiting again and again. This will mean consistent business with regular and loyal customers.

3.     Easy to Use Web Design

Your website’s visual appeal is important, but if your web visitors have a hard time to get around, all that will be in vain. Web visitors will leave the website immediate they realize they cannot easily find what they were looking for. It is, therefore, in your best interest to design your website in a logical and easy to use manner.

You want your web visitors to find the information they need with just a few clicks. This means having a sitemap, contact page, company page, and other important pages linked on your home page.

You can include a search bar on the website’s homepage if your site has numerous pages, or integrate helpful additions such as Google Maps to show the location of your retail casino.

4.     Loading Speed

How your website loads can either increase or hurt your web traffic. If your site loads slowly, its user experience (UX) will be poor, and visitors will bounce back to the search engine results page (SERP) to click on a competitor’s site.

Google search engine algorithms will also penalize your site by ranking it lower in the SERP for slow loading, which amounts to poor UX. Most Google users click on the top-ranking results on the first page of the SERP.

Some web content, such as images and videos, can slow down your site’s loading speed. However, this type of content is important for competition. To incorporate them and retain a high loading speed, you should compress these large file media content.

A web design that allows the use of such content and at the same time improve search engine and visitors’ experience on your site will help increase your web traffic.

5.     Having a Blog

Business blogging is one of the major factors that drives traffic to websites with a blog. With more content on your blog, it means you have more chances of being found on the search engines. Again, if you shared your blog content on your social media accounts, you will reach a larger audience and hence attract more web traffic.

Fresh content is one of Google’s ranking factors as it recognizes your efforts to provide consistent, useful content. This prompts Google to send more traffic to your site by ranking your webpages higher on the SERP. A blog is such a powerful tool that if used effectively, it will demonstrate your industry expertise and knowledge.

6.     Optimized Content

For search engines crawlers to rank you high on the SERP, your web content should match the search intent of the users. On-page optimization is the process of incorporating the relevant keywords in your webpage content, URLs, title tag, page title, and in the meta description.

This helps both the search engine and its users understand the content your webpages offer. Your web design strategy should ensure that your webpages are optimized in such a way that they can be easily crawled, indexed, and ranked.

7.     Great Website Architecture

Website architecture entails how your webpages are organized and linked to each other. A great website architecture makes it easier for search engine crawlers to find, index and rank your web pages. A website with a great website architecture is more likely to rank higher in the SERP compared to one with poor architecture.

You can improve your websites’ architecture through proper internal linking. Internal links help to show how your web pages are related and linked to each other. A great website architecture will also improve user experience as visitors can navigate through your site with ease.

8.     Sharing Features

Building a site that can be shared will help increase web traffic. If you have recently visited a serious website, you will recall seeing a share icon that prompts and allows you to share the webpage’s content to your business and personal social medial accounts.

If your web design allows visitors to share your content, they will be inclined to share it for others to see and engage with it.


via https://ift.tt/3pvr0Yl

WordPress Child Theme Design – Tips and Tricks

Thursday, December 24, 2020

WordPress themes are something that all WordPress powered websites need. And at some point in time, we need to revamp the website to improve its appearance and performance. There are various kinds of WP themes that we have formed a collection of in our blogs. Every website owner should look at those themes to see if any of them fit their website and its requirements. But, there is also a concept called a WordPress Child theme. A child theme is a WordPress theme that takes template files and features from another theme. Here, the theme from which the features are taken is called a parent theme. There are many benefits to using a child theme, but the most important one is that when the core functionality of your parent theme is updated, your customizations in a child theme stay in place.

Let us dive a little deeper and understand the meaning and importance of the child theme. Moreover, we are also going to take a look at the tips and tricks when it comes to designing child themes in WordPress.

1. Defining the WordPress Child Theme:

Defining the WordPress Child Theme

So you must be wondering about the meaning of the WordPress Child theme. A child theme is one that borrows or picks up the templates and files from another theme. Thus, the child theme takes up functionalities and features from the parent theme. Hence, the theme that picks up the features from another theme is called the child theme. And the one that provides the files and features to the child theme is called the parent theme.

The folder of the WordPress child theme can include a CSS file. And, parent themes tend to get updates after every little interval of time. But, you can customize the code of the theme to turn it into something that your website needs. In such a scenario, if you update the theme, you lose all the customizations. You can choose to ignore the updates, but that would mean that the security would be less.

A child theme is said to work in a way similar to the parent theme. This happens because we mentioned that the child theme takes up the features from the parent theme. The theme still behaves like the parent theme without copying the files from the parent theme to the child theme. The secret lies in the style.css file of the parent theme. To create a child theme, you have to build a folder in the WordPress themes main directory. Name the folder accordingly. And put the following line of code in the style.css file in the child theme’s folder:

/*

Theme Name: The name of the child theme (e.g., The WordPress Child Theme)

Theme URI: http://www. Child Theme Example .com (Your child theme’s URL)

Description: A short outline of the child theme

Author: Here goes the name of the developer of the child theme

Template: Directory name of the Parent theme(e.g., Parent-Theme, Main-theme, etc.)

Version: 1.0.0

*/

Now, edit the sixth line in the code given above and place the following code:

Template: Name of the Parent theme directory

This lets the WordPress child theme know which one is its parent theme. And that is the theme from where the child theme can take up the functions and features. Once this is done, the child theme gets the features and files from the specified parent theme. And the child theme is successfully installed on your platform. In short, the template line decides the inheritance of the parent theme when the child theme is triggered.

2. Benefits of activating a Child Theme on your website:

Benefits of activating a Child Theme in your website

As we have already established that the parent theme offers some or more of its features and functionalities in the child theme. This enables you to update the parent theme whenever the upgrade is available. In such a situation, you can use the features of the parent theme in the child theme. Hence, as the parent theme gets an upgrade, you can safely update the parent theme. And it does not disturb the child theme at all in the process.

The flexibility that comes with a child theme is innumerable. It lets you build new templates that don’t come from the parent theme. Moreover, it is also possible to add new features and extended functionalities. For this purpose, you can access commercially and freely available tools.

While using the child themes, the best thing about them is, it is easy to deal with the problems that show up when the line of code is missed out. WordPress is quick to provide a solution to that kind of issue using the parent theme. But this is possible if the line of code exists in the parent theme too.

3. Creating a WordPress Child Theme:

As daunting as it looks, the process of building a Child theme is effortless and straightforward. You can access the child theme builder for an empty child theme, use a plugin, or create your child theme. Let us take a look at each in a detailed manner.

1. Using a Child theme builder:

Using a Child theme builder

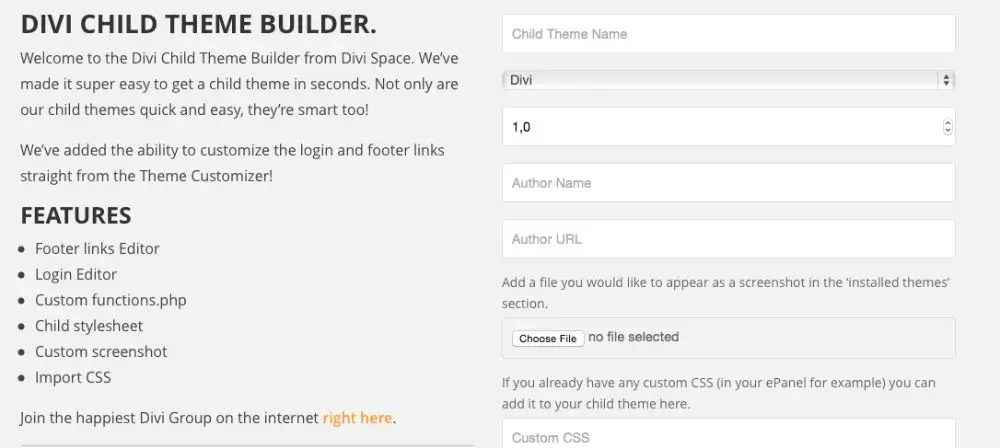
Divi Space provides a great tool with which you can use the child theme builder to build one. You can use the tool for free. In this tool, you have to enter all the details in the provided text box, and everything is downloaded. As it is done, all you have to do is upload the zip folder to the WordPress console. This should be done once the installation and activation of the theme are accomplished.

2. Creating a child theme using a plugin:

Creating a child theme using a plugin

To make the process even simpler, you can take up a plugin to support the process of building a child theme. Once you download and install the relevant plugin, the Child theme builder shows up in the menu item. This all happens within the settings menu of the WordPress console. As you reach this point, give a new title to the generated child theme along with the description. Now click “Create Child.” As you do this, an empty theme is generated.

3. Building your child theme:

Building your own child theme

If you are interested in seeing what goes into building a child theme from scratch, then you should take up this step. It is a good idea to take this step up if you want to gain some wisdom on how to build a child theme from scratch.

This process needs an Integrated Development Environment (IDE) working on your system. And then you have to create and save some relevant files. But Brackets and Sublime are the editors that you can use for free. They also come with color codes to make everything easier. Moreover, you can also use TextEdit on the MAC system or TextEditor on PC. In either of the tools, you have to be careful when it comes to writing and editing the lines of code. One mistake and the entire code can go down the drain. So you have to follow the following two steps:

  • Build a theme directory in the website’s directory.
  • Generate a style.css with the child theme’s details and information in it.
  • Take a screenshot.

If you have been working with a local host server, you have to go to the right folder in your website’s directory. Here, you can find a folder that consists of all the files. But if you are dealing with a live server, configure all the folders and files and take up an FTP client once everything is done. Under the themes folder, build a new folder and give it a title that is relevant to the client. For instance, you can name it “child-theme” at the end of the folder’s title.

1. Create a theme directory:

create a theme directory

Create a folder in the directory of the theme for the child theme that you want to build. Add a name to it. Let us, for instance, name it DiviChild.

2. Style.css:

style-css

Now, create a stylesheet file for the theme named “style.css.” Put the following code in the IDE. Rename the file as per your requirements.

/*

Theme Name:   Divi Child Theme

Theme URI:    https://MyWebsite.com

Description:  Child theme, according to Divi

Author:       Name of the author of the theme

Author URI:   https://iamauthor.com // Your web address

Template:     Divi

*/

Make sure that you change the details where your information has to be fed. But the essential things in the code are the “Theme Name” and “templates” section. The text specified in the “Theme Name” is displayed in the appearance>Themes of the WordPress theme list. The “Template” defines the name of the parent theme from which the feature set should be taken.

3. Functions.php:

functions-php

Start with functions.php file and open the IDE. Take up the first block of PHP code or use the code given below:

<?php

Add_action(‘wp_enqueue_scripts’, ‘enqueue_parent_styles’);

Function enqueue_parent_styles()

{

Wp_enqueue_styles(‘parent_style’, get_template_directory_uri().’/style.css’);

}

?>

Put this code in a new file and ensure that all the file paths and directories are mentioned correctly. These directory paths of parent and child folders should be given correctly. Save the file as functions.php in the child theme’s directory.

4. Ways to Install the WordPress Child Theme:

ways to install the wordpress child theme

As the WordPress child theme has been successfully built, now it is time to install it and use it on your website. The process remains the same whether you work on a local server or a live one.

To install it, take all the files into a folder and compress the folder to create a zip file. Make sure that a WordPress instance is installed and functional on your system. Install the Divi.zip file using Themes>Add New section of your WordPress Dashboard. As you are done installing, click Activate. Now, Divi runs as a parent theme here.

Now, go back to Themes>Add New section of your WordPress Dashboard. Choose the zip file of the child theme that you built. As you are done with the installation, it can be activated to get it running.

5. Customizing the Child Theme:

The purpose of building a child theme is to customize an already existing theme. Hence, let us take a look at how you can customize the WordPress child theme.

a. Applying customizations in the child theme:

applying customizations in the child theme

As we created the first file that was style.css, we should start changing the code in that file. Adding a custom code in this file, you can override the parent theme’s behavior and feature set. Using the CSS file, all kinds of modifications can be made to the child theme. With this file, you can change all the styling in the resulting child theme.

To do this, you have to add a custom code at the bottom of the CSS file of the WordPress child theme.

Conclusion:

Using ready-made WordPress themes is one thing and creating a customized theme out of an already existing theme is another. Moreover, all the themes that are available online are ready to install. But if you want a customized theme, you don’t have many options to get them ready-made. For that, you have to write down the line of codes to make sure that the theme you want is customized. Hence, in the WordPress jargon, the customized theme is called a child theme. The reason behind this is that the child theme comes out of a ready-made theme. And the child theme picks up the feature set of the parent theme or the ready-made theme. Thus, the child theme does not pick up the upgrades when the parent themes are rolled out. And this makes sure that the customizations are not lost. This blog helps you understand the usage, creation, and benefits of using the child theme.


via https://ift.tt/3piX7dN

13 Amazing Animal Illustrations

Wednesday, December 23, 2020

Graphic design and illustration design are technically two different areas of work. But these two usually overlap each other in one way or another. Generally, a graphic designer tells a story or conveys his or her message through text and pictures, but they can also use illustrations sometimes to make the designs even more effective. Illustration means portraying a story, message, object, concept, etc. in a creative and attractive visual image format rather than just text or photographs. This is a beautiful way of art and it is highly demanding in every possible business sector. Because they are unique, attractive, universally appreciated, and give better message delivery, illustrations are always on the top of the list in global trends. Illustrations are like digital versions of paintings and drawings.

Anybody can need them in any sector regardless of their purpose and knowledge. In the article, you are going to see a number of beautiful picks of animal illustrations. Animal illustrations can be used for many different purposes like designing, logo creation, education, cartoons, campaign creation, etc. Let us take a look at our specially curated list of 13 amazing animal illustrations.

1. Funny penguin illustration:

Funny Penguin Illustration

This illustration is available on the Behance website and it is illustrated by the artist Diana NB. on this site you can check out the illustrations and you can hire the artist as well. Talking about the illustration, the artist has created this in a very creative yet funny way, there are another 5 animal illustrations created by the same artist under the name the usual suspect and they all are created in the same theme.

Here penguin is standing with a height measuring background in behind and the background is black and white where the animal is colorful. This is a great combination and thought. penguins are generally innocent and calm but here penguin is an aggressive expression which makes this illustration is a bit funny and unique.

2. Poster illustration of a lion:

Poster Illustration of a lion

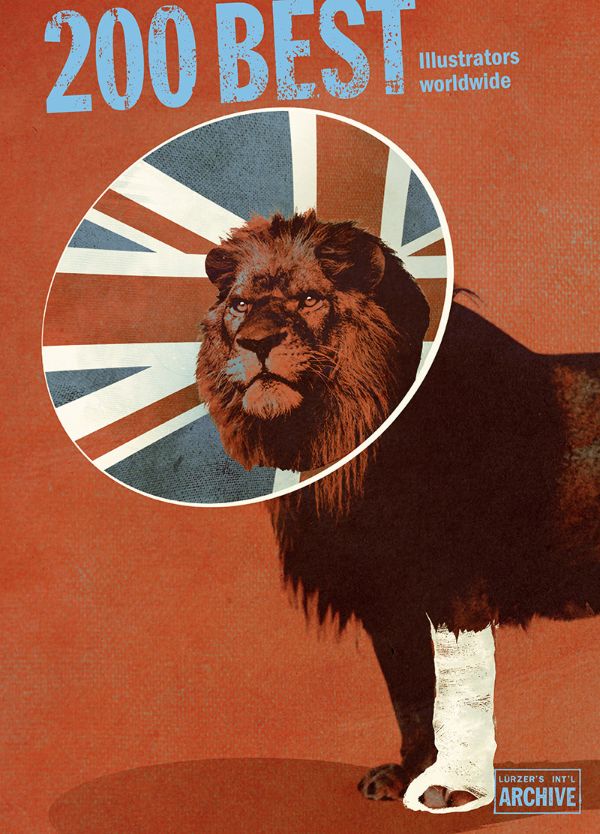
This illustration is available on the Annagoodson website. This is a UK based illustration agency where you can check out the artists and hire them as well. This illustration is created by the artist andy potts. So coming back to the illustration, this one is a very attractive and classy illustration of the lion and it is presented in Lürzer’s Archive poster which is a Vienna-based magazine. Here illustration is based on a monochromatic theme and the lion is presented very differently.

He is injured and wearing a protective cone on his head which is having a design of the UK’s flag, his one leg is shown in bandages and he is looking very furious and angry. The color theme, animal selection, his illustration, and his style is easily giving out vibes of some tension or crisis. This is a perfect example for a graphic designer who wants to make a poster using an animal illustration and wants to portray some theme or concept through the appearance of that animal.

3. Single shape illustration of an Owl:

Single shape illustration of an owl

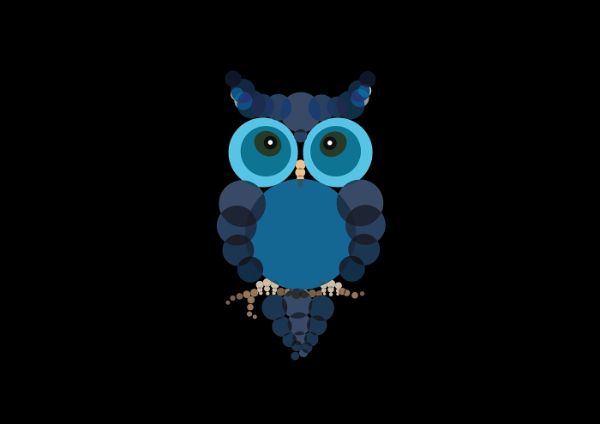
This illustration is available on the Behance website. Here you can check out artworks and hire the artists as well. This illustration of an owl is created by the artist Ambika Unny. Here this illustration is something different. It is beautiful and perfectly balanced. It is simple and very clear. Artist has created this by using only one shape and that is ‘circle’.

This is one of the oldest and finest techniques for designing. The whole shape of an owl is made by using different sizes of circles. Only for his beak, his eyes, and for branch she had used a different color otherwise, the complete illustration is in different shades of blue. This can be a great idea to make any animal illustration simple and attractive.

4. Rabbit Illustration Picture book type:

Rabbit Illustration Picture book type

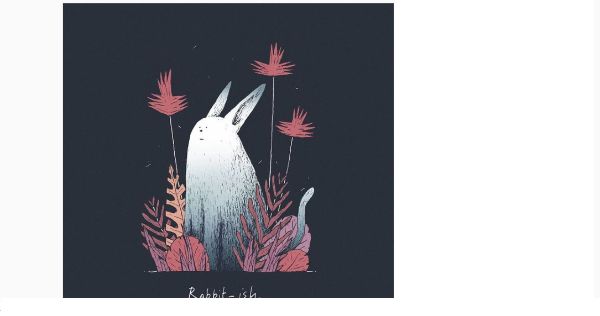
This illustration is available on the Instagram page of the artists ben and Elsa. You can contact them and follow them for more information and artworks. Here the illustration of the rabbit is very contemporary. We have generally seen rabbit as fluffy and cute animals they always have cute smile and innocent face with small teeth.

But here artists have created it a bit differently, rabbit is not white as you see normally in any picture or illustration. He is in blue shade and he is expressionless. The illustration is having pencil strokes and dull colors. It is very unique and a perfect inspiration to make illustrations for children’s books since it is very suitable for kid’s storybooks.

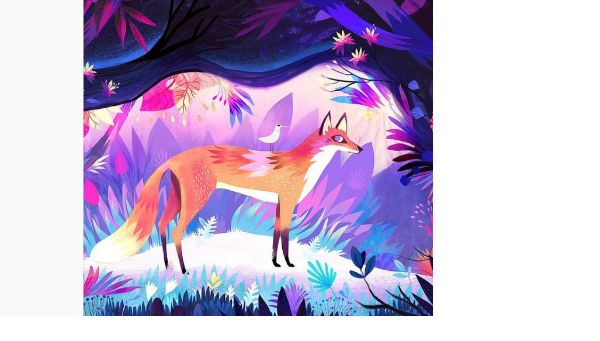
5. Colorful illustration of the fox:

Colorful illustration of the fox

This illustration is available on the Instagram page of the artist Orbendorfer Juliette. You can check out the artist and follow her for more information and artworks. The illustration of the fox is very eye-catchy you can see so many beautiful and vibrant colors here. the shape of the fox, leaves, small bird, and flowers are very sharp and pointed, which makes the whole composition even more dramatic.

This style is a favorite style of many illustrators since it can give a perfect attractive look and vibrant and dramatic vibes which can be used in so many things for so many purposes. It can serve as a great inspiration for animation storytelling and for attracting the younger generation’s attention.

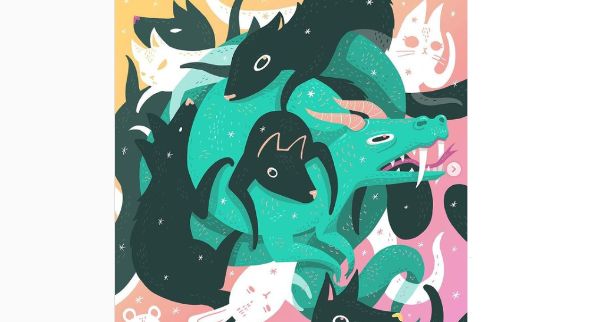
6. Single Creepy illustration of multiple animals:

Single creepy illustration of multiple animals

This illustration is available on the Instagram page of the artist Kelsey king. You can follow this artist and check out more of his work. This illustration of his is completely out of the box. It is so unique and mischievous. He had used a bit of a monochromatic theme and complementary style in color selection. In this single artwork there are so many animals and in that too in creepy style. There is a dragon, wolves, rats, and cats in this illustration; they all are oddly placed around each other.

The background is gradient and cats are presented as ghosts here, the color of the dragon, rats, and wolves are dull shades of green which is making it enough creepy. This is a perfect example of any horror theme based illustration. It can be used for ghost stories and Halloween concepts.

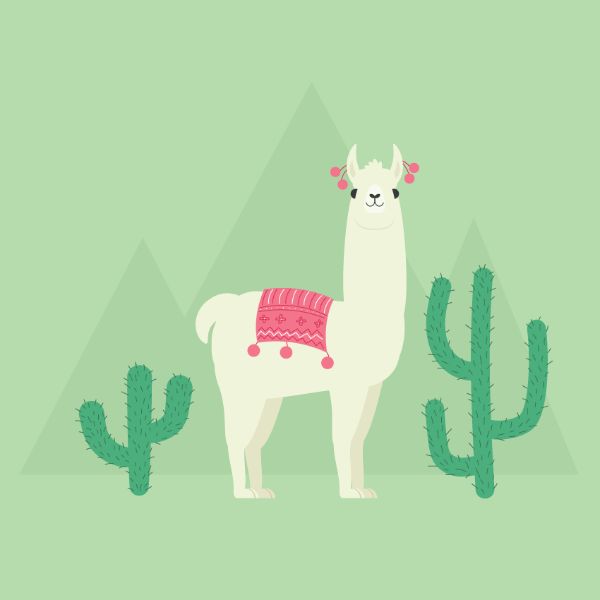
7. Easy LIama illustration:

Easy Llama illustration

This illustration is available on Envato tuts+ portal. This is an online learning platform by Envato. Various courses are available here along with designing. So this illustration is by Natalia dolotko and a complete tutorial is available by her which is completely free for anybody to learn. This illustration of the llama is very simple and cute. Llama is a very adorable animal and the illustrator has presented it in the same way. It is not having many complicated shapes or several colors. Just a simple technique to portray the simple animal along with some shapes of mountains and cactus in the background. You can learn this technique to make similar animals like a camel as well.

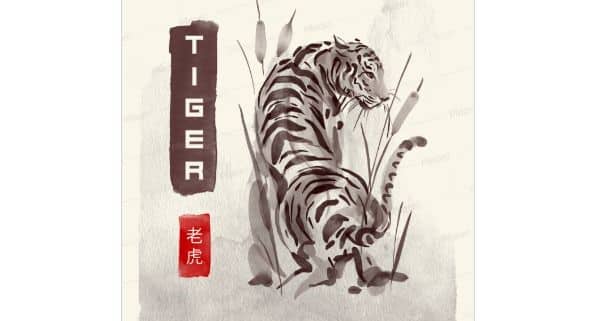
8. Watercolor illustrator of the Tiger:

Watercolor illustration of the tiger

This illustration is available on the place it by Envato. You can purchase various designs from here. This one is a t-shirt design template and it is a watercolor-based illustration. Here the background is in pale white and the tiger is in black strokes. It just looks like watercolor art but it is created digitally. This exhibits a very simple and beautiful design for T-shirt printing. Tiger is not created precisely here and hence the abstract look makes it a very cool and funky design.

9. 3D illustration of an Elephant:

3D illustration of an elephant

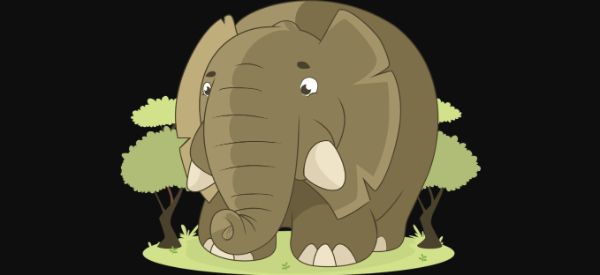
This illustration is available on the Pixabay site, you can download it for free from here. This is a 3D illustration of an elephant. It has balanced colors to give out the impression of a place in a jungle. This has comic touch since the elephant is standing in the jungle as a carefree animal. That is only possible in imagination and that’s what only imagination can do. Nowadays 3D illustrations are playing a dominant role in the market and because they are more appealing they are more demanding and expensive as well. This idea of the illustration can easily be used in animation storytelling, comic, and cartoon designs.

10. Dinasour illustration in a Logo:

Dinosaur Illustration in a logo

This design is available on the dribble website and it is by the designer Gert van Duinen. This site allows you to explore designs and hire a designer as well. Here the designer has used the illustration of a dinosaur in the logo of some wine company whose name is Jurassic wine. This is a very clear example of how graphic designer use illustrations in their work, the logo is very simple but the idea is so amazing. The older the wine better the wine that is why the name of this company is Jurassic wine and thus the logo is also containing an illustration of a dinosaur. Completely justifying the meaning and purpose. So that’s how you use illustration techniques in your graphic designing work.

11. Funny sloth illustration:

Funny sloth illustration

This illustration is available on the Instagram page of the artist Keigo. You can follow him for more artworks and details. This illustration is a perfect example of how illustration is an amazing art. Here the artist has created an illustration of a sloth who is very much a lazy animal by nature and he is ironing a shirt in this image. The best and funny part is it’s showcasing how lazy a sloth can be that he is ironing a cloth but scorching the same before finishing his first movement. It is such a creative and funny idea. Apart from the whole idea illustration is very simple and clean. No excessive effort is given nor was needed. That’s his style and that can also work, sometimes the portrayal of a message is so unique and amazing that the illustration does not require much of an artistic way. It is completely up to you what your creativity is and how you want to execute it. This is a great inspiration to promote the fact that how big the idea plays a role in art.

12. Dark illustration of a Wolf:

Dark illustration of a wolf

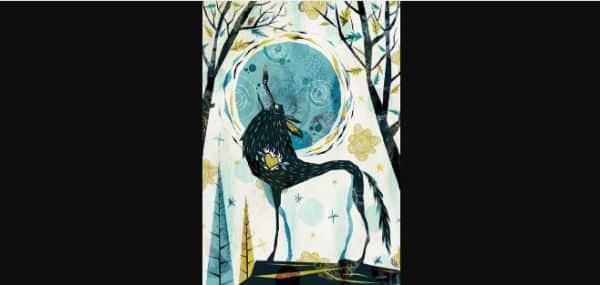
This illustration is available on Pinterest and you can save it to your collection from here. This illustration is not portraying a wolf as an aggressive, strong, and wild animal but it is showing the other side. This illustration is about the heart that an animal has, and that heart is broken which is why the wolf is looking above the sky with despair and sad eyes. What a beautiful idea and what a beautiful illustration! The composition of this illustration is with sharp and pointed shapes along with dark and dull colors. That is why this illustration looks dark, sad, and gloomy. That is how an artist has created it to showcase the emotional side of a wild animal. This is something you can’t see in reality that is something only you can only showcase in an art form. So that’s how illustrators use their imagination and creativity to showcase the hidden beauty of our world which is why this one is a perfect inspiration to create something unexpected, undiscovered, and unseen.

13. Funny illustration of a Panda:

Funny illustration of a panda

This one is also by the artist Keigo and it’s available on his Instagram page. How simple and amazing illustration it is. Artist has shown panda here with very simple art, there is no background and no other element yet this is worth remembrance. Panda whose eyes are very small and complete black around the black circle is trying to curl his lashes but in the second image, he is disappointed because it still doesn’t make any difference his lashes cant be seen in any case! This one is another funny illustration with a simple technique. These kinds of illustrations very well opt for marketing purposes since they can make great campaigns. So illustrators and graphic designers should take some inspiration from these kinds of things to deliver perfect results.

Conclusion

Imagination has no limits and the only boundary of your creativity is only you. So if you are an illustrator or graphic designer, above mentioned all creations can help you to get inspiration and make your design amazingly creative. If you are looking at some of the best artworks of animal illustrations to get an idea about your design then you should not skip even a single illustration from the above list. We have captured great varieties of work from different artists and different perspectives into this small list for you to expand your range of imagination. Some of them you can use because they are available on free sites, for some of them you need to contact the artist so go accordingly if you want to use them for any kind of purpose.

The post 13 Amazing Animal Illustrations first appeared on Line25.


Source: https://ift.tt/2KRHDhI
 

The Cash Box Blueprint

Most Reading