Using Adjustment Layers in Photoshop

Tuesday, December 31, 2019

Photoshop is the go-to software for all designing requirements, be it individual projects or professional assignments. Many features help transform an image into a more usable version of itself. One such modification option is Adjustment Layers in Photoshop.

Adjustment Layers refer to the process of using a powerful set of a group that is useful for non-destructive image editing. Moreover, it allows you to add color and make tonal adjustments to an image. And it doesn’t even make any permanent changes to the picture’s pixels.

The most known advantage of using Adjustment Layer is using it; you don’t need to worry about losing the original picture.  It allows you to edit, discard or restore your adjustments at any given point of time. This helps to make the workflow more efficient and flexible.

Other than this, it helps fix exposure and brighten portraits.  If the image is underexposed, you can correct it using adjustment layers by brightening the shadows on a subject’s face. On the other hand, if you need to recover details from slightly overexposed skies, adjustment layers can be used to.

Adjustment layers are also used for advertisement for web and print.  Adjustment layers are used in several instances to create layouts for posters and ads. You can use it to change the color of anything. Other than that, you can use adjustment layers to correct and color grade.

Now that we have briefly covered the benefits of using Adjustment Layers in Photoshop, let us understand how to use them:

1. Adjust Contrast/Brightness:
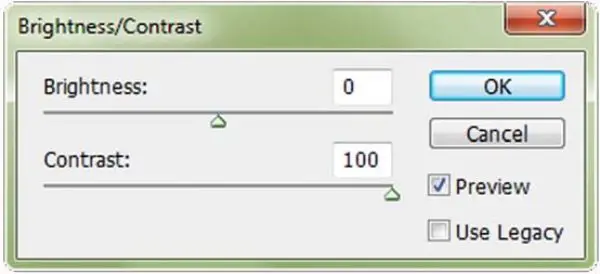
Brightness and Contrast slider in Photoshop

By making adjustments to the contrast and brightness of the image, you can affect the tonal range of the image. Brightness Slider helps to adjust the highlights of the image, whereas the Contrast Slider helps to make adjustments to shadows of the image. Changing these helps set different moods to the image.

2. Use Levels:

Using levels adjustment layer in adobe photoshop

Levels let a user modify the tonal values of an image further. This is done by adjusting the levels of mid-tones, shadows and highlights. Levels are often the most frequently used tool in the adjustment layer panel. Using a hint of levels can also bring significant changes to your image.

3. Understand Curves:

Understand cuves in Photoshop

Using Curves is one of the strongest and most flexible methods of adjusting the tonal range of an image. It allows you to add as many anchors as needed throughout the image.  The Curves tool is also one of the most precise tools for tonal range modification. Pressing on curve adjustment would show you a diagonal line on a graph. This graphic representation of your image’s tonal range helps understand the image much better.  On the x-axis, it shows the original values of the image, whereas the y-axis shows the new adjusted values. Both axes have a gradient strip from black to white that represent the tonal range of the image.

You can increase the overall contrast and quality of the image by clicking to add points on the line of the graph. After adding a point, you would be able to drag it up or down using your mouse. If you pull it down, it darkens the image, whereas pulling it up would brighten it.  You can add two points and use one of them too bright out the highlights and the other to pull out the shadows of an image by pulling one point up and other down.  This would create a slight S curve.

4. Set the right Exposure:

Exposure adjustment layer in photoshop

For any image to look good, its exposure needs to be right. Depending on the mood, the exposure should be set in a way that brings out that mood. A well-exposed photo doesn’t necessarily mean a neutral image; it can be manipulated to be a low-exposed picture or a high-exposed picture. The only thing is to be cautious about the detail of the images. Ensure it isn’t compromised upon when we experiment with exposure.  Adobe Photoshop allows setting or adjusting Exposure with three sliders- Offset, Exposure, and Gamma.  Offset focuses on mid-tones, Exposure would modify the highlights and Gamma helps to adjust the dark tones specifically.

5.  Changes in Vibrance:
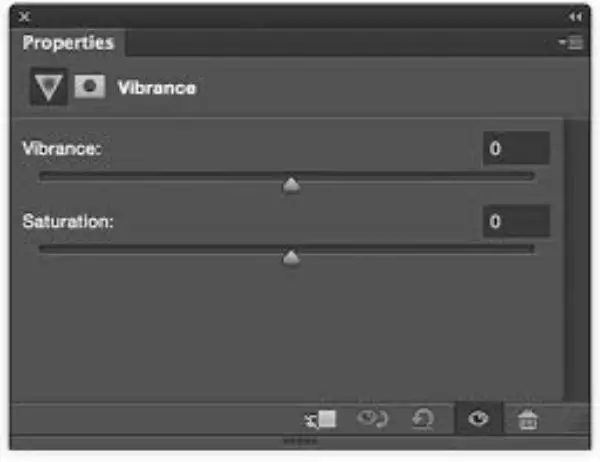
change vibrance in photoshop

Vibrance is changing the tones for the muted colors, skin tones and already saturated colors alone.  Using the Adjustment Layer allows you to modify the vibrancy of an image in two methods. There is a Saturation slider that affects all colors of the image.  The other Vibrance Slider is more accurate to its name; it also affects the saturation of the colors. However, it is more selective and focuses on the least saturated colors, also avoids oversaturation of skin tones.

6. Changes in Hue/Saturation:
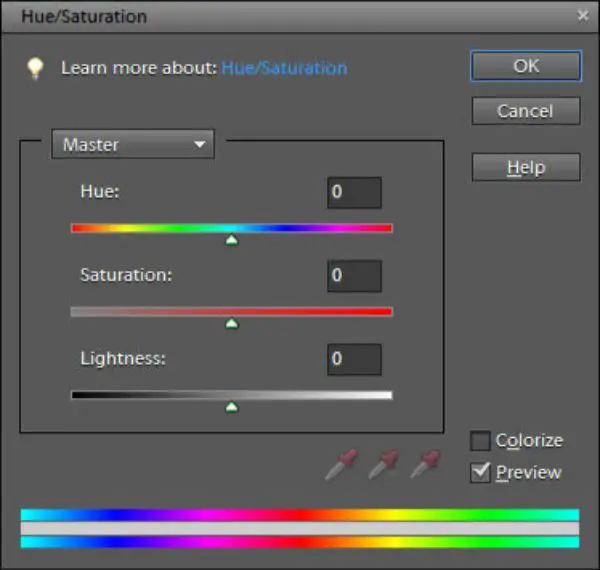
Hue and Saturation slider in photoshop
Hue and Saturation allow you to adjust Hue, Saturation and lightness of the entire image. You can also use it selectively for a specified of colors in the image.  You can adjust the sliders to either increase the saturation of the entire image or use a preset from the drop-down menu. One of the options, for instance, is Greens. If you select greens, the tool would look for all green color elements in the image and reduce the saturation of those elements specifically. Green is generally not very soothing to the eye; hence lowering its saturation can give the overall image a better feel.

Generally changing the overall saturation of the image is not a good idea. It reduces the overall tonal range. Targeting the saturation of specific colors gives you greater control of the image editing experience. This can also help to colorize the grayscale images.

7. Color Balance:
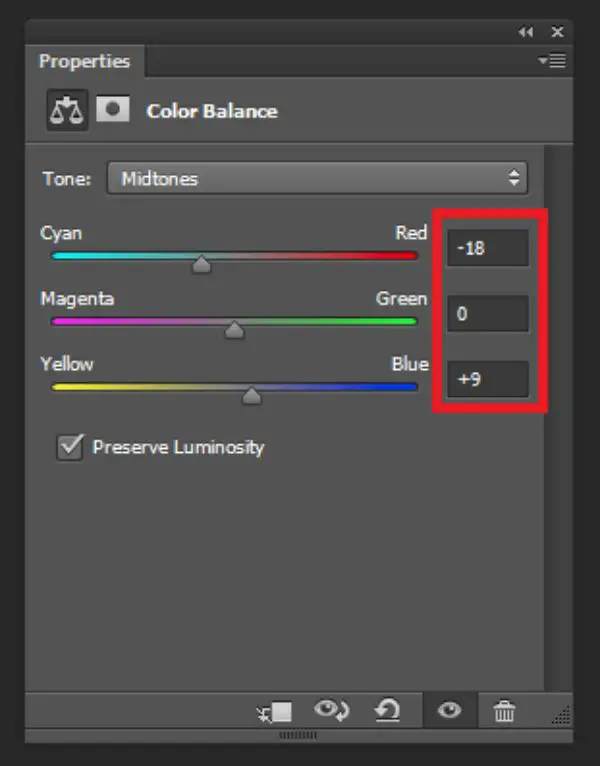
Color balance enhancements in adjustment layer photoshop

Color Balance allows the user to manipulate the mixture of colors in an image. For instance, in this image, the selection of the butterfly’s wing and adjusting the color balance sliders brings out the red and magenta tones in its wings.

8. Adjustment in Black and White:
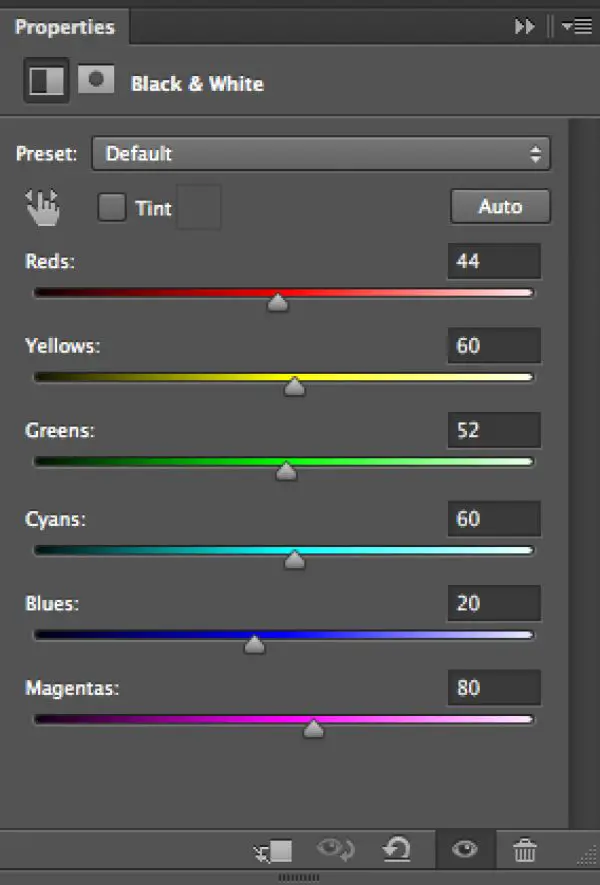
adjustment layers in black and white image using Photoshop

Black and White adjustment option allows you to make grayscale versions of the images. The left image is the default setting. To the right, the image preset is changed to Custom. This allows changing sliders that in turn gives more control over how the reds in the wings of the butterfly were converted to black and white.

9. Using Photo Filter:
Using photo filter in photoshop

Photo Filter adds a different color filter as a layer on top of the original image.  Keep the Preserve Luminosity box is kept checked. Just by adjusting the density slider, the intensity of the effect filter on the image would change. Another option is to customize an individual color filter. To do this, you can double click the color swatch from the properties panel. Then you can adjust it by the Color Picket window that would pop up.

10. Understand the Channel Mixer:
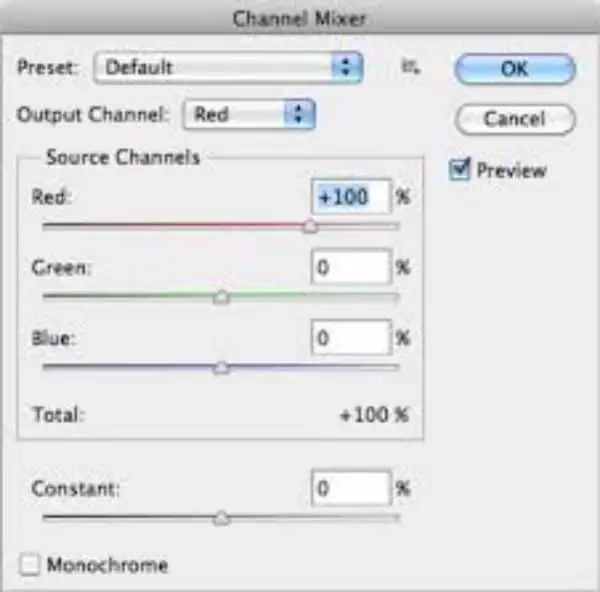
channel mixer adobe photoshop

Channel Mixer helps the user to modify the colors of the image.  It can be used for creating grayscale and tinted images. To the image on the right, the red channel is used for bringing out a red tint in the image. For the image on the left, the Monochrome box is checked.  Then adjustments are made to the sliders for ensuring better color conversion to grayscale. Keeping the channel on 100% gives you the best results.

11.  Color Lookup:
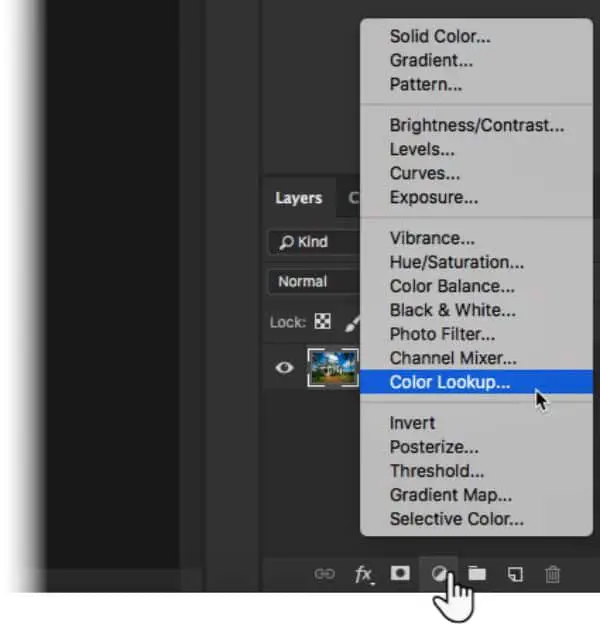
color lookup adjustment layers

Color Lookup is an adjustment that has many prepackaged looks for you to apply to the image you’re working on. There are three different options- Abstract, Device Link and 3DLUT File. All these options load the image in a different look. Each look is made by remapping the colors in the image with the help of a lookup table (LUT).  This creates pretty exciting effects, and Photoshop allows you to make your LUTs if you use Adobe Speedgrade.

12. Making use of Invert:
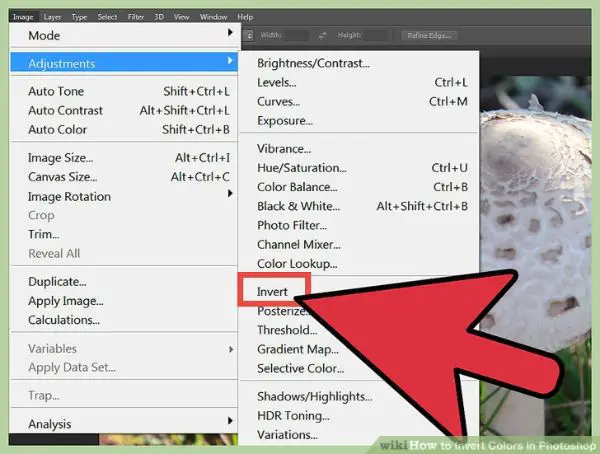
Invert adjustment layers in Photoshop

Inver adjustment layer helps bring out the negative effect by inverting the colors of the image. Inverting color is essential when you’re working on client projects at times. To invert the color of an image, simply open the window menu, select layers and reveal the layers panel. Now using any selection tool like Marquee, Magic Wand or Lasso make a selection that you wish to invert. If you wish to invert the entire image, you need not make any selection. Now you can click on create new fill or adjustment layer button and choose invert from the drop-down menu. Now you can drag the inverted layer up or down the layers stacks to bring it to a new position.

13. Posterize effect:
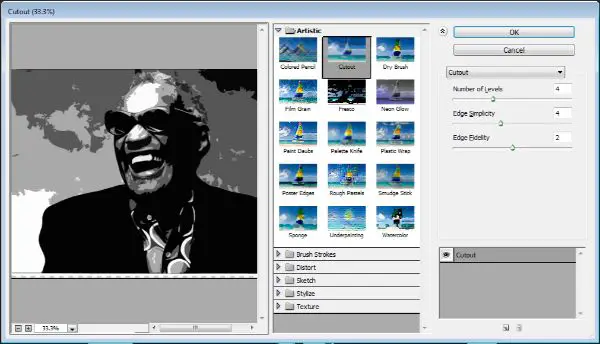
Posterize effect in Photoshop

Posterize effect helps produce a flat poster-like appearance.  It does so by reducing the brightness value numbers in the image.  To posterize photos on Photoshop, you can go to the adjustment panel. Using Posterzie effect allows you to specify the number of brightness value using a slider.

14. Changing Threshold:
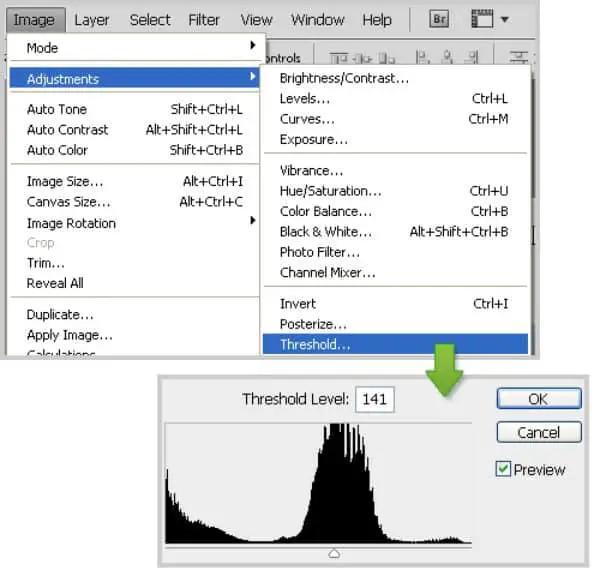
Threshold adjustment layers in photoshop

The Threshold tool converts the image to black and white. For instance, the flower is selected individually to change the threshold values of the flower only. Increase or decrease the Threshold controls, for manipulating the number of pixels turning black or white.

15. Using Gradient Map:
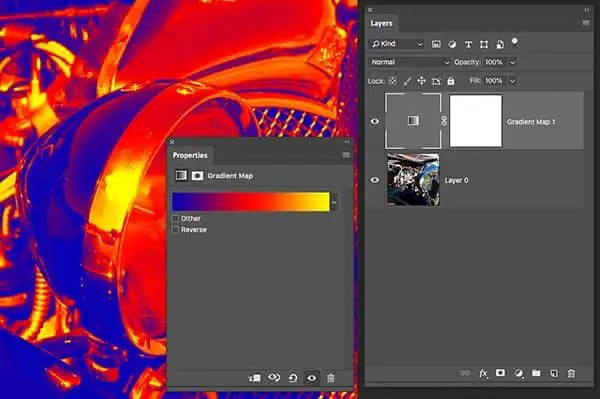
Making use of gradient map photoshop

This tool allows the grayscale range of an image to a custom gradient fill. It comes with different gradients that you can adjust as per you want, by using the gradient editor window. If you check the reverse box, it inverts the colors of your gradient.

16. Selective Color Adjustment Layer:
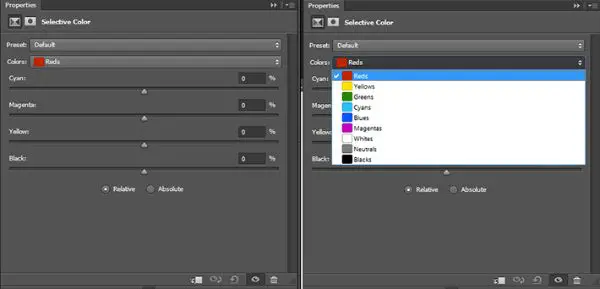
selective color adjustment layer photoshop

Selective Color adjustment layers allows to selectively modifying the amount of a single primary color without affecting the other primary colors in the image. For instance, there is a lot of red in the image , hence if we select red in the drop-down menu as the color that we want to change; it would adjust the values for that color. Then you can drag the slider around properties panel for decreasing or increasing the components for the reds in the image.  Hence you can change an image’s reds without changing greens of the photo. This is a very specific tool for precise editing and is generally used for skin tones corrections.

These are the several tools for adjustment layers that you can use to refine images in greater depths to bring out the true potential of an image or to change it in a way that suits the purpose. Each of these techniques is great to master, as all of them are non-destructive editing techniques.  With repetitive practice, you can master each adjustment layers to their full potential. There is a lot more to do with adjustment layers that you can explore as you practice.

The post Using Adjustment Layers in Photoshop appeared first on Line25.


Source: https://ift.tt/2MH82gA

20 Awesome Font Pairing Tools for Designers

Monday, December 30, 2019

Paring the right fonts in the designing process can really make your website or any graphic design project stand out. It is important to choose the right fonts combinations according to your project’s overall look and feel.

When you need to use more than one font for a project, it may be difficult and time-consuming to find other fonts to pair it with. This is where font pairing tools come in handy! Designers always appreciate tools to make their lives easier, such as coding tools for designers or font pairing tools featured in this article. These amazing tools are project-savers and will help you find matching fonts quickly and easily.

These tools will give you various font paring options to choose from and are very easy to use. All you need to do is to select the primary font that you are using and you will be given many similar fonts to choose from to pair with your primary font.

Browse through this selection of font pairing tools that have only one purpose, to match your chosen typeface. You can use one or all of these tools to help you achieve great results in your design project. Enjoy!

Google Type

Google offers lots of beautiful fonts available for free download. By using Google Type, you can easily pair typefaces and make the designing process easier.

google web fonts typographic

Type Genius

Type Genius is, as the name states, a genius tool that helps you correspondent matches for your font. It is very easy to use, all you need to do is to select your font and press ‘find matches’. Enjoy!

adelle font matches

Mixfont

Mixfont is a fun and simple way to discover and visualize new fonts. You can test different fonts or just choose to see the most popular font combinations that you can pair.

Mixfont _ A modern font generator

Font Combinator by Typotheque

Typotheque is a great tool that helps you pair various fonts from Latin, Greek, and Cyrillic types. It is perfect for graphic designers to use in their projects.

font combinator

Type Connection

Type Connection is very easy and fun to use and  it offers great results when it comes to paring fonts. By using this neat tool, you can find matching fonts for your font and make your job easier.

type connection

Font Pair

Font Pair offers a great way to find pairing fonts based on a series of filters: sans serif, serif, cursive, etc. It is a very useful tool for any designer and it will definitely help with the designing process when it comes to matching fonts to the overall look of your design.

font pair helps designers pair

Type Wolf

Type Wolf is a neat selection of gorgeous font that blends various fonts. You will find specific information on each font along with great suggestions on how to find your matching font.

typography inspiration

Typ.io

Typ.io helps you match you selected font with tons of other fonts to help you chose the best one. It also gives you examples of various font combinations to see other combinations and to choose your favorites.

typ io

Font Combinator

Font Combinator makes your job easier when it comes to matching fonts. You can select some parameters such as font, size, and color.

the web font combinator

Adobe Typekit

Adobe Typekit is an easy and rapid way of finding matching fonts. You need to select your font and it will suggest paired Webkit fonts that you can use in your projects.

typekit

Typespiration

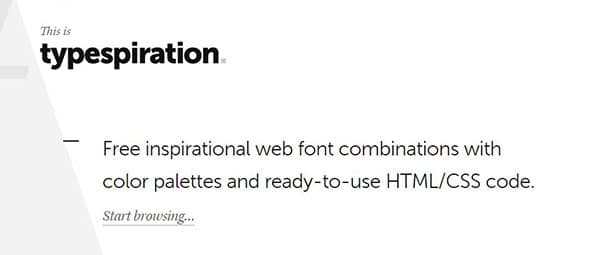
Typespiration lets you search through lots of websites with gorgeous fonts and color palettes. Below each example, you will be given a list with each font that was used, color combination and more information about the site.

typespiration com a showcase of web typography designs

Fonts In Use

Fonts in Use offers a nice and easy way of finding matching fonts for your design project. Take a look at its full features and start using it today!

fonts in use type at work in the real world

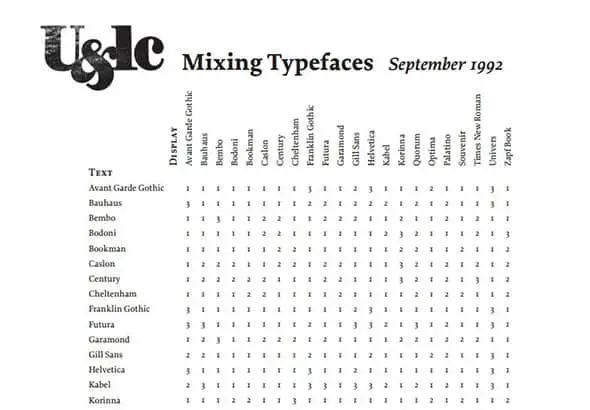
Mixing Typefaces

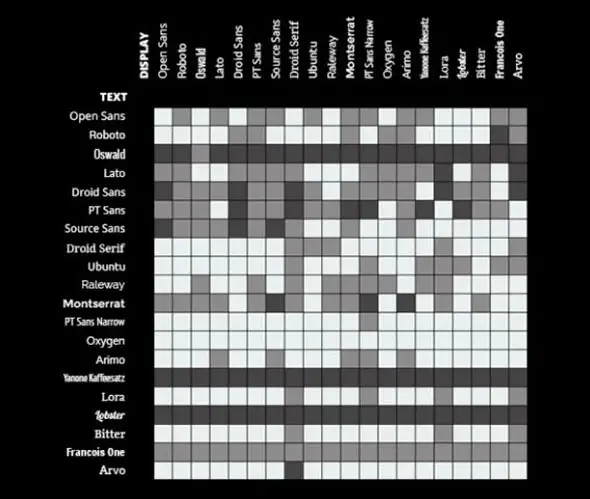
Mixing Typefaces is actually a PDF file that gives you font matching possibilities. You need to choose a font from the vertical axis and cross-reference it with a font from the horizontal axis.

mixing typefaces

The Art of Combining Fonts

Here is a nice tool that helps you pair various fonts in a very easy way. Take a look and use it for your design projects. Enjoy!

the art of combining fonts

The Art of Mixing Typefaces

This is a nice font pairing tool that is very useful for any designer. It offers an infographic on how to combine Google fonts in the best way.

the art of mixing typefaces

The Ten Commandments of Typography

This is a set of 10 rules that stat how it best to use and to match various fonts. This is a real time-saving tool and it will help you achieve great results.

infographic the 10 commandments

Typecast

Typecast helps you pair different fonts and it can really make the designing process faster and better. It is a useful tool for any designer. Take a look!

design with web fonts in the browser

Mixing and Matching Fonts

Mixing and Matching Fonts is a neat infographic that gives you some useful information on how to choose and to combine various fonts.

fontaholic mixing and matching fonts

Matcherator

Matcherator is an excellent tool that helps you identify any font from an image that you have. If this great tool can’t determine the exact font, it will give you a selection of matching fonts that you can use.

fontspring matcherator

The post 20 Awesome Font Pairing Tools for Designers appeared first on Line25.


Source: https://ift.tt/2Qa5xVZ

How to Find and Rectify Malicious Redirected Links

A malicious redirect code is usually inserted into your website with a plan to redirect the site visitor to other websites. Attackers often place these malicious redirects into a website intending to create marketing impressions. However, the problem comes when these redirections cause more damaging effects.  Some damages can include vulnerabilities in the computer of the site visitor. This happens through web-based scripts that install malware on vulnerable machines. Therefore, it is vital to remove any malicious redirect from your site. In this how-to guide, we will explain the best ways to identify and remove malicious redirects from your website.

How to know if your site is infected

As a site owner, you may not be aware that your website is redirecting visitors. By the time you realize it, your customers may have already ending up visiting a not so pleasing website via a redirect while trying to visit your site. In as much as you may think everything is ok on your computer, site visitors using mobile platforms may still experience malicious activities. However, the redirects usually happen on some pages, but not others. At times, you may need to identify any malicious redirects, find out how to remove them and restore your site to normalcy.

Finding and removing harmful (malicious) redirects

Ensure you back up any site files in a secure place before you make changes to the data in your site, as well as the database. This process is vital for those who are unaware of their content management system’s (CMS) inner workings. You can find malicious redirects in any area of your site, including your database, site files, and so on.

Here is how you can find and rectify redirected malicious links:

Javascript inserted in pages and posts

Attackers usually run a script that can add javascript through each post and page on your site. So, these redirects will be found in the site’s database. (here’s an example of JS redirect to see on your database).

Removing this redirect: The scripts can be removed via editing through the necessary tools.

Complicated javascript added to javascript files 

An attacker adds some lines of javascript to numerous javascript files in your site’s data. For this reason, you may not find results due to the site files searching for the URL redirecting you to the website.

Removing this redirect: You can remove this malicious file by downloading the entire site through an FTP program to your machine. The process will enable you to search for the offending javascript using any file editing software, such as Notepad++ (our personal favorite). A development tool can detect if the malicious files have been inserted in all the javascript files on the site.

Ad networks

Your site may be free of malware, but some advertising networks can redirect your site visitors. Knowing the culprit advertising network may be challenging due to sporadically and random malicious advert redirects.

Removing this redirect: Maybe you have utilized all options to stop advertising networks from redirecting your site visitors. In such a case, removing the ad networks from your site will resolve the malicious redirection concerns.

How to Protect Your Site from malicious redirect attacks

Attackers may insert malicious code on your website and make it behave abnormally. You can take the following steps to ensure your site is secure:

  • You can begin by reviewing your hosting account to ensure it doesn’t contain additional harmful content.
  • Make sure your site has updated applications in their latest versions
  • Update your site plugins, extensions, and plugins to their latest versions.
  • You can change the FTP database passwords along with web apps
  • Consider scanning your local workstation for any signs of compromise and take necessary actions.
  • Adopt security software for your website to scan your site for compromises and vulnerabilities.

Why You Should Protect Your Site from Redirects

Redirect attacks can include malware hacks and can cause severe damage to your website. Some of the ill effects associated with redirects include the following:

Reduces SEO effectiveness

Getting your site to rank high on search platforms is a difficult task that takes months of laborious hard work. Hackers, once they get access to your website, piggyback on your SEO endeavors. Your traffic may fall as site visitors get redirected to other webpages. Hackers tend to place links inside your site, baiting visitors to click on them upon which they get redirected to other websites. Such hacks can cause Google to penalize you for bad backlinks. Recovery from this kind of failure could take a lot of time.

Privacy breach

Website hacks increase your risk of visitors’ information being stolen which is what is usually referred to as a data breach. This is considered a severe offense to visitors because no one gets pleased when their personal information is leaked to anyone. Data breaches also carry a lot of legal consequences depending on each country’s regulations.

Risk of Google Blacklist of Your site

Search giant Google values its users’ safety and experience above all. Keeping this in mind, sites with malicious links may be blacklisted on Google. When this happens, your prospective site visitors will either be shown a warning that the site risks their information or be blocked from accessing the site.

Your web host may suspend your account

Web hackers need to access your web server resources to be able to run their activities smoothly. This can easily exceed your web host limit. Sites with malicious content eat up more server resources than what may be granted. This usually slows down other sites on the same web server or causes unforeseen problems for your web host. This may prompt the web host provider to suspend your account.        

Loss of revenue and sales

When your site is suspended and blacklisted, the visitors to your site will be diverted, and you will effectively take a hit. Putting this into perspective, for every second your website is down, you stand to lose your ad revenue and paying customers.

Conclusion

In conclusion, knowing how the redirect got into your site is paramount. You need to know the malware types as well as security vulnerabilities on your website. You will need to see how the attacker gained access to your site and inserted the malicious (harmful) redirect.

Want to check if you have hidden redirects? My recommendation tool is ‘Redirect Tracker’ – https://www.websiteplanet.com/webtools/redirected/

The post How to Find and Rectify Malicious Redirected Links appeared first on Web Design Blog | Magazine for Designers.


via https://ift.tt/35beJOj
 

The Cash Box Blueprint

Most Reading