WordPress Logins are probably one of the least touched–upon subjects as far as WordPress theme design is concerned, but it can really help create a unique look and feel for a client’s website, or even your own! Here’s how to easily make a login of your own without the need of a plugin.
Why make a custom login?
Most websites that are WP–driven all have the same login design; the generic WordPress packaged design. However, there may be clients that want their brand to be seen across the whole website, including the backend.
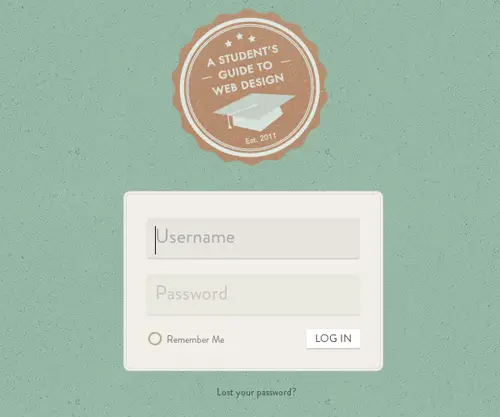
I’ll be showing how I made the custom login design for Janna Hagan’s website, A Student’s Guide to Web Design. It’s fairly simple, and you can use your own custom CSS and jQuery without the need of a plugin.
Why not just use BM Custom Login?
I really liked the BM Custom Login plugin until the second version as it is very different to the first. The current version is a bit crazy, and I try and use as little plugins as I can since I’d like my sites to load fast. ;-)
Anyway enough of that, let’s dig in!
Template Hierarchy
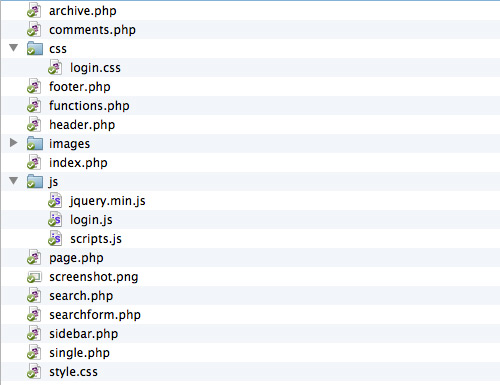
The cool thing about this method is I can keep all the necessary files within the template itself, so everything is kept organized and easy to reference, unlike plugins which keep all their files within the plugin folder itself.
Updating functions.php
function custom_login() {
        $files = '<link rel="stylesheet" href="'.get_bloginfo('template_directory').'/css/login.css" />
                          <script src="http://use.typekit.com/pgf3epu.js"></script>
                          <script>try{Typekit.load();}catch(e){}</script>
                          <script src="'.get_bloginfo('template_directory').'/js/jquery.min.js"></script>
                  <script src="'.get_bloginfo('template_directory').'/js/login.js"></script>';
        echo $files;
}
add_action('login_head', 'custom_login');
The first step is writing a function in the functions.php file, and storing all the necessary files in a variable, then echoing it out. I am able to call files that are within the theme using get_bloginfo('template_directory') and linking the file directly. I’ve also included a minified jQuery file, and a typekit kit.
function custom_login_url() {
        echo bloginfo('url');
}
add_filter('login_headerurl', 'custom_login_url');

function custom_login_title() {
        echo get_option('blogname');
}
add_filter('login_headertitle', 'custom_login_title');
I also add two more functions, one for changing the url of the logo to the website itself instead of WordPress.org, as well as change the login’s title. No more PHP needed to do this, that was easy peasy! ;-)
Changing the CSS
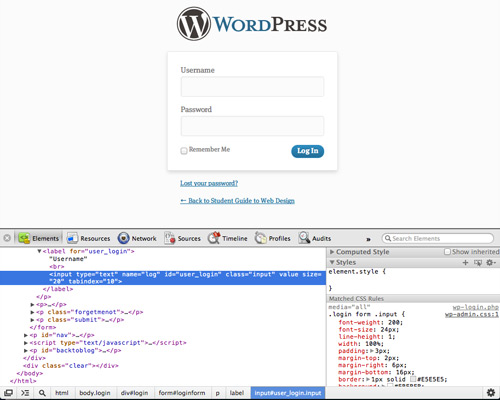
This is where things might get a bit challenging, because you really need to look through the DOM tree to see what elements you can change, but also you need to override the current CSS on the page. In order to do this, you should use Browser Developer Tools of some kind. I really like using Chrome’s Developer Tools, but you can also use Firebug for this as well.
What I’d like to add at the beginning of the file is a universal or * selector to target all elements, and add a CSS transition to them, as well as add -webkit-font-smoothing antialiasing, just to add some cool effects and clean type in webkit browsers. I also like to reset the :focus pseudo–class selector to have no outlines.
* {
        -webkit-transition: all 0.3s ease;
        -moz-transition: all 0.3s ease;
        -ms-transition: all 0.3s ease;
        transition: all 0.3s ease;
        -webkit-font-smoothing: antialiased;
}

:focus {
        outline: 0!important;
}
Locating the different elements and using the Developer Tools, I can also find what CSS has been used in order to change it. For example, I want to change the logo on top of the form to the one used on the site itself.
body.login h1 a {
        background: url('../images/logo.png') center center no-repeat transparent;
        background-size: 188px 189px;
        width: 188px;
        height: 189px;
        margin: 0 auto 30px;
        opacity: 0.7;
        padding: 0;
}

body.login h1 a:hover {opacity: 1;}
I target the body tag and its class first, then down to the h1 tag and the a tag. I then link to an image within the theme’s images folder, and set some simple CSS. I also need to set the background-size property as in WordPress 3.4, it stretches the graphic and I also set a low opacity on the tag as to have a cool transition on hover.

Some CSS I also use to hide certain elements, i.e. the #backtoblog id, as the logo serves as the link back to our blog now. I can use a lot of CSS here to change all the elements as to add consistency to the blog’s design. If I need to override CSS on the page, I use the page’s CSS ids to override some of the CSS, as well as using !important when necessary.
form#loginform p.forgetmenot label {
        position: relative;
        background-image: url('../images/checkbox.png');
        background-position: 0 0;
        background-repeat: no-repeat;
        padding: 2px 0 0 24px;
        height: 18px;
        display: inline-block;
        -webkit-transition: none;
        -moz-transition: none;
        -ms-transition: none;
        transition: none;
}

form#loginform p.forgetmenot label input[type="checkbox"] {position: absolute; left: 0; opacity: 0; width: 20px; height: 20px; display: block; cursor: pointer;}
I also want to change the checkbox design, so I use a background image and add padding to the left of the label, and hide the actual checkbox itself. Unfortunately, because the checkbox is nested inside the label, it’s very difficult to change the graphic upon click. This is where some jQuery comes in handy.
Adding some jQuery
I can use some jQuery on our form as to enhance our styling; I can also use this to add attributes or change parts of elements. Within my login.js file under the theme’s js folder, I want to add placeholders the form’s text inputs as well as make the checkbox work with my custom images.
$('#loginform input[type="text"]').attr('placeholder', 'Username');
$('#loginform input[type="password"]').attr('placeholder', 'Password');

$('#loginform label[for="user_login"]').contents().filter(function() {
        return this.nodeType === 3;
}).remove();
$('#loginform label[for="user_pass"]').contents().filter(function() {
        return this.nodeType === 3;
}).remove();
Using jQuery, I can add placeholder text in the input fields, but because the inputs are held within the <label> tag, it’s a little tricky to remove the label’s text. I use the .contents() and .filter() selectors to remove any text from the labels so he form is left with some nice, clean placeholders.
$('input[type="checkbox"]').click(function() {
        $(this+':checked').parent('label').css("background-position","0px -20px");
        $(this).not(':checked').parent('label').css("background-position","0px 0px");
});
Again, since the checkbox is within the label tag, it’s hard to work with for what I want it to do. The way it’s meant to work is when the label is clicked, the checkbox becomes checked, and the graphic I added to <label>changes to signify this. So, with jQuery, I can use it to see if the checkbox is checked, then it changes the graphic. However, for some reason if it’s unchecked, it returns to normal.
Conclusion
Using basic WordPress functions, some CSS and jQuery, it’s very easy to make a custom login design and requires no plugin whatsoever. You can come up with some pretty creative ideas on writing your own custom login and it adds some more shine to the final design on your WordPress Blog!
View the Live Custom Login Example
Source: http://line25.com/tutorials/create-a-custom-wordpress-login-without-plugins


No comments:
Post a Comment